
Sections Installation
Manual informationInstallation
1.6 | Sep 27, 2024 | Updated C++ Runtime references | Viewpoint Team
Document conventions
Convention | Explanation |
|---|---|
Bold | For file names, commands, fields, menus, options, and window names. |
Courier New | Commands as you should type them. |
Lucida Console | Example output generated by the system. |
Italics | For configuration variables, including variable portions of file names and URLs. Also indicates a document name. |
Note / Blue Callout | The Blue Callout text indicates information that is of special interest or importance, an idea that could be useful or additional information about a product or a feature. |
| The Caution icon along with the text indicates actions that can lead to problems in system operation or configuration settings if the instructions are not followed properly. |

Revision history
This section tracks the initial creation of the document after each major version thereafter.
Ver: | Date | Description | Reviewed / Approved By |
|---|---|---|---|
1.0 | Oct 16, 2012 | Initial Version | Team |
1.1 | October 6, 2021 | Rebranded adhering to the latest Conduent brand central documentation standards/guidelines. | Technical Writer |
1.2 | March 29, 2022 | Replaced FoxIt Reader™ references with Adobe Reader DC™ | Viewpoint Team |
1.3 | July 18, 2022 | Added Lotus Notes command line to Worker Install section (1.4) | Viewpoint Team |
1.3 | Sep 8, 2023 | Changes related to 64-bit Viewpoint | Viewpoint Team |
1.4 | Jan 24, 2024 | Lotus Notes registry key | Viewpoint Team |
1.5 | Feb 13, 2024 | Updated Lotus Notes registry key | Viewpoint Team |
1.6 | Sep 27, 2024 | Updated C++ Runtime references | Viewpoint Team |
Viewpoint Installation#
Introduction#
This document enumerates the steps to install the Viewpoint Application Suite into an environment for the first time. It is assumed that the individuals who will be using this document are familiar with IT terminology, IT best practices, and are comfortable working with Microsoft SQL Server and Active Directory.
To complete the installation process, you will need a copy of the Viewpoint File Store Security Guide, the Viewpoint Database Security Guide and the Viewpoint Config.txt Creation Guide.
Active Directory#
Viewpoint leverages Active Directory. Viewpoint databases and Workers must be deployed in an Active Directory environment.
- Create two Active Directory groups:
- VP_Internal
- VP_External
- Create an Active Directory user named VPWorker. Make this user a member of the VP_Internal Active Directory group.
File Store#
- Identify your File Store server. The File Store must be accessible by UNC path from all potential machines running a Viewpoint application component (Review, Processing, Worker or QC).
- If the File Store is running on a Windows server, be sure that Windows Indexing is turned off – it does not benefit Viewpoint and will unnecessarily consume extra space.
Note: If you are using Windows 2012 for your file store, we recommend using NTFS instead of ReFS due to the large block size required be ReFS, which results in a larger expansion rate (you will run out of space sooner).
- Identify or create a folder on the File Store which will be the root folder for Viewpoint. This is the Viewpoint root folder.
- Grant the VP_Interal Active Directory group full control over the Viewpoint root folder.
- Acquire the Viewpoint File Store Security Guide. Follow the steps in the guide to apply the appropriate level of file system security to the File Store.
Database Setup#
Preparation#
- Identify your Processing SQL Server. It should be a dedicated MSSQL 2008 R2 – 2016 server instance.
- Identify your Review SQL Server. It should be a dedicated MSSQL 2008 R2 – 2016 server instance. The Review SQL Server must be a different instance than the Processing instance.
- Identify the MSSQL Groups / Logins which you will be granting access to the databases. The Viewpoint Database Security Guide contains a listing of the types of Logins which will be required.
- Make a backup of the model database on the Processing and Review MSSQL servers, as this database is going to be overwritten during this installation.
- Each database server will need to have the Admin$ share enabled during the installation process – it can be turned off once the installation is complete.
Installing the Viewpoint Databases#
- Launch the Viewpoint Installation program (LateralData.Tools.Installer.exe).
- Click the “Install” button.
- Follow the prompts of the Installation wizard. Use the default options whenever possible. You will be prompted for the names of the Processing and Review server and the root folder of the File Store. You will also be prompted for passwords for the Workflow Login and the Server Link Login – for more details on these logins (dedicated Viewpoint logins created during the installation process) see the Viewpoint Database Security Guide.
- When the wizard completes your initial database setup will be complete. Your logins will have been associated with the Viewpoint database role (VP_USER), your server links have been created and some configuration values will have been populated in the Processing and Review configuration tables.
NSRL#
Viewpoint can utilize the NSRL’s (National Software Reference Library) Reference Data Set (RDS) to assist in filtering out files known to be safely excludable (for example, Operating System files). The installation process involves the acquisition of the NSRL RDS, loading it into a database and configuring Viewpoint to use the NSRL RDS database.
- Locate the Viewpoint NSRL Loader application (“LateralData.Tools.NSRLLoader.exe”).
- Locate the NSRL database (by default it will be located on the Processing MSSQL instance).
- Locate and download the latest NSRL RDS files:
- Determine which PC you will be using to perform the download, extraction and assemblage of the database. This PC must have at least 20 gigabytes of free space available – this process is space intensive.
- Open a web browser and navigate to the NSRL DRS download site. (https://www.nist.gov/itl/ssd/software-quality-group/nsrl-download/current-rds-hash-sets at the time of this document’s publication).
- Locate the minimal hash set (as opposed to the unique hash set). As of October 2019, the latest version is RDS 2.66, the minimal hash set contains 56,058,194 file hashes. Download the file – do not unzip the file.
- Launch the NSRL Installation Tool.
- Click Next. Fill in the database credentials. Use the “Test Connection” button to verify your credentials.
- Click “Add Files…” and select the ZIP file that you downloaded.
- In the NSRL File Version box enter the version number of your NSRL files.
- Click Next. The data will be extracted from the NSRL file and loaded into the NSRL database. The entire process will take several minutes.
Database Maintenance Plans – Index Maintenance#
Viewpoint is a database intensive application and as such requires regular index maintenance. Lateral Data best practice is to perform index rebuilds three times a week and index reorganizations on the other days of the week. Failure to execute index maintenance on a regular schedule will result in degraded performance, ultimately leading to timeouts. The following steps outline the creation of two maintenance plans – one for rebuilding indexes (to be run weekly) and one to reorganize indexes (to be run nightly). Perform these steps on both the Processing and Review MSSQL Server instances.
- Connect to an MSSQL instance using Microsoft SQL Server Management Studio.
- In the main tree, locate “Management”. Under this folder locate “Maintenance Plans”. Right-click “Maintenance Plans” and select “New Maintenance Plan…” You will be prompted for a name – enter “Rebuild Indexes” and click OK.
- A new window opens for the new plan and the Toolbox appears with Maintenance Plan Tasks.
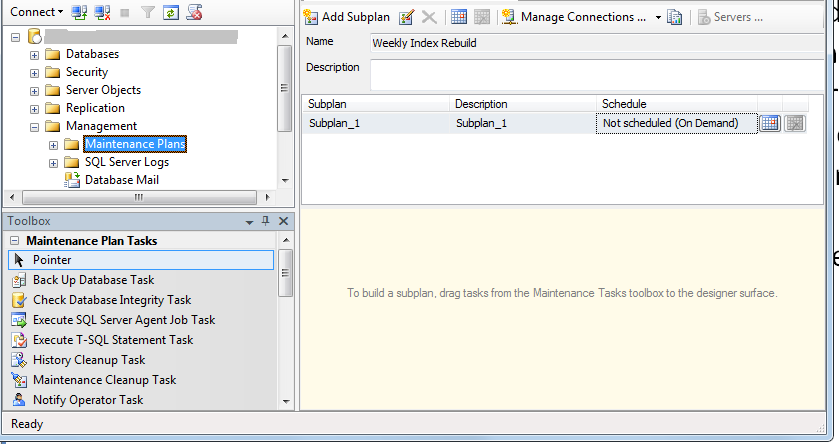
- Locate the “Schedule” column. The first row will contain text indicating that no schedule has been defined. Locate the calendar icon at the far right of this column.

- Click the calendar icon. The Job Schedule Properties dialog will appear.
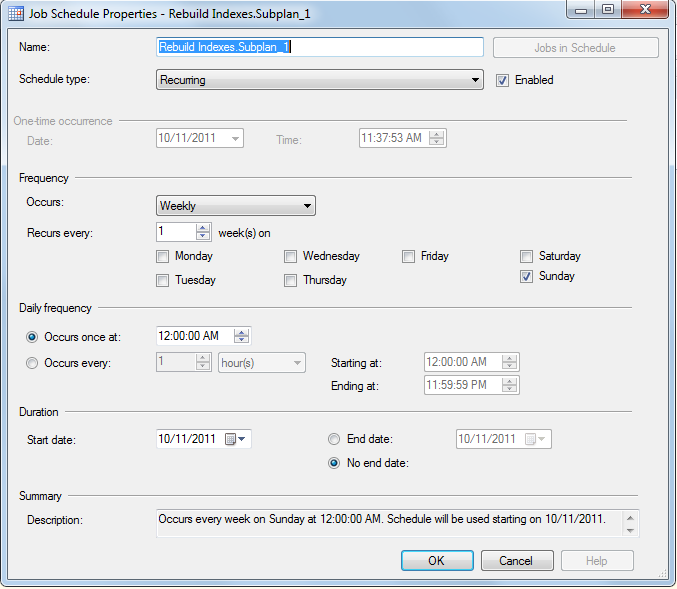
- Configure a schedule that runs three times a week during off-hours; for example, Monday, Wednesday, and Friday. Click OK to commit the schedule.
- In the Toolbox, which contains Maintenance Plan Tasks, locate “Rebuild Index Task”. Click and drag this Task into the large yellow area. A “Rebuild Index Task” box will appear in with an arrow pointing downward on its bottom edge.
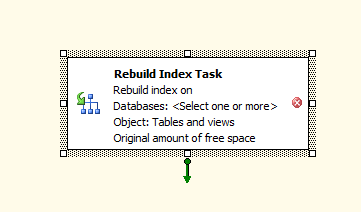
- Right-click the Rebuild Index Task and select “Edit”. A dialog will appear with the properties of this task.
- Open the “Databases” drop down and select the “All user databases” radio button. Click OK.
- From the Main Menu select File | Save Selected Items.
- From the Main Menu select File | Close.
- Right click the “Rebuild Indexes” Maintenance Plan and select “Execute”. This will execute the plan. Verify that it runs to completion without error.
- Right click “Maintenance Plans” and select “New Maintenance Plan…” You will be prompted for a name – enter “Reorganize Indexes” and click OK.
- Locate the “Schedule” column. The first row will contain text indicating that no schedule has been defined. Locate and click the calendar icon at the far right of this column – the Job Schedule Properties dialog will appear.
- Configure a schedule which runs for the days of the week that the Rebuild Indexes job does not run. The job should run during off-hours. Click OK to commit the schedule.
- In the Toolbox, locate the Maintenance Plan Task named “Reorganize Index Task”. Click and drag the task into the yellow area.
- In the Toolbox, locate “Update Statistics Task”. Click and drag the task into the yellow area, below the “Reorganize Index” task.
- Click on the “Reorganize Index” task. Note the arrow pointing downward on the bottom edge. Click and drag the arrowhead so that it points into the body of the “Update Statistics” task. Release the mouse and the arrow from the top task will “stick” to the bottom task.
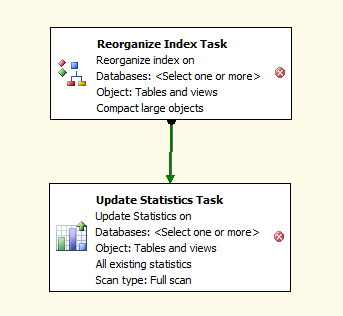
- Right-click the “Reorganize Index” task and select “Edit”. In the “Databases” drop-down select “All user database”. Click OK. Click OK on the dialog to save the changes to the Task.
- Right-click the “Update Statistics” task and select “Edit”. In the “Databases” drop-down select “All user database”. Click OK. Click OK on the dialog to save the changes to the Task.
- From the Main Menu select File | Save Selected Items.
- From the Main Menu select File | Close
- Right click the “Reorganize Indexes” Maintenance Plan and select “Execute”. This will execute the plan. Verify that it runs to completion without error.
- In the main tree locate “SQL Server Agent”. Open this item and locate “Jobs”. Locate the two new jobs (“Rebuild Indexes” and “Reorganize Indexes”).
- Right-click each job and confirm that “Enable” is grayed-out and “Disable” not. This indicates that the Job is awaiting its next scheduled run. If this is not the case, click “Enable”.
Database Maintenance Plans – Backups#
At this point in the installation process it is prudent to set up your backup plans according to your enterprise standards and execute a test restoration. Viewpoint does not impose any particular requirements upon this, nor does Viewpoint come with its own database backup plans. Any reasonable backup scheme would consist of at least a daily full backup and more frequent transaction log backups. Database files grow as they are used – a maintenance plan for reclaiming unused space (“Shrink”) is also prudent.
Note that more databases will be added in the normal course of Viewpoint usage (each new project creates a new database) so be sure to create maintenance plans which anticipate the regular addition of new databases.
Consider your enterprise’s best practices regarding the monitoring of maintenance plan errors. A production Viewpoint environment should never be run without regular, known-recoverable backups.
Click-Once Deployment Server (IIS) Setup#
- Identify a server which will act as your Click-Once Deployment Server. This server’s job is to hold the deployment packages for the various Viewpoint applications and to serve them to users (via IIS). Often customers use their File Store for this duty. Be sure that whatever server you select it is a server that it is highly reliable and backed up as an outage of this server will prevent users from being able to launch Viewpoint. It must be accessible by HTTP (or HTTPS) from all of the machines which will be running Viewpoint directly.
- You may wish to disable User Account Control (UAC) temporarily during the setup of IIS. This is not a required step.
- Type “UAC” into the Start Menu.
- Move the slider all the way to the “Never notify” setting.
- Click “OK”.
- Install IIS on this server if it is not already installed. Use default installation parameters.
- Locate the Viewpoint ‘Click Once’ Deployment Packages. They are:
- PMC
- Review
- Worker
- QC
- The Processing and Review Deployment Packages, received from Lateral Data, will come pre-packaged with your company’s license files.
- Log into the server.
- Create folder C:\Inetpub\wwwroot\Viewpoint\
- Under this folder create four other folders:
PMC
Worker
Review
QC - Open the IIS Management Console. To do this, open the Start Menu and execute inetmgr.
- Navigate to the Default Web Site node.
- On Windows 2008 R2 or newer, perform the following steps:
- Right-click the Default Web Site node and select “Add Virtual Directory…” The Add Virtual Directory dialog appears.
- In the Alias box enter “PMC”. In the Physical path enter the path C:\inetpub\wwwroot\Viewpoint\PMC
- Click OK.
- Select the Virtual Folder. In the center pane, under the IIS group, locate and double-click “Request Filtering”.

- Select tab “Hidden Segments”. If “bin” appears in this list, right-click “bin”, select “Remove” and confirm removal.
- Repeat these steps for the other three folders – Worker, Review and QC.
- Copy the contents of the Processing Deployment Package to the PMC folder on your server. Locate file “LateralData.Applications.PMCEx.application”. Open this file with a text editor. Locate element “deploymentProvider”. Change the value of this element to be the fully qualified URL of this self-same file. For example “http://myCompany.com/Viewpoint/PMC/ LateralData.Applications.PMCEx.application”.
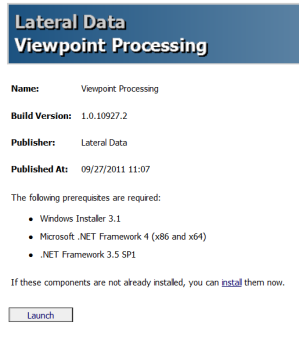
- To test this install, bring up Internet Explorer and browse to the URL of the publish.htm file. You should be shown an installation page:
- Repeat the same procedure for the Worker, QC and Review Deployment Packages. The name of the “application” file will be different for each of these applications. The Terminal Server setup follows a different procedure, outlined elsewhere in this installation guide
- ‘Smoke Test’ the installations. Open Internet Explorer and navigate to the publish.htm page for each application – for example the deployment page for Viewpoint Processing will have a URL like “http://<server name>/PMC/publish.htm”.
- Click the “Launch” button – this will initiate the deployment process. Once the application login box appears you may close the application. Repeat this process for all applications (Processing, Worker, Review and QC).
- If you disabled User Account Control (UAC) previously you should turn it back on:
- Type “UAC” into the Start Menu.
- Move the slider to a setting appropriate for your enterprise policy.
- Click OK.
Worker Installation#
- Identify your Worker PCs. These PCs should conform to the requirements of Worker PCs.
- Identify the user account that the Workers will run as – this user must be an Active Directory user, and a member of the Active Directory Group which has been granted the VP_USER role on the Processing MSSQL Instance. This user will need Full Control access to the File Store(s) and be a local administrator. It is not necessary (nor recommended, for security reasons) to use Domain Administrators as your Worker users.
- Ensure that Microsoft .NET Framework 3.5 SP1 and 4.0 (Full Extended) are installed.
- Download and install Microsoft .NET Framework 4 Reliability Update 2. For more information on this topic see Microsoft Knowledge Base article KB 2600217.
- Download and install the following Microsoft Visual C++ Runtimes versions:
- C++ 2012 (x86) - https://www.microsoft.com/en-us/download/confirmation.aspx?id=30679
- C++ 2017 (x86) - https://aka.ms/vs/16/release/vc_redist.x86.exe
- C++ 2012 (64 bit) - https://www.microsoft.com/en-us/download/details.aspx?id=30679
- C++ 2013 (64-bit) - https://learn.microsoft.com/en-us/cpp/windows/latest-supported-vc-redist?view=msvc-170
- C++ 2015-2022 (64-bit) - https://learn.microsoft.com/en-us/cpp/windows/latest-supported-vc-redist?view=msvc-170#visual-studio-2015-2017-2019-and-2022
- Ensure that the Worker PCs are up to date with the latest Windows Updates. Reboot the Worker after installing all updates.
- Install anti-virus software if desired. Typically, real-time scanning is sufficient (as opposed to a scheduled scan).
- Log in to the Worker PC as the user which you have identified as the Worker user. This is the user that you must use to install software as some third-party components require single-user installations. This user must be a domain account and a local (box) administrator. All software installations will be under the C:\Program Files folder, as opposed to the C:\Program Files(x86) folder unless specifically noted otherwise in this installation guide.
Install Microsoft Office. The following versions are supported:
2016, 2019, 2021 (64-bit)
- Open Excel.
- Click the button at top left to open the main menu. From the main menu click the “Excel Options” button at bottom right. This opens the Excel Options Dialog.
- On the left bar click “Trust Center”. Click the “Trust Center Settings” button. The Trust Center Dialog appears.
- On the left sidebar click “Macro Settings”. Checkmark “Enable all Macros”. Checkmark “Trust access to the VBA project object model”. Click OK on this dialog. Click OK on the Excel Options dialog.
- Install Microsoft Outlook. Start Microsoft Outlook to create a profile (no email account)
- Acquire the installation package for Lotus Notes 8.5.1.
Note: If you do not anticipate the need to process Lotus Notes files this entire step may be skipped. It can be performed later in the future if a need emerges.
- Lotus Notes 8.5.1 Installation:
- Start the installation program.
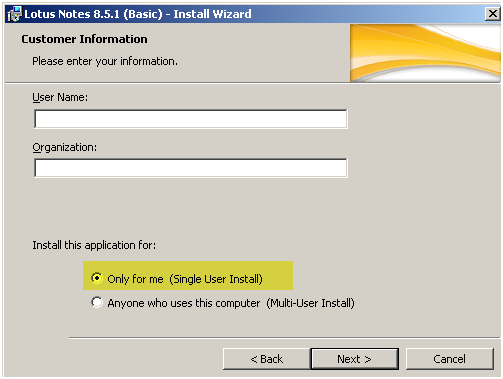
- Enter user and organization name. Select “Only for me” and click Next.
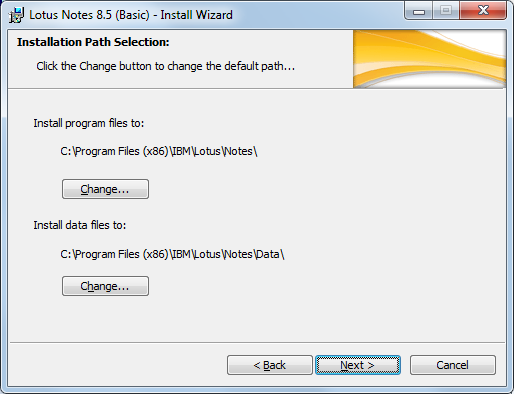
- There are no points which need to be configured on this page – click Next.
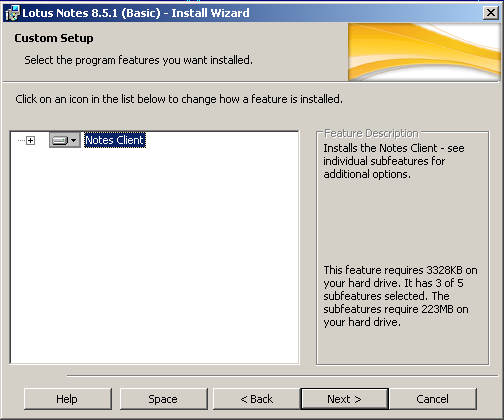
- There are no points which need to be configured on this page – click Next.
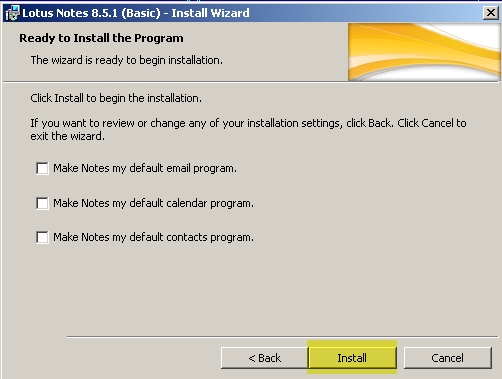
- Uncheck all three of the checkboxes. Click Install. Wait for the installation to complete.
- Once the installation has completed launch Lotus Notes from the shortcut that was added to your desktop.
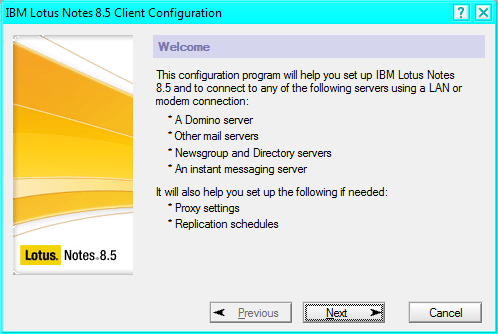
- Click Next.
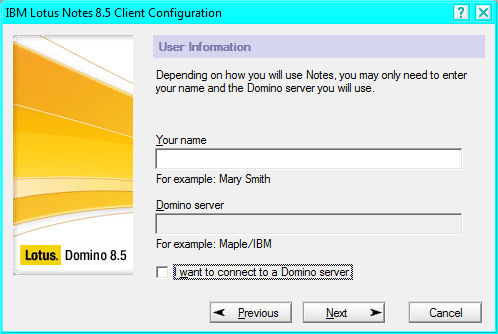
- Enter a name if you’d like, however it is not required. You must uncheck “I want to connect to a Domino server”. Click Next.
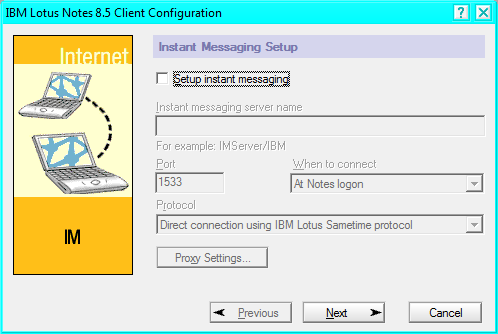
- Uncheck “setup instant messaging”. Click Next.
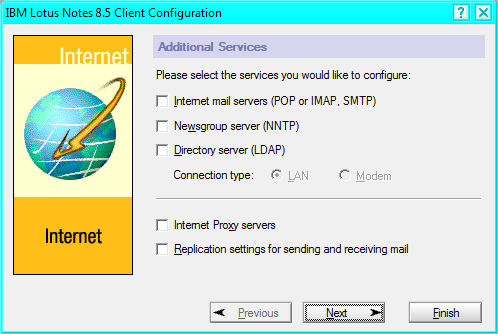
- At this screen click Finish. You will be prompted to make Lotus Notes your default email program. Click No. Close Lotus Notes.
- Open the Windows Registry Editor and navigate to key HKEY_LOCAL_MACHINE\SOFTWARE\Lotus\Notes. If is does not exist, look for the key in HKEY_LOCAL_MACHINE\SOFTWARE\WOW6432Node\Lotus\Notes. If neither exists, created a Registry Key with the path HKEY_LOCAL_MACHINE\SOFTWARE\WOW6432Node\Lotus\Notes
- Locate Value ‘Path’. If it does not exist create it – it is of type string.
- Set the value for ‘Path’ to hold the executable path to Lotus Notes.
Note: the typical installation path for Lotus Notes is:
C:\Program Files (x86)\IBM\Lotus\Notes\
- Install Informatik Image Driver version 6.21 (64-bit). This is a Virtual Printer. Install the Virtual Printer. Once installed locate the Printer icon, right-click and select “Properties”. Perform the following actions:
- Make this printer the default printer
- Change the name to Informatik Image Driver 3.00 (UM)
- Printing Preferences: Advanced Options
- Scaling 95%, Format B/W Group4.
- Paper Quality
- Color: Gray scale.
- Print Output Settings
- Check on box #3 Serialization (each page in the document get written to an individual tiff)
- Serial Prefix “ld_” or the initial letter of the company name
- Check on the box “hide this dialog”
- Install a printer with HP Drivers (4 PCL or 6). You do not need the actual printer, just the drivers. This printer should not be the default printer.
- Acquire Adobe Reader DC (PDF Reader). Install with default settings.
- Install Irfanview (iview427_setup.exe):
- Install for all users
- Select all image file types
- Do not install Google tool bar
- Install Tesseract OCR support files using the following process:
- Locate the folder “TessData” among the installation assets provided to you.
- Select a location to copy this folder to. You have two options:
- On a network drive which all Workers and PMC instances can access. This is the preferred method as it allows for easier maintenance.
- In the root folder of every Worker / PMC instance. If this is done every Worker / PMC instance must use the exact same path (for example, C:\TessData).
- Copy the entire TessData folder to the target location. Note the path, you will be using it later in this process. The path must be a UNC path.
- Using MS SQL Management Studio log on to the Viewpoint Processing MS SQL Server Instance
- Locate the database LDControl.
- Under the LDControl folder locate Tables | Configuration. Right-click the “Configuration” table and select “Edit Top 200 Rows”.
- Create a new record with the following values:
- ConfigName : Tesseract3Data
- ConfigValue : <the fully-qualified UNC path to the TessData folder, such as \\myserver\viewpoint\TessData>
- SortOrder : 1
- Move to a new row in the table to commit the change.
- Install the Viewpoint Worker application on each worker PC. To this end, open Internet Explorer. Navigate to the Worker installation page (publish.htm). Once on the installation page click the “Launch” button – this will install the Worker and create a desktop shortcut.
- Register the new worker machine to the processing SQL by following the steps. This step must be performed for each worker individually. Simply restoring a virtual image of a worker is not enough – every worker that will participate in the same environment must register itself with the environment.
- Run the Worker application. A console will appear. After a few moments you will be prompted to enter the name of the Processing MS SQL instance.
- Type in the name of the Processing SQL Server instance. Press Enter. The Worker is now registered with the Processing MS SQL Server.
- Stop the Worker by typing Ctrl-C.
- Open a command prompt and enter the following: (replace VPWorker with the name of the worker Active Directory user account username if it is different than VPWorker).
netsh http add urlacl url=http://+:8731/LateralData.Workflows.Services.WorkflowService.svc/ user=VPWorker
In addition, execute the following if you plan on using Lotus Notes: (replace “viewpoint\vpworker” with the domain and name of the worker Active Directory user account username if it is different than VPWorker).
netsh http add urlacl url=http://+:8731/Extractors/LotusNotes/Extractor.svc/ user=viewpoint\vpworker
- Disable User Account Control (UAC):
- Type “UAC” into the Start Menu.
- Move the slider all the way to the “Never notify” setting.
- Click OK.
- If the Worker will not have outbound Internet access, the following steps need to be performed to prevent Office 2013 (or newer) from performing poorly during TIFFing:
- On the Worker, open Windows Firewall if it is running. This can be done by launching “Windows Firewall with Advanced Security” from the Start Menu
- Select “Outbound Rules” in the panel on the left and click “New Rule…” in the panel on the right.
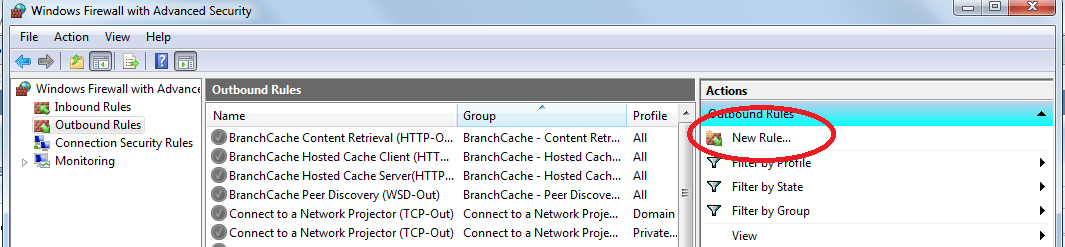
- The New Outbound Rule Wizard appears. Select “Program” and click Next.
- Select “This program path”. Enter the path to WINWORD.EXE into the edit box (this is typically something like: %ProgramFiles% (x86)\Microsoft Office\Office14\WINWORD.EXE). Click Next.
- Select “Block the connection” and click Next.
- Domain, Private and Public will all be checked. Click Next.
- Enter a name for the rule – any name will do, it is recommended that you use “Viewpoint Worker Rule - MS Word”.
- Click Finish. The outbound firewall rule has been created. You will now be able to TIFF MS Word files with external links without suffering a performance penalty.
- The Workers can be remotely restarted through the PMC application using psexec. Typically, customers wish to use this feature. To make use of this feature the Worker, and any machine running the PMC, will need to have ports 135 and 445 (TCP) open. Additionally, the Worker will need to have its Admin$ and IPC$ shares on (they are on by default). If these steps are not taken, then Workers will need to be restarted manually.
- Reboot the Worker.
- Optional Worker packages (OCR, etc.) are installed later in this process.
First Run#
Some aspects of configuration cannot be completed until you have started some of the Viewpoint applications. To perform this step, you will need to work with someone who has been trained in the operation of the Viewpoint Processing and Review components.
Viewpoint Processing#
- Install Viewpoint Processing. To do so, open Internet Explorer. Navigate to the Viewpoint Processing installation page (publish.htm). Once on the installation page click the “Launch” button – this will install Viewpoint Processing and create a desktop shortcut. If instead of “Launch” you are presented with a screen stating that you lack prerequisites, then follow the steps indicated to acquire the pre-requisites.
- Install the Informatik Image Driver on this PC using the same options that were used when installing on to the Worker. Unlike the Worker installation, this printer does not need to be the default printer.
- Install anti-virus software if desired. Typically, real-time scanning is sufficient (as opposed to a scheduled scan).
- Launch Viewpoint Processing. You will be shown the Login Dialog.
- Type the name of the Processing SQL Server instance into the Server box. If Windows Authentication is turned on your user credentials will auto-populate. If this occurs, uncheck “Use Windows Account” as your user does not yet have a Viewpoint Processing login.
- Enter the bootstrap user name and password and click OK. Username: Administrator Password: ld
- Locate and click on the Security Management button in the toolbar. The Security Management Dialog appears.
- Click the Companies toolbar item. Select the Company “Lateral Data”. In the grid on the right side of the application locate the “Name” row. Change this name to the name of your Company.
- Create a Viewpoint User for the Worker to use. This user will be an Active Directory user – this is the same user that the Workers will run as, set up earlier in this process. Follow these steps to create the Viewpoint User:
- Click the Users tab.
- In the Users grid, right-click and select “New”. The New User Wizard appears.
- Select your Company. Click Next.
- Enter the Worker Active Directory User account name into "User Name" box and click “Look up in Active Directory”. The User’s credentials will populate the form. Click Next.
- Click Finish to create the Viewpoint User.
- Select the “Roles” tab.
- Locate and select the Administrator Role.
- In the Users grid right-click and select “New”. Select the newly created Viewpoint User and select Finish.
- Change the password for the built-in administrator account. This step is extremely important – it is critical that the bootstrap user have its password changed as soon as possible. To do this perform the following steps:
- Click the Users tab
- Locate the User “Administrator”. Right-click and select Update. The Create or Modify User Dialog appears.
- Click Next at the first page.
- On the second page change the password. Change the First Name, Last Name and Email if the default values are not appropriate to your use. Click Next.
- Click Finish to save your changes.
- Close Viewpoint Processing.
- Log in (to the Processing SQL Server) as the user “Administrator” and the new password.
- Create a new (Processing) Project. The details of the project are not important – the purpose of this project is to facilitate the configuration and smoke test of Viewpoint. This project should not be used for live data. You may choose to remove this project once your installation is known to be complete and fully smoke tested however there is no requirement to do so.
- Create a corresponding Review Project for this Processing Project.
Workers#
- While still in Viewpoint Processing click on the Workers tab.
- Click the “Worker Selector” toolbar button. Verify that the number of Workers in the grid is the same as the number of Workers you have set up.
- Locate the column “Max. Simulations Workflows”. Set this value to 50 for each worker.
- Select a single Worker. Right-click and select “Start Workflow Host”.
- Populate the User Name and Password boxes with the username/password of the Windows User which will run the Worker. The Worker runs under the context of this user. This user must have local administrator rights and be able to read/write/delete files on the File Store.
- The Executable box will automatically populate to contain the path of psexec.exe (on the PC running Viewpoint Processing, not the worker PC). Generally, you will not have a need to change this.
- Populate the Remote Internet Explorer box. This is usually C:\Program Files\Internet Explorer\iexplore.exe
- Populate the Install URL box. This is the full URL to the LateralData.Consoles.WorkflowRuntimeHost.application file for the Worker installation package.
- Click OK to start the worker. After a few moments right-click the Worker grid and select “Refresh”. The Worker’s row should now appear in light green.
- Select all the other workers, right-click and select “Start Workflow Host”. The settings from your previous session will be retained – just click OK and the other Workers will start. After a few moments refresh the Worker grid and verify that all Worker rows are displaying in light green.
- Working with a user which has been training in how to process data in Viewpoint, process a small amount of data – a few files. As part of this process select options to generate TIFFs, HTML, text, metadata, and to set the File Identity. Ensure that the job completes without error.
Viewpoint Review#
- Install the Review application. To do so, open Internet Explorer. Navigate to the Review installation page (publish.htm). Once on the installation page click the “Launch” button – this will install the Review application and create a desktop shortcut. If instead of “Launch” you are presented with a screen stating that you lack prerequisites, then follow the steps indicated to acquire the pre-requisites.
- Launch the Review application. You will be presented with the Login Dialog.
- Type the name of the Review SQL Server instance into the Server box. If Windows Authentication is turned on your user credentials will auto-populate. If this occurs, uncheck “Use Windows Account” as your user does not yet have a Viewpoint Review login.
- Enter the bootstrap user name and password and click OK. Username: Administrator Password: ld
- Locate and click on the Security Management button in the toolbar. The Security Management Dialog appears.
- Click the Companies toolbar item. Select the Company “Lateral Data”. In the grid on the right side of the application locate the “Name” row. Change this name to the name of your Company.
- Click the Users tab. Locate the User “Administrator”. Right-click and select Update. The Create or Modify User Dialog appears.
- Click Next at the first page. On the second page change the password. Change the First Name, Last Name and Email if the default values are not appropriate to your use. Click Next. Click Finish to save your changes.
- Close Review.
- Log in (to the Review SQL Server) as the user “Administrator” and the new password.
- Click the “Review” button. The installation of two OCX components will occur.
Processing and Review Interaction#
- Launch Viewpoint Processing. On the Index tab, locate the data you have processed and Index the data. Once complete right-click the Scope and select “Post”.
- Open the Review application. Select the project and click the “View Manager” button. The View Manager screen will appear. Click the “Scopes” tab. The Scope(s) you posted will appear.
- Create a View containing the documents from the Scope(s).
- Close the View Manager.
- Click the “Review” button. Review appears. Select the View you just created. Browse through a few of the documents. Right-click on some documents and select “View Native”. A copy of the Native File for the selected Document will appear.
QC#
- Install the Viewpoint QC Application. To do so, open Internet Explorer. Navigate to the Viewpoint QC installation page (publish.htm). Once on the installation page click the “Launch” button – this will install the Viewpoint QC application and create a desktop shortcut. If instead of “Launch” you are presented with a screen stating that you lack prerequisites, then follow the steps indicated to acquire the pre-requisites.
- Log in (to the Processing SQL Server).
- View a few documents.
Sample Repository#
Viewpoint ships with a sample project. The purpose of this project is to allow customers to quickly assess the readiness of the installation. It is not required that this process be performed – Viewpoint will function without the sample repository – however it is recommended.
- Acquire the Viewpoint Sample Repository package. The package contains the following items:
- Folder ‘Databases’. This folder contains two database backup (.bak) files
- Folder ‘Repository Files’. This folder contains the 7-Zip archive “Processed Files.7z”
- Folder ‘SQL Scripts’ – This folder contains four SQL scripts
- If you have not already performed the steps in the “First Run” section of this Install Guide, do it now – you will need to already have at least one Project database in the Review and the Processing servers.
- Unzip the 7-Zip archive “Processed Files.7z” to your Viewpoint File Store’s root folder. When the process is complete you should have a new folder “T00001” in your Viewpoint File Repository. Note the file path of this folder – it will look like “\\ServerName\ViewpointRootFolder\T00001” … you will be using this value later in this process.
- Open MS SQL Management Studio. Log in to the Processing Server Instance. Locate the LDControl database. Locate query “Add Processing Project.sql” from Sample Repository folder “SQL Scripts”. Execute this script on the LDControl database.
- Locate the Processing Database backup file in the Sample Repository “Databases” folder and restore the database, naming it “T00001_Processing”.
- Once the restoration is complete, browse to Security | Logins and locate the MSSQL Logins which you wish to give access to the sample repository database. Grant connect rights to each of these Logins and assign them the VP_USER role. To do this right-click a Login and select Properties. Select User Mapping from the panel at top-left. Locate the database in the grid on the right and checkmark the “Map” column. Then locate and checkmark the role “VP_USER” in the grid at bottom right. Click OK. Perform this step for each Login you wish to have permission to connect to the Sample Repository Database.
- Right-click the database and select “New Query”. Locate the SQL script “Update Processing Paths.sql” in the Sample Repository “SQL Scripts” folder and copy its contents to the new query panel.
- Locate the line:
set @NewPath = '\\NewServer\NewShare\T00001'
…and replace this value with the path to the T00001 folder on the Viewpoint File Store. Execute the query.
- Log in to the Review Server Instance. Locate the LDControl database. Locate query “Add Review Project.sql” from Sample Repository folder “SQL Scripts”. Execute this script on the LDControl database.
- Locate the Review Database backup file in the Sample Repository “Databases” folder and restore the database, naming it “T00001_Review”.
- Once the restoration is complete, browse to Security | Logins and locate the MSSQL Logins which you wish to give access to the sample repository database. Grant connect rights to each of these Logins and assign them the VP_USER role. To do this right-click a Login and select Properties. Select User Mapping from the panel at top-left. Locate the database in the grid on the right and checkmark the “Map” column. Then locate and checkmark the role “VP_USER” in the grid at bottom right. Click OK. Perform this step for each Login you wish to have permission to connect to the Sample Repository Database.
- Right-click the database and select “New Query”. Locate the SQL script “Update Review Paths.sql” in the Sample Repository “SQL Scripts” folder and copy its contents to the new query panel.
- Locate the line:
set @NewPath = '\\NewServer\NewShare\T00001'
…and replace this value with the path to the T00001 folder on the Viewpoint File Store. Execute the query.
Close MS SQL Management Studio.
- Open Viewpoint Review and select the Sample Repository project. Click ‘Review’ and select any document to verify that the database and file system have been properly configured. Close Viewpoint Review.
- Open Viewpoint Processing and select the Sample Repository project. Click the Process tab. Select any group of documents and use the “Browse To…” menu to browse to the Native file. Close Viewpoint Processing.
Optional Worker Installations#
Viewpoint Workers can be augmented with additional capabilities by installing additional packages. Some packages require additional 3rd party licenses – be sure to stay in compliance with all 3rd party licenses.
When installing components on the Workers please be certain that you are performing the installation as the Worker user. Some 3rd party components are single-user installations.
ExperVision (OCR)#
Viewpoint facilitates OCR capabilities through ExperVision. Each Worker will need to be installed and configured individually due to licensing requirements.
- Locate the Viewpoint ExperVision Registration Package. Place a copy of this package on all Workers which will have ExperVision installed on them. Create a folder for the package (example: C:\ExperVision Registration Package).
- Log into the Worker as an administrator.
- Each worker will need to have its own key information – this is part of licensing ExperVision. The following steps outline this process:
- Open the folder containing the ExperVision Registration Package.
- Locate and run LateralData.Tools.ExperVisionInit.exe. Click the “Call Init ExperVision” button. The Registration Dialog will appear.
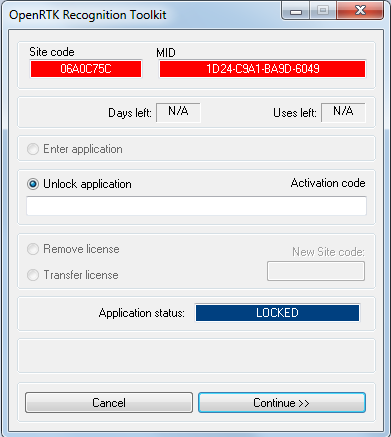
- Copy the contents of the Site Code and MID boxes from the dialog. Click Cancel.
- Send the Site Code and MID information to viewpointsupport@lateraldata.com for the key specific to this Worker. Each Worker will have its own key. The process of key generation can take time – you may choose to continue with other facets of the Viewpoint installation process while waiting for the key.
- Once the key has arrived, open the Viewpoint ExperVision Registration Package.
- Locate and run LateralData.Tools.ExperVisionInit.exe
- Click the “Call Init ExperVision” button. The Registration Dialog appears.
- Type the license activation code into the box.
- Click Continue and the dialog box will disappear.
- Do not remove the copy of the Viewpoint ExperVision Registration Package from the Worker – you may need it in the future if your ExperVision key expires or is transferred to another Worker.
- Open the Viewpoint Processing application. Select the Workflow tab. Locate the Worker. Enter WebserviceOCR into the column “Supported Features”.
- Using MS SQL Management Studio log on to the Viewpoint Processing MS SQL Server Instance
- Locate the database LDControl.
- Under the LDControl folder locate Tables | Configuration. Right-click the “Configuration” table and select “Edit Top 200 Rows”.
- Locate or create a new record with the following values:
- ConfigName : WebServiceOCRType
- ConfigValue : ExperVision
- SortOrder : 1
- Move to a new row in the table to commit the change.
Mount Image Pro#
This package allows for the extraction of EnCase images. Generally this is only installed on a few workers.
- Acquire a copy of Mount Image Pro and any secure any required licensing.
- Must be installed into Program Files\GetData\Mount Image Pro v3\MIP3.exe - if your install does not place the executable here, or the executable has a different name, your executable will need to be moved / renamed.
- Open Viewpoint Processing. Select the Workflow tab. Locate the Worker(s). Enter MountImagePro into the column “Supported Features”.
- Once installed verify the File Identify for E01 points to this extractor.
StuffIt#
This package allows for the extraction of StuffIt archives (Mac OS). Generally, this is only installed on a few workers.
- Acquire and install a licensed version of StuffIt 2010 v14.0.0.18.
- Once installed verify the file identities for SIT point to this extractor.
DWGSee#
This package facilitates the TIFFing of AutoCad drawings.
- Acquire and install a licensed version of DWGSee Pro v4.01.
- Install the program under Program Files, not Program Files (x86).
Microsoft Project#
This package facilitates the TIFFing of Microsoft Project files.
- Acquire and install a licensed version of Microsoft Project.
Microsoft Publisher#
This package facilitates the TIFFing of Microsoft Publisher files.
- Acquire and install a licensed version of Microsoft Publisher.
Microsoft Access Snapshot Viewer#
This package facilitates the TIFFing of Microsoft Access Snapshot files.
- Acquire and install a licensed version of Microsoft Access Snapshot Viewer.
Terminal Server Setup#
Often it is advantageous to make use of Terminal Server or similar product to serve the Viewpoint Review application to external users. Do not install Viewpoint Processing or Viewpoint QC on Terminal Server.
It is beyond the scope of this Installation Guide to outline the set of compatible products and the details of how to install these products. What follows is best-practice guidance on what to configure and what to be aware of when deploying in this scenario.
- Identify the servers which will host your terminal server environment. Install the Terminal Server (or other) products. Ensure that the servers can:
- Access the File Store
- Access the Review and Processing SQL Server instances
- Install the Adobe PDF Reader plug-in for Internet Explorer if it is not already installed. The free version is sufficient.
- Install Microsoft Office 2016 or newer. Microsoft licensing requirements apply.
- Download and install the following Microsoft Visual C++ Runtimes versions:
- C++ 2012 (64 bit) - https://www.microsoft.com/en-us/download/details.aspx?id=30679
- C++ 2013 (64-bit) - https://learn.microsoft.com/en-us/cpp/windows/latest-supported-vc-redist?view=msvc-170
- C++ 2015-2022 (64-bit) - https://learn.microsoft.com/en-us/cpp/windows/latest-supported-vc-redist?view=msvc-170#visual-studio-2015-2017-2019-and-2022
- Install .NET Framework 4.72 if not already installed. Reboot after installation.
- Viewpoint can view native documents both within the Viewpoint application and by launching the native file in its native application. Supporting the latter feature requires that native viewer applications be installed on Terminal Server. Licensing requirements may apply.
- If the users are not domain users with access to the MSSQL Review instance you will need to construct a Config.txt / Config.INI file. See the Viewpoint Config.txt Creation Guide for instructions on how to set up one of these files.
- Disable User Account Control (UAC):
- Type “UAC” into the Start Menu.
- Move the slider all the way to the “Never notify” setting.
- Click “OK”.
- Reboot the server – this step is required so that Windows security configuration changes.
- Create the root folder for the installation package. By convention this folder is named “INS”.
- Under the “INS” folder create child folder “Viewpoint”. Under the “Viewpoint” folder create a child folder with the name of the version of the application you are running (7.0.0, etc.). In this folder place the Viewpoint Review installation file (SETUP.EXE).
- Run the SETUP.EXE application. Complete the installation package – use all defaults.
- Now that Viewpoint Review has been installed, navigate to the program files which by default are located at C:\Program Files\LateralData\Viewpoint\
- If you have generated a Config.INI file, place it into this folder.
- Configure Terminal Server to run the Viewpoint Review application executable. It is named LateralData.Applications.Dashboard.exe.
- While still logged into the Terminal Server, as a box administrator, open the Viewpoint Review application. Click the ‘Review’ button at top-left; this will open the Review screen. Ensure that the Review screen opens without error. Close Viewpoint Review when done.
- Log into a user PC and access Viewpoint Review through your server.
- Click the “Review” button. Navigate to a document. Open a Viewer to ensure that the viewer is working properly through your hosting application. On the Viewer select the Native, HTML, Text and TIFF viewer types. These steps will exercise basic functionality for launching other programs from within Viewpoint Review, as well as surface any potential file store access / permission issues.
- Configure printing – often hosting applications such as Terminal Server require a few additional steps to facilitate printing from a hosted application (Viewpoint Review) to the user’s local printer. If you are using Terminal Services try using the “Terminal Services Easy Print” driver as this is usually successful.
- Click the “Review” button. Locate any Document. Right-click on the Document and select “Print” – ensure that documents are printed to the expected printer.
- With a Document selected right-click and select “Save” and save a copy of any Document locally. This will further exercise file store access.
Optional Terminal Server Components#
You may choose to install additional software packages on Terminal Server to facilitate viewing documents in their native application. The following are recommended:
- VLC Media Player – to natively review audio and video files. Installation is a standard setup executable.
- RealLegal E-Transcript Bundle Viewer – To natively review LiveNote transcript files. Installation is a standard setup executable.
Viewpoint Installer Maintenance Options#
The Viewpoint installer package also includes a maintenance section that is used to perform various tasks post-installation. Each of the options is covered in detail, as follows:
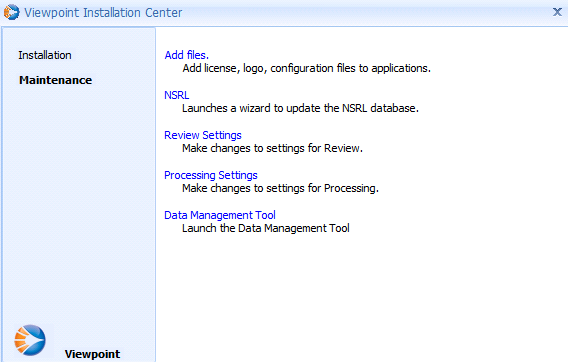
Add Files#
This is used to aid in adding licenses, logos, and configuration files to the install location of the applications. Click the ellipsis on the right side and browse to the install location of the application where the files will be added to. After clicking Next, click the add icon and then click the ellipsis on the new box to browse to the file that will be added to the install location. To add multiple files, click the add icon again to create additional boxes. Click Next when all the files are ready to be added. The last screen verifies which file(s) will be copied to which location. Click Copy to finish.
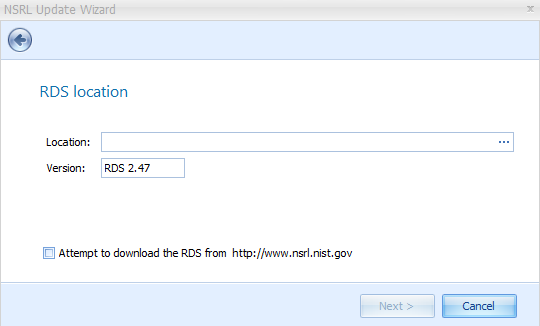
NSRL Update#
The user will be required to login to the SQL Server instance containing the NSRL database. If Windows Authentication is used as the authentication type, the User Name and Password fields remain blank and the user can click Next. If SQL Server authentication is used as the authentication type, a user name and password will need to be typed in before moving on. Please ensure that whichever authentication type is used, the account has administrative rights in SQL to complete this task.
If the user has already downloaded the current hashset, click the ellipsis on the Location field to browse to the .zip file containing the hashset. Update the Version field to reflect the version number of the new hashset, and then click Next. Then click Update to begin the process of extracting and installing the new hashset.
Alternatively, checking the box to Attempt to download the RDS from http://www.nsrl.nist.gov, and clicking Next will attempt to download and install a legacy version of the hashset.
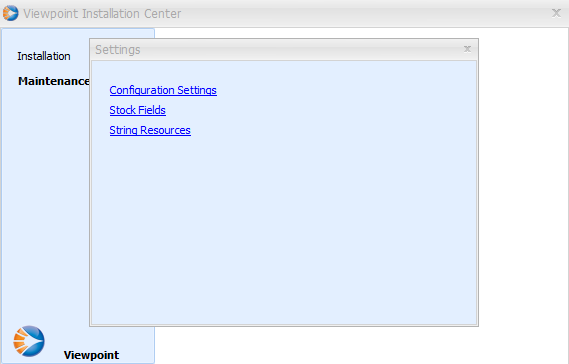
Review Settings#
Selecting Review Settings will bring up a window to log in to a Review SQL database. Successfully logging in will open the Settings window.
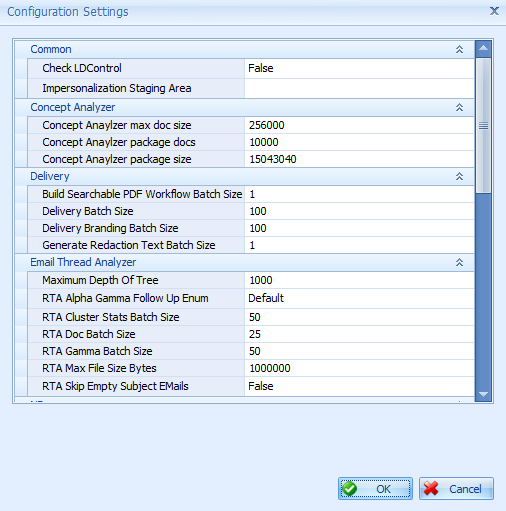
Configuration Settings#
This section is primarily intended to assist support personnel in troubleshooting specific issues without needing direct SQL Server access. It is recommended to only make changes to these settings when advised to do so by Viewpoint Support. These settings control many features within the Review application function.
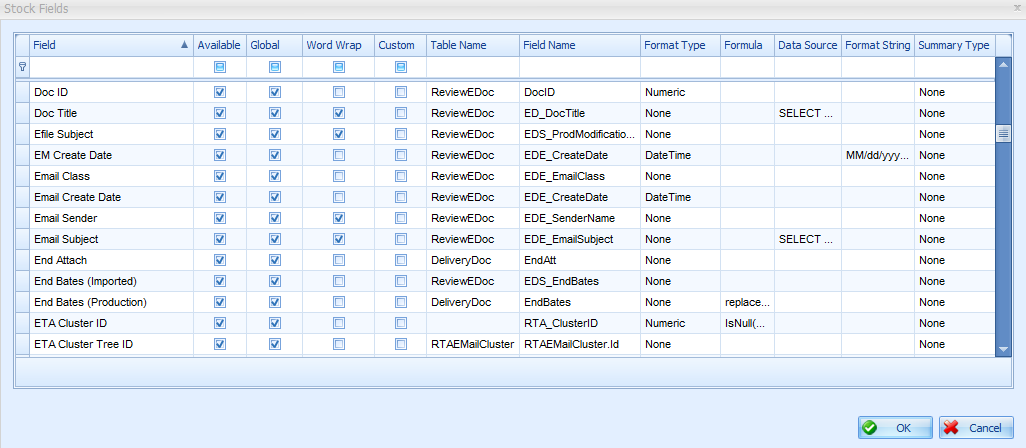
Stock Fields#
The Stock Fields Editor allows users to manage which fields are available to use in the Review application. The Available, Global, and Word Wrap checkboxes are editable. The Available field controls whether the field is available to add to a Form. The Global field controls whether the field is included in the Global Form. The Word Wrap field controls whether the field will word wrap and adjust to the column width when it is displayed in the document grid.
When a View is loaded in the Review application, all the available fields are queried. That way when a new field is added to the grid from the Fields Selector, the application doesn’t have to send a new query to populate the added field. The Stock Fields Editor can be used to control the number of fields that get queried when a View is opened. By removing unnecessary fields, loading times of larger Views can be sped up.
There are some fields that are tracked in the database but are not considered stock. Occasionally, there is a need to make these fields available in the Review interface. New custom stock fields can be added by right-clicking in the list and selecting, New.
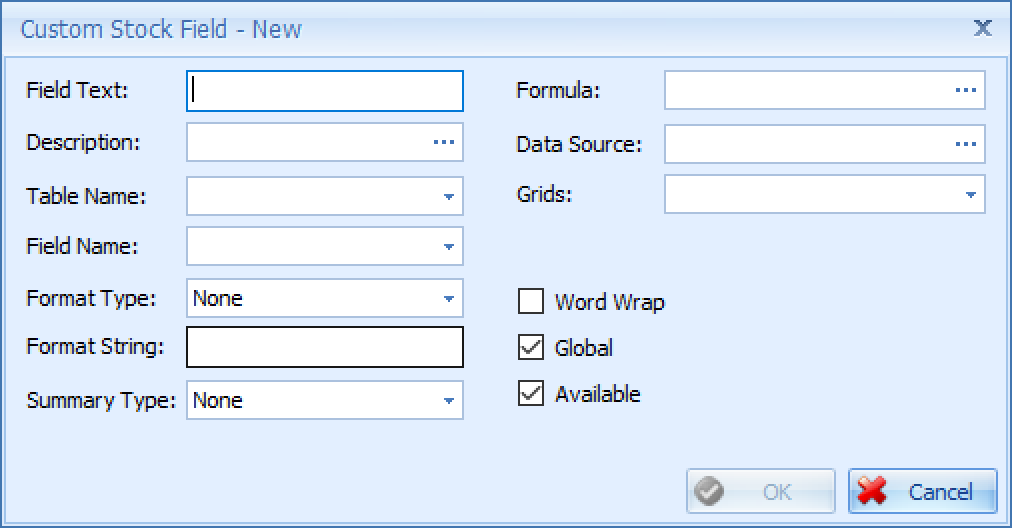
Field Text is how the name will appear in the application. A description can be entered, if desired. Table Name is selected from the dropdown box. The Field Name drop down box will list all of the fields in the table selected previously. This is where the user will find the field they wish to add to the stock fields list. A Format Type, such as Date/Time and Numeric, may need to be selected to display the field value as the correct data type. Format String is used to change how certain format types are formatted. For example, if a Format Type of Date/Time is used, a Format String of MM/dd/yyyy HH:mm can be used to display the field as 11/29/2017 12:27. Formula and Data Source are used for advanced customization of the new field. Using these two options, custom queries can be used to further customize the new custom stock field. The Grids field is a dropdown box where the user can select what parts of the application the new field will be available to be used.
String Resources#
String Resources is designed to give users the ability to update the values of string resources within the Review application. This means that many buttons, labels, settings, and dialog boxes can be updated with new text. This is especially useful for non-English users who would like the application to display application resources in their own language. Changes can be made on a global level or limited down to a single project.
To update values, select a language from the Language dropdown box. From the Project dropdown box, select whether the changes will be applied globally, or a single project. Then, find the Key or Value to be updated. Finally, click on the Value of the Key and type in, or copy/paste the new Value. Values that have been changed from default will now appear bolded in the list.
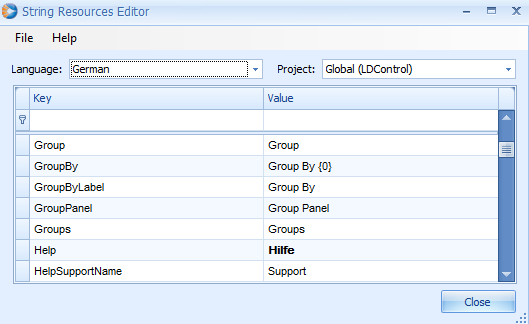
For users to see the changes reflected in the application, click the About button in the Review application. At the bottom of the About box there is a Language dropdown box. Select the desired language that was edited in the String Resource Editor. If changes were only made on a project level, select the project from the project list in the dashboard of the Review application, and then click the About button at the top of the screen and select the language from the dropdown box.
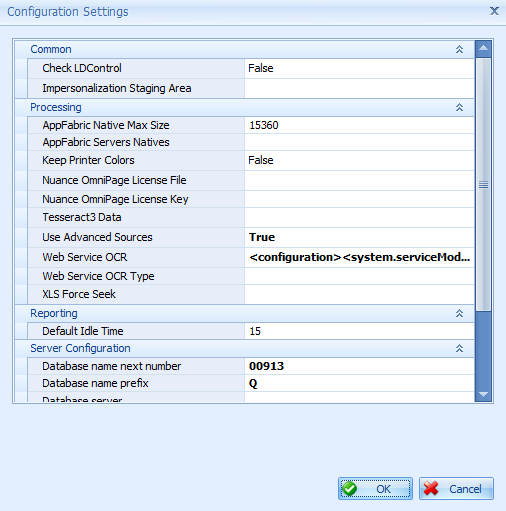
Processing Settings#
The Processing Settings will display the current settings for the system. It is not recommended to change these values without first speaking with Viewpoint Support.
Data Management Tool#
The Data Management Tool is designed to give users the ability to easily move Viewpoint project data and simplify the process of moving Viewpoint project database files.
The Data Management Tool (DMT) is accessed from the Viewpoint Installer application.
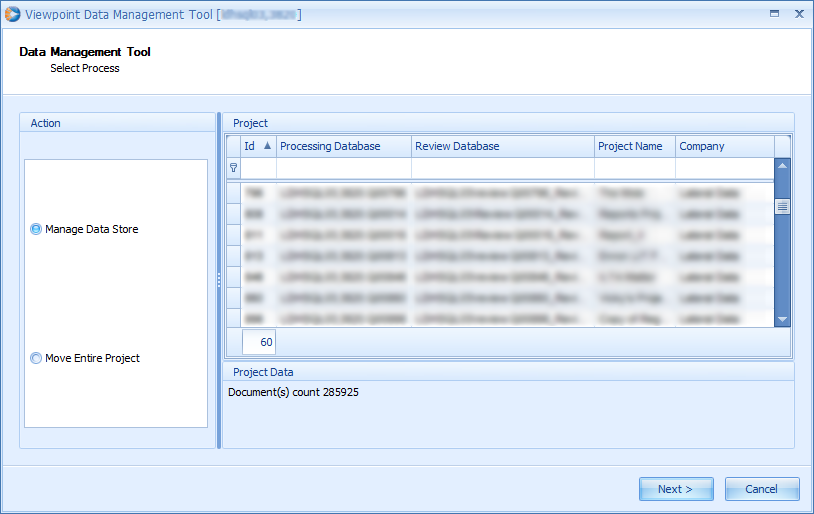
Within the application, click the Maintenance option on the left side and then click the Data Management Tool option. A login window will open where the user can enter the SQL Server name of the Viewpoint processing SQL database. Click OK to log in.
Note: Only user accounts with sys admin privileges to the SQL Server database will be able to log in successfully. Alternatively, users can uncheck the “Use Windows Account” option and use a set of SQL Server credentials that have sys admin privileges.
If successful, users should see a window like the screenshot below. There are two radio button options, Manage Data Store and Move Entire Project. These will be covered in detail below. The Projects list displays all the Viewpoint projects stored in the database. Additional fields can be added to the list, such as Database Version and File Server, by right-clicking in the panel, selecting Fields Selector and then double-clicking on or dragging the desired field into the panel.
Manage Data Store#
When a user selects Manage Data Store and clicks Next on the main page, a window opens like the screenshot below. This feature allows users to move specific project data to a new location based on selected Medias, Views, Dedupe Set, File Category, or Ignored Files, and then automatically updates the path information in the project database to reflect the new location within the application.
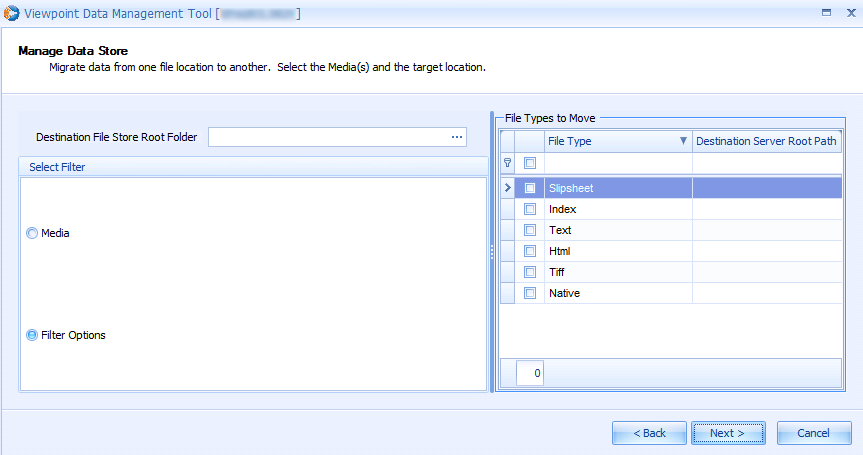
To use this feature, type in the UNC file path of the location where the files will be moved to. This will be the root path where the selected file type folders will be moved to. Alternatively, click the ellipsis to browse to the new root folder. After a destination has been chosen, the Destination Server Root Path field will be populated on the right side of the window. Individual paths can also be used for Index, Text, HTML, and Tiff. To change a path, either click on the Destination Server Root Path field and type in a new path or click the ellipsis on the right side of the field to browse out to a new location.
Note: The credentials used to log in to the Data Management Tool will need full file permissions in the current file location and the new file location for the data to successfully move. Also, check to make sure there is sufficient free space available in the new location.
Also, please do not attempt to move files if they are already in their target location.
Next, check the boxes of the file types that are to be moved from the current location to the new location.
Finally, select whether to move files based on Media or Filter Options. The filter options gives the user the option to move files based on View(s), duplicate files as defined by a Dedupe Set, file category, or files marked as Ignored.
Media#
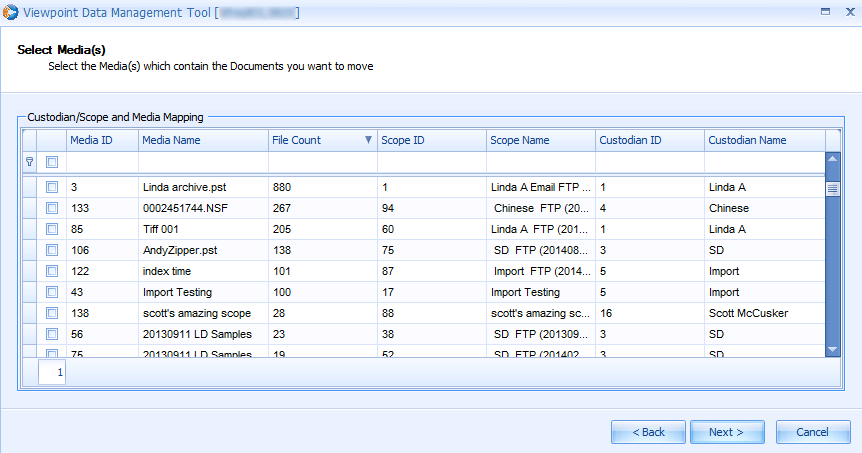
If the Media option was selected, the next window will display the list of Medias in the project. Check the boxes of the Medias that need to be moved. If all Medias need to be selected, right-click in the panel and select Check All.
Users can see where the different file types are currently stored by right-clicking in the panel using the Fields Selector option to add in the root path fields.
When the user is ready to move forward, click Next.
Filter Options#
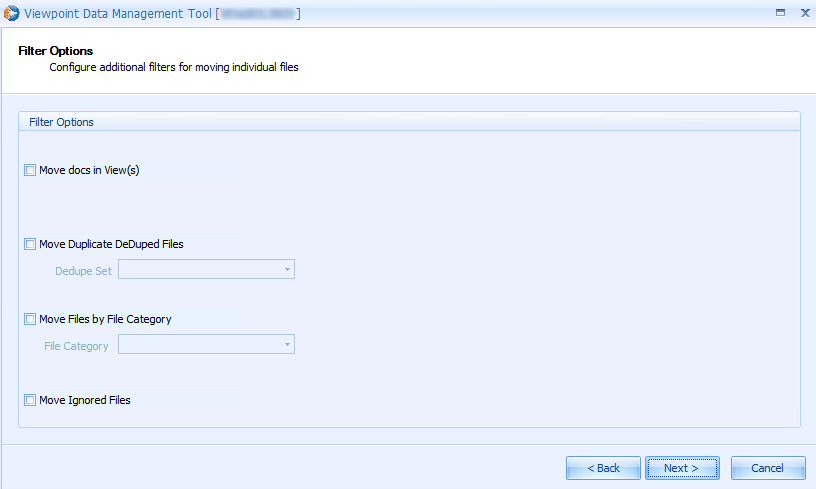
If Filter Options was selected instead of Medias, the next window will display four filter options. Selecting the Move docs in View(s) option and clicking Next will display a new window where the user will select one or more Views to move. Selecting the Move Duplicate DeDuped Files option will enable the dropdown box to select one or more Dedupe Sets from the project. Selecting the Move Files by File Category will enable the dropdown box to select one or more file categories, such as compressed archives or system files. Finally, selecting Move Ignored Files will move all files in the project that are marked as Ignored
Ready to Process#
After the user is done making selections, there is a confirmation window that is displayed before executing any change. Please verify that all the information displayed here is correct before clicking Finish.
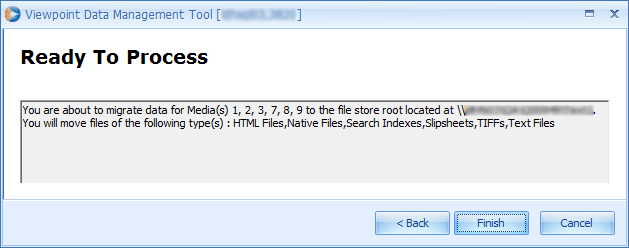
When the process is complete, a box will pop-up to notify the user that the process is completed successfully.
Move Entire Project#
This option provides an easier way to migrate whole projects (databases and/or project data) to a new location.
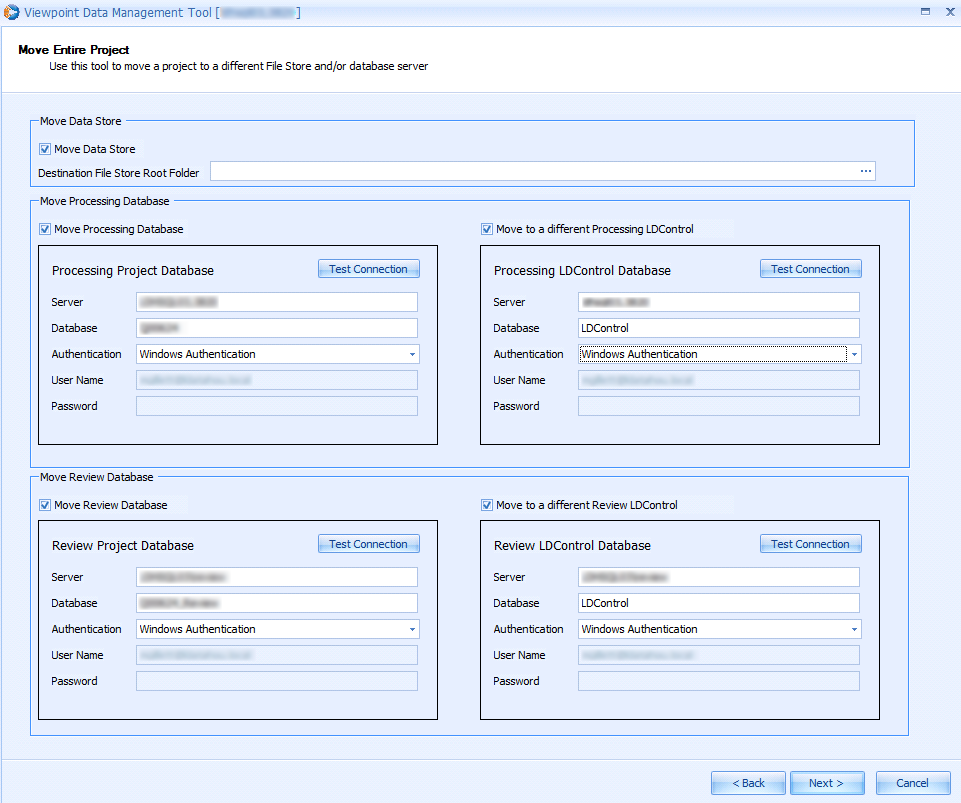
The Move Data Store option is essentially performing the same function as the Manage Data Store option discussed above. However, this will move the entirety of the project data without needing to select which file types and Medias to include. Either type in or paste the new root UNC file path in the field provided or click the ellipsis to browse to the new location. Once the migration has been executed and the files have been moved, the new file paths will be updated in the project database and reflected in the application.
Note: The user account used to log in to the Data Management Tool needs full file permissions in the old file location as well as the new location for the data migration to complete successfully. Also, check to make sure there is sufficient free space available in the new location.
Moving the project database(s) is done by checking either the Move Processing Database box and/or Move Review Database box. Then, if the database being moved will need to communicate with a different LDControl database, check the box labeled, Move to a Different Processing (or Review) LDControl.
Each of the four sections has identically labeled fields to enter in the pertinent information of each checked option. The Server field will be the new SQL Server instance the database will be moving to (ex. NewViewpointSQL\Processing.) The Database field will be the database name in the new location. This name may need to be changed if a project with the same name already exists in the new location. The Authentication field gives the option to use either Windows Authentication or SQL Server Authentication. If Windows Authentication is used, the User Name and Password fields will be disabled. If SQL Server Authentication is used, use a set of credentials that has sys admin rights to the server entered in the Server field. Use the Test Connection button to check the credentials and database name against the new server.
After the necessary selections have been made and the connection tests complete successfully, click Next. If moving LDControl databases, a window will pop up requiring the user to select a Company from the new LDControl database to associate to the project being moved.
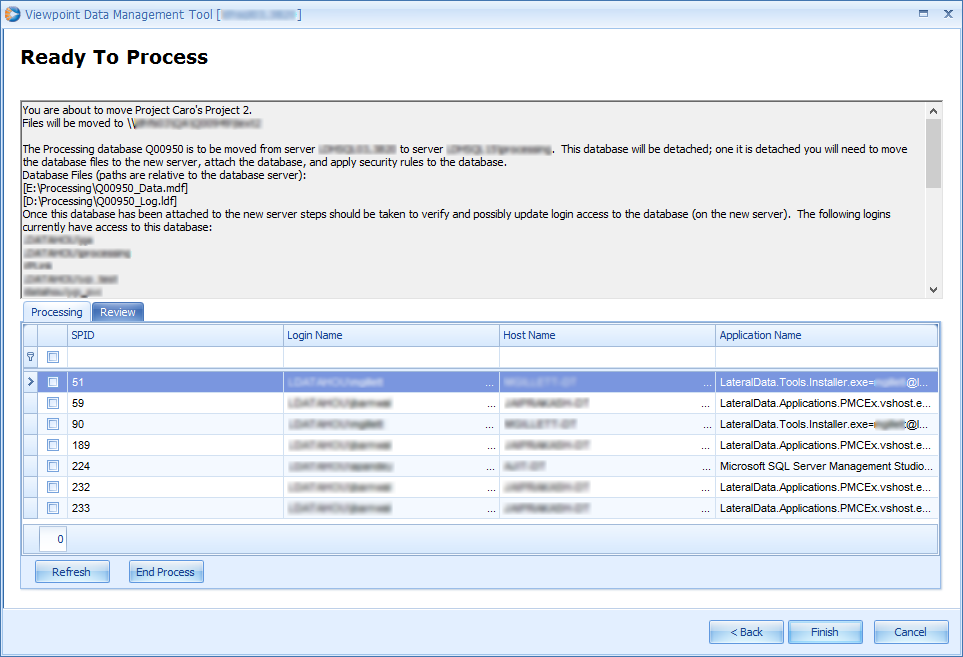
There is a confirmation window that is displayed before executing the move. The text box summarizes the selections that were made previously and give important information on how to proceed after the process finishes. Please read this and verify that all the information is correct before clicking Finish.
Note: This tool does not completely automate the migration of a project from one SQL Server to another. This tool will make the necessary changes in the project database and LDControl databases to make it easier to move. Once the process is complete, the database files will need to be manually moved to the new location and then attached to the new SQL Server.
The grid on the bottom portion of the window is displays the processes in SQL Server currently accessing the selected project. There is a separate tab for the Processing and Review databases. From here, users still accessing the project can be seen. Please make sure that all users are out of the project before moving the project databases and/or project files.
Clicking Finish will do a final check and prompt the user if there are still open processes accessing the project database.
The process may take some time to complete depending on the size of the database and files being moved.