Sections Web Review
Manual informationWeb Review
1.2 | March 31, 2022 | Added info on Project Details | Data pane | Viewpoint Dev Team
Document conventions
Convention | Explanation |
|---|---|
Bold | For file names, commands, fields, menus, options, and window names. |
Courier New | Commands as you should type them. |
Lucida Console | Example output generated by the system. |
Italics | For configuration variables, including variable portions of file names and URLs. Also indicates a document name. |
Note / Blue Callout | The Blue Callout text indicates information that is of special interest or importance, an idea that could be useful or additional information about a product or a feature. |
| The Caution icon along with the text indicates actions that can lead to problems in system operation or configuration settings if the instructions are not followed properly. |

Revision history
This section tracks the initial creation of the document after each major version thereafter.
Ver: | Date | Description | Reviewed / Approved By |
|---|---|---|---|
1.0 | Feb 28, 2020 | Initial Version | Team |
1.1 | August 6, 2021 | Rebranded adhering to the latest brand central documentation standards/guidelines. | Technical Writer Karunakar |
1.2 | March 31, 2022 | Added info on Project Details | Data pane | Viewpoint Dev Team |
Viewpoint Dashboard / Home Page#
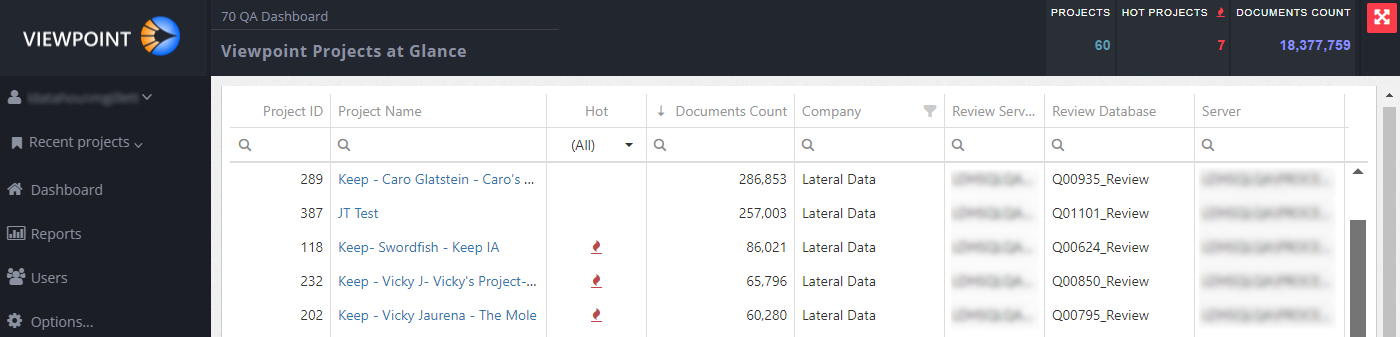
This section of the document provides information specific to the Viewpoint web review dashboard and its different modules. The detailed step-by-step information with the required screenshots specific to each module will be provided in this document. The following is the Viewpoint dashboard home screen:
Permissions#
Permissions within the Viewpoint Web application are dependent on the user’s permissions within the Viewpoint Review Security Management tool.
Layout#
Viewpoint Web review application is divided into several modules as follows:
- Environment Dashboard
- Project Dashboard
- Document Review
- Rapid Search
- Reports
- Users, and
- Productions.
Adjusting Size and Placement of Panels#
Viewpoint Web uses separate widgets or panels to organize and group functions or information. These panels can be resized or re-ordered as needed.
Perform the following steps to resize the panel:
- Click on the lower-right corner of the panel and drag the panel to the desired size.
- To move the panel, click the colored top bar of the panel and drag the panel to the new location. A light-yellow outline will show the area, the panel will occupy when the mouse button is released. Other panels may change in size or placement as the selected panel is moved or resized.
Panels cannot overlap.
To enlarge the panels temporarily, click the two-sided arrow in the upper-right corner of the panel next to the X option that closes the panel. When you click the same button again, it will return the panel to its original size, as shown on the screen.
Breadcrumbs#
Viewpoint Web includes a breadcrumb trail to help users find their way around the application and give context to the page hierarchy within the Viewpoint Web. When you click the breadcrumb, it will take the user to the respective page.

Sorting and Filtering Columns#
Panels that contain tables of information usually have a row that allows for sorting and searching.
Perform the following steps:
- Click the column header name to sort the table in ascending order—click again to sort in descending order. Some fields have a small
 icon, which can be used to select specific values contained within the column, as shown in the following screen:
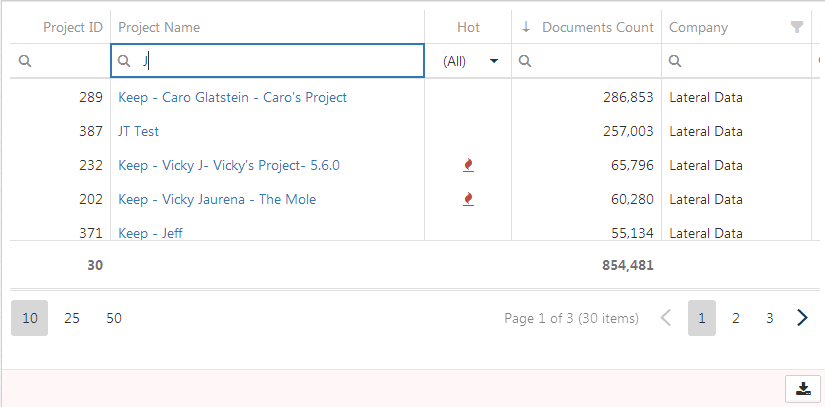
- Below the column names is a row that contains a magnifying glass icon in each field that can be searched.
- Wildcard characters cannot be used.
- Columns that contain date information will also have a small calendar icon. You can click to open a calendar and select a specific date.
- Hovering over the magnifying glass icon reveals various search options. The default search option for alphanumeric fields is Contains, as shown in the following screen:
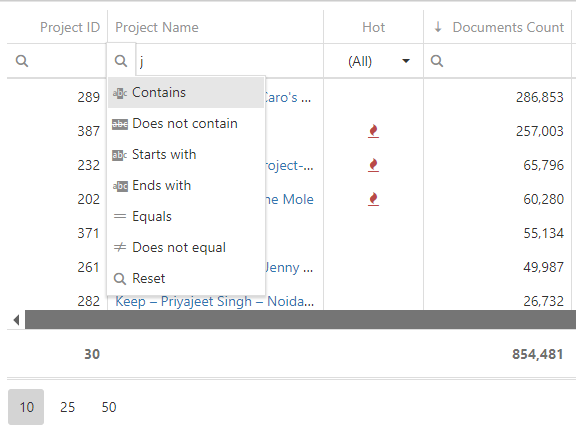
- To remove a filter, either delete the text in the search field or hover over the magnifying glass icon and click Reset.
Save Panel Content#
Information in panels that contain table or chart information can be downloaded in .xlsx format.
- To download, click the
 button on the bottom-right corner of the panel.
Add/Remove Panels#
- To close the panels, click the X in the upper-right corner of a panel.
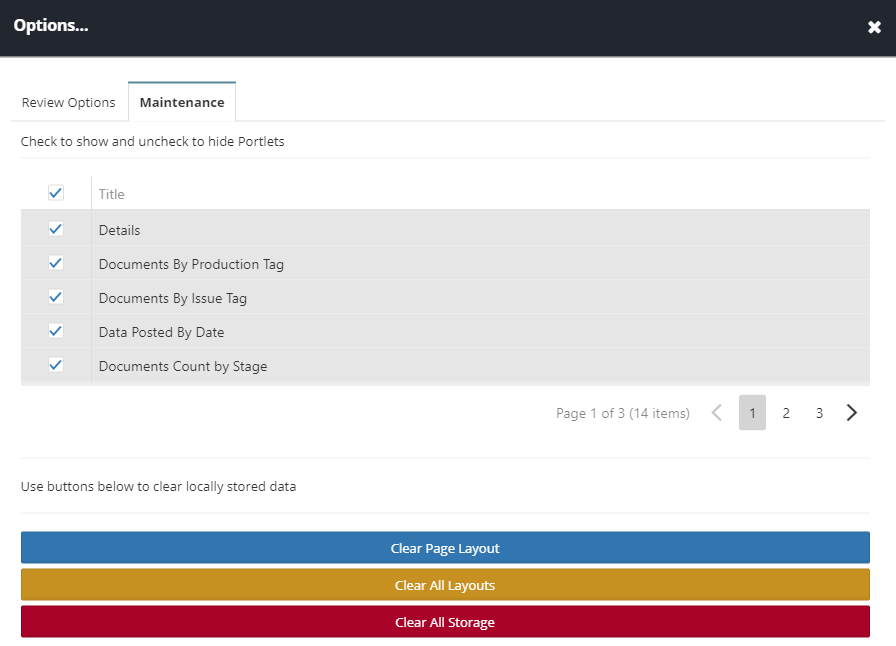
- To add or remove panels, click the Options button on the vertical toolbar on the left side of the screen.
- Click the Maintenance tab if more than one tab is available and then check or uncheck boxes for the panels that will be added or removed.
Note: There may be multiple pages of panels to select from. Click a page number or arrow button near the bottom to move between the pages.
Reset Layout(s)#
Viewpoint Web will remember the layout and sizing of the various panels as the tool is used so that when a user logs in again the layout will be the same as they left it. However, there may be times when a user would like to reset their layout back to the default.
Perform the following steps:
- To resent Layouts, click the Options button on the vertical toolbar on the left side of the screen.
- Click on the Maintenance tab if more than one tab is available.
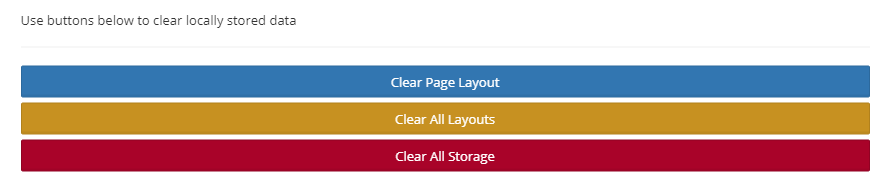
- Click the Clear Page Layout option to reset the layout for the currently displayed page.
- Click the Clear All Layouts option to reset the layout for all pages in the Viewpoint Web.
- Select the Clear All Storage to reset the layout for all the pages and any stored information such as the Recent Projects list and any saved filter values, as shown in the following screen:
- A confirmation box will pop up when you select any one of these options.
- Click OK to proceed with the reset or Cancel to back out without making any changes.
Left Toolbar#
The vertical toolbar on the left side of the screen is mostly used to quickly switch between the modules in Viewpoint Web.
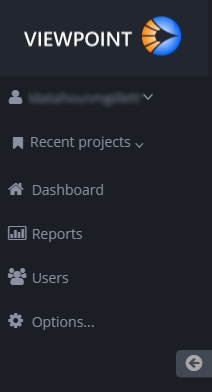
- To minimize or expanded the toolbar, click the grey arrow in the middle of the toolbar.
Username#
- The logged-in username will be displayed just under the Viewpoint logo.
- To log off from the Viewpoint web application, click the username and then click the logout option.
Recent Projects#
Recent Projects option facilitates quick access to the five most recent Projects accessed by the user.
Dashboard#
Facilitates to open the Environment Dashboard page.
Reports#
Facilitates to open the Reports page.
Users#
Facilitates to open the Users page.
Options#
Facilitates to open the Options page. There may be two tabs in the window depending on which page the user was on when they have tried to click the Options button.
The first tab Review Options contains several categories of settings that can be adjusted to change behaviors of specific parts of the application. The specific settings will be further detailed in their applicable sections.
The second tab Maintenance has been discussed in the above Add/Remove Panels and Reset Layout(s) sections.
Environment Dashboard#
The dashboard provides a high-level look at the current state of the Viewpoint environment. The individual panels display information about specific aspects of the environment.
- Click “Options” on the left toolbar, to add or remove these panels.
Top Toolbar#

Projects Count#
Lists the total number of Projects available in Viewpoint Web
Hot Projects#
Lists the number of projects that have had some sort of user action taken (ex. Tags, notes, redactions) within the last seven days.
Documents Count#
Lists the total number of documents posted to Viewpoint Web.
Full Screen#
When you click the red arrow button in the upper-right corner, the respective page will go full screen by hiding the browser’s tabs and toolbars.
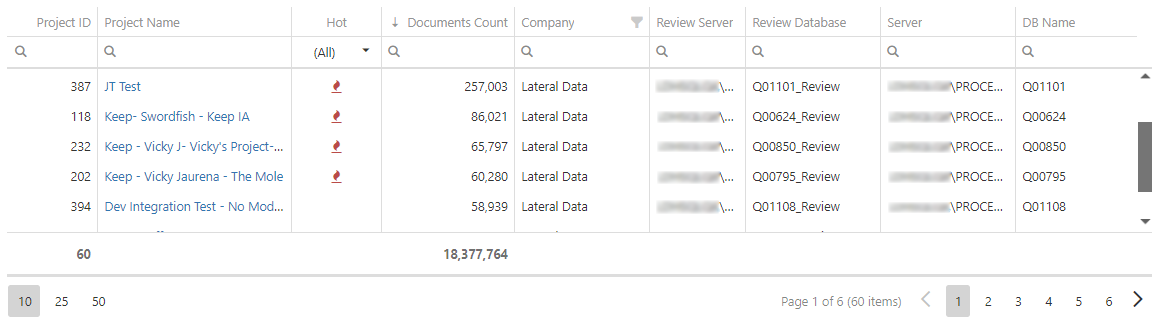
Projects List#
The top section contains a list of Viewpoint Projects. Each of the columns in that list can be sorted and filtered to quickly find and access specific Projects.
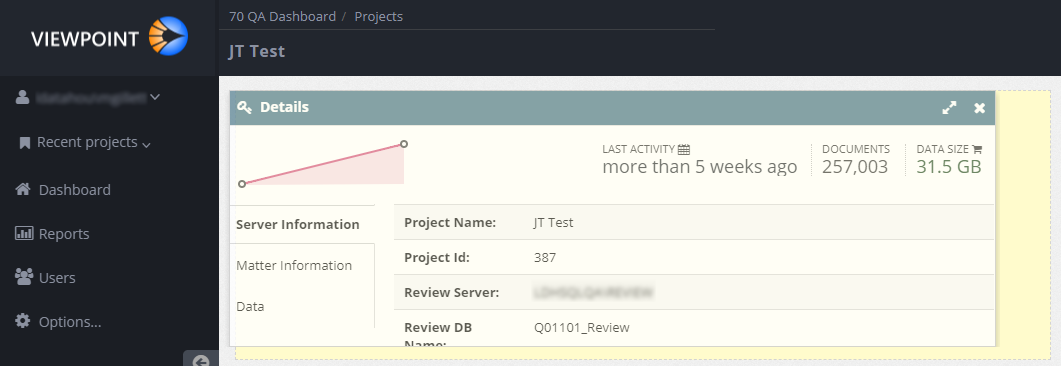
- When you click the Project Name, it will take the user to the Project’s dashboard page, as shown in the following screen:
Productions#
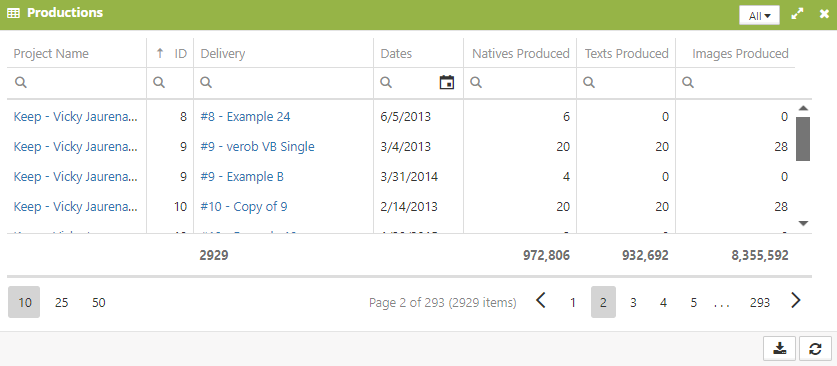
The Productions panel provides a quick, filterable look at the productions performed in the Viewpoint. Along the top bar of the panel is a filter to display the productions from the past week, month, year, or all. The options along the bottom of the panel control depict how many records will be shown on each page and which page to display.
- Click the
 icon on the bottom-right corner to reload the results.
 - Click the
 icon on the bottom-right corner to save an .xlsx file that contains the records listed in the panel.
 - Click the Project Name, which will take you to the Project’s Dashboard page.
- Click the Delivery name, which will take you to the Delivery’s Dashboard page, as shown in the following screen:
Custodians#
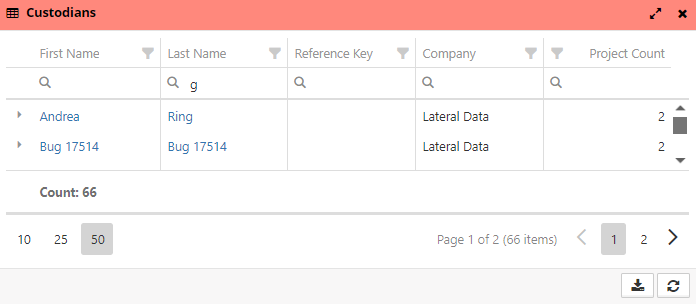
The Custodians panel provides a broader look at custodians within the Viewpoint, specifically the number of Projects they are currently associated with.
- Click either the first name or last name value of a custodian which takes the user to the Custodian Details page.
- Click the small, grey triangle to the left of a custodian’s first name, which will expand to display the specific projects the custodian is currently a part of.
- Click the
 icon in the bottom-right corner to reload the results.
 - Click the
 icon in the bottom-right corner to save the .xlsx file that contains the records listed in the panel.
Active Users#
The Active Users panel displays all the Viewpoint users who have performed either tagging or redaction actions within the timeframe selected near the top-right section of the panel.
Changing the timeframe will limit the users, projects, and actions to those users who accessed projects during the selected timeframe and only count the actions performed during that same timeframe.
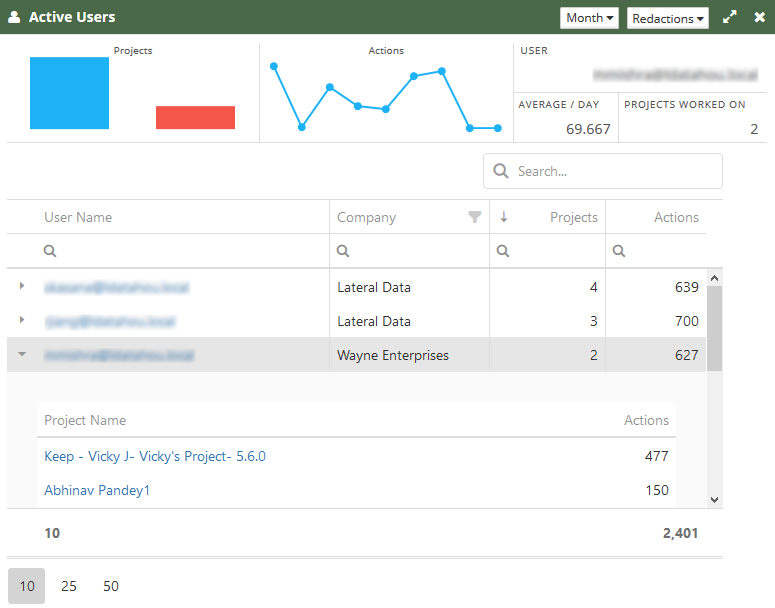
The list of users can be searched using the search bar above the list.
Perform the following steps:
- Click the small, grey triangle to the left of a User Name to display a breakdown of the number of actions that the user has performed in each Project.
- Click the blue text of the User Name which will go to a more detailed look at the specific user. These details will be covered in the User Details section.
- Click the user (though not the actual User Name) will populate the fields in the top section of the panel. One will display the number of actions completed each day while the other will display the number of actions completed in each Project. Hovering over a data point on the charts will display information about the point.
- Click in the upper section of the panel such as one of the charts, which will display properly labeled charts that can be printed or saved; click the
 icon.
icon.
Top Projects#
This panel displays a chart of the largest Viewpoint Projects by file size or file count (toggled using the dropdown box in the upper-right corner of the panel.
- Click the
 icon near the bottom-right corner of the panel, to save the chart in the .png format.
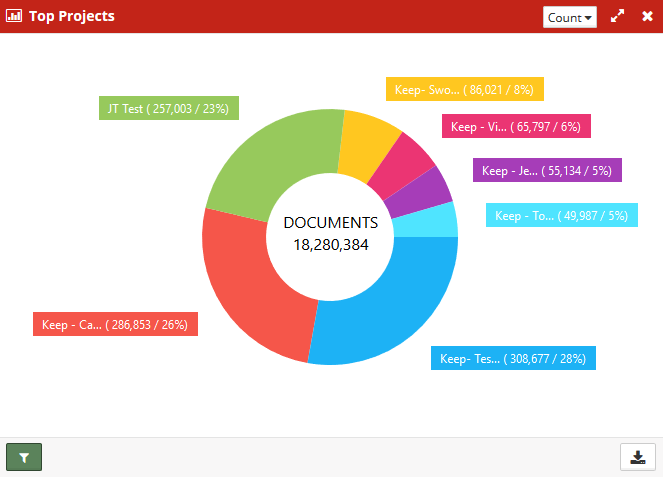
- At the bottom-left corner of the panel is an option to filter which Viewpoint Projects are included in the chart.
- Check the boxes of the Projects to include.
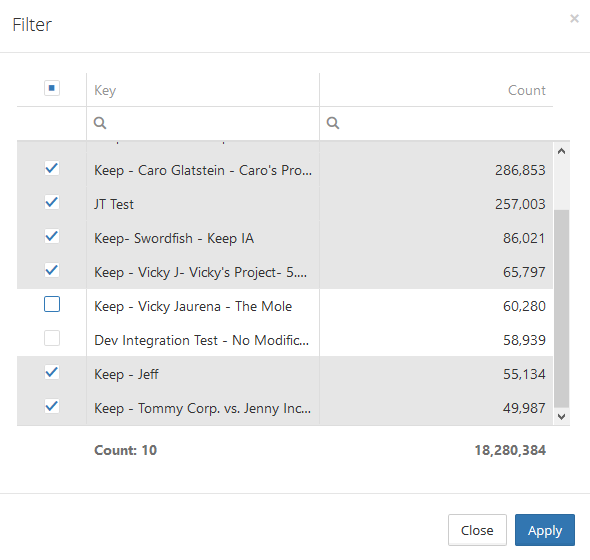
- Click Apply.
Custodian Details#
The Custodian Details page provides insight into the makeup and distribution of a custodian’s data within the Viewpoint environment. The individual panels display information about specific aspects of the custodian’s data.
- Click the Options on the left toolbar to add or remove these panels.
Top Toolbar#

The top toolbar displays key information that is aggregated across all the Viewpoint Projects the custodian is a part of.
Data Posted by Date#
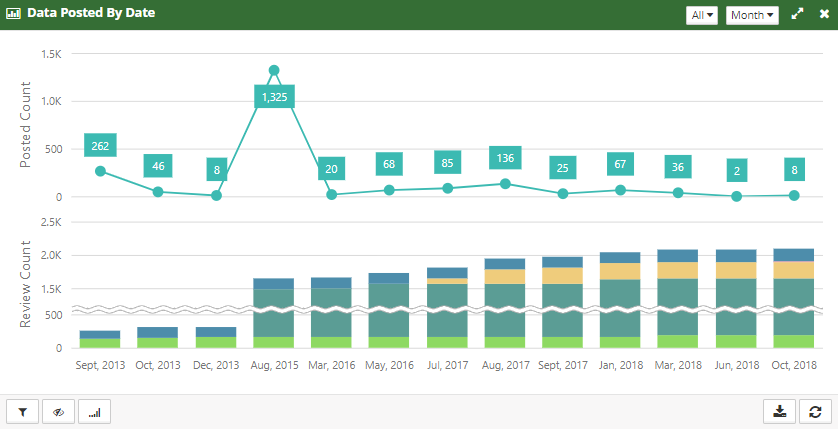
The top chart of the Data Posted by Date panel displays the total number of the custodian’s documents posted to Viewpoint throughout the selected timeframe and grouped by the selected time interval. The bottom chart of the panel displays the aggregate number of documents (but color differentiated per project) over the same timeframe and grouping.
Changing the left dropdown box will adjust the timeframe and only count the documents posted during that time. Changing the right dropdown box will adjust the length of time that makes up the grouping.
For example, if I wanted the chart to show me the number of documents posted per week for the past month, I would set the left dropdown to Month and the right dropdown to Week.
- Click the
 icon in the bottom-left corner to hide/unhide individual chart categories.
 - Click the
 icon to hide/unhide the chart legend.
 - Click the
 icon to toggle on/off chart scaling.
 - Click the
 icon in the bottom-right corner to reload the results.
 - Click the
 icon in the bottom-right corner to save a .png file of the chart as it currently appears on-screen.
Documents by Extension#
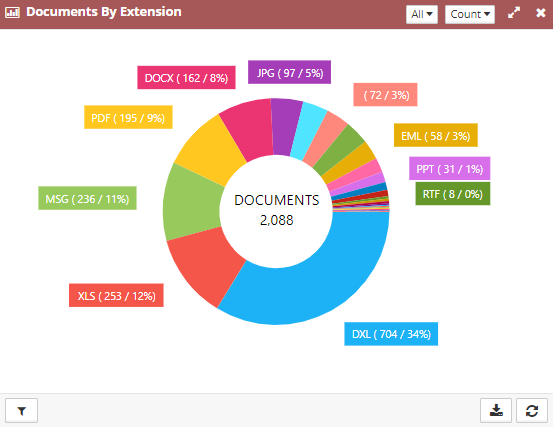
This panel displays a chart of the total size of documents or the number of documents for each file extension that has been posted to Viewpoint within the timeframe selected at the top of the panel.
- Click the
 icon in the bottom-left corner to hide/unhide individual chart categories.
 - Click the
 icon in the bottom-right corner to reload the results.
 - Click the
 icon in the bottom-right corner to save a .png file of the chart as it currently appears on-screen.
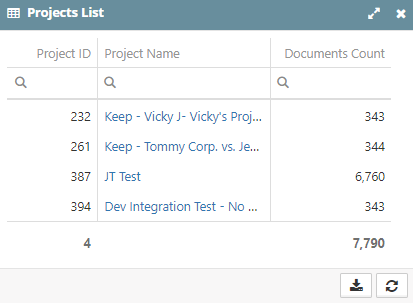
Projects List#
The Projects List panel displays the number of documents the custodian has in each Viewpoint Project as well as a link to the project dashboard of each project the custodian is associated with.
- Click the
 icon in the bottom-right corner to reload the results.
 - Click the
 icon in the bottom-right corner to save the .xlsx file that contains the records listed in the panel.
Productions#
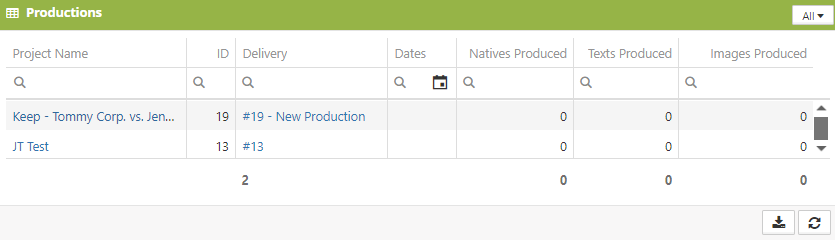
The Productions panel lists all the productions that contain data that belongs to the custodian.
- Click the dropdown box in the upper-right corner to filter the list to only those productions that were performed within the selected timeframe.
- Click the
 icon in the bottom-right corner to reload the results.
 - Click the
 icon in the bottom-right corner to save the .xlsx file that contains the records listed in the panel.
Production Tags#
The Production Tags panel displays the number of documents tagged per project (but color differentiated per production tag), or per tag (color differentiated per project).
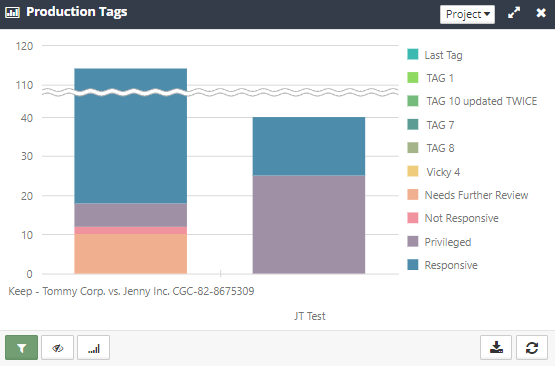
- Click the
 icon in the bottom-left corner to hide/unhide individual chart categories.
 - Click the
 icon to hide/unhide the chart legend. Click the
  icon to toggle on/off chart scaling.
 - Click the
 icon in the bottom-right corner to reload the results.
 - Click the
 icon in the bottom-right corner to save a .png file of the chart as it currently appears on-screen.
Project Dashboard#
The Project Dashboard page uses several panels to display a range of useful information about a Viewpoint Project.
- Click the Options on the left toolbar and then click the Maintenance tab to add or remove these panels.
Top Toolbar#
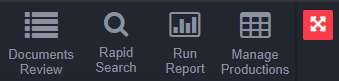
- Click the Documents Review option to open the Review page and begin reviewing documents.
- Click the Rapid Search option to open the filtering/searching page which is used to create Views within the Viewpoint Web. This provides some of the same functionalities as the View Manager tool in the Viewpoint Review desktop application.
- Click the Run Report option to open the Reports page. Any report that is selected from the list that has a filter for a specific Project will default to the Project the user had selected from the dashboard.
- Click the Manage Productions option to open the list of productions from the currently selected Project.
- Click the blue text of a Delivery ID value to open that production’s dashboard page.
Left Toolbar#
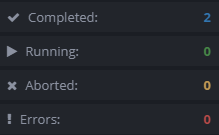
Job Counts#
The bottom of the left toolbar displays categories of Jobs that have been started on the currently selected Project. You can click anywhere in this section of the toolbar that will open the Review Jobs Details window.
Note The numbers listed here also include any Jobs created from the Viewpoint Review desktop application.
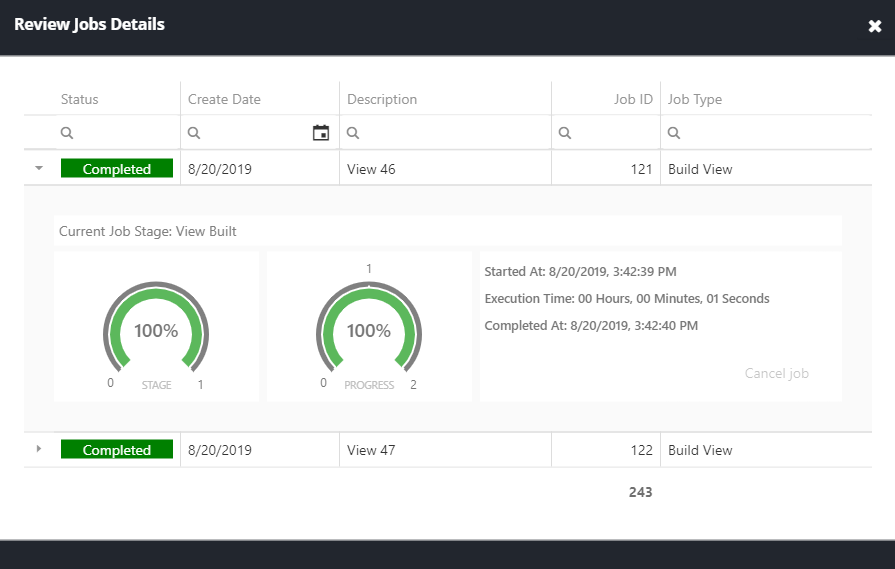
- The Review Job Details window lists each of the Jobs performed on this Project.
- Click the small, grey triangle to the left of the record to expand/hide additional details about the Job. If a Job in progress becomes stuck for some reason, the Job can be canceled by expanding the details and then clicking Cancel job.
Project Dashboard Panels#
Details#
The Details panel displays basic information about the Project and displays a kind of pulse of the activity in the Project.
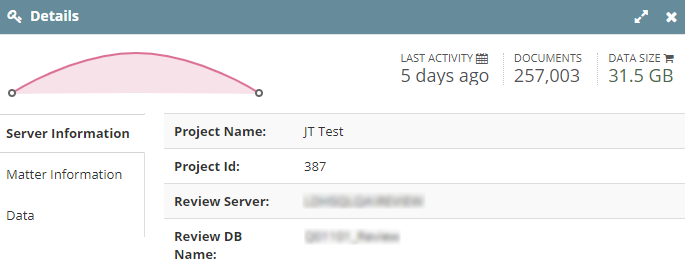
- Click the Data option on the left side which will display important metrics about the Project.
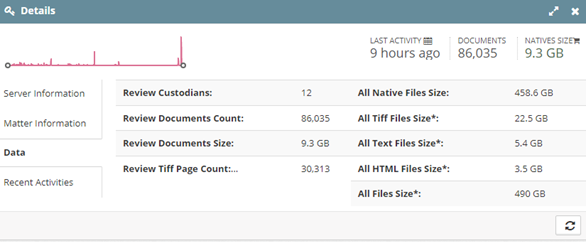
The metrics presented are:
Review Custodians: Count of all Custodians in Review
Review Documents Count: Count of all Documents in Review
Review Documents Size: Original File Size, in Gigabytes, of all Native files in Review
Review Tiff Page Count: Numbers of TIFF pages in Review
All Native Files Size: Size, in Gigabytes, of all Native files (in Processing)
All Tiff Files Size*: Size, in Gigabytes, of all TIFF files (in Processing). *Only applies to data collected in Viewpoint 5.5 or later
All Text Files Size*: Size, in Gigabytes, of all Text files (in Processing). *Only applies to data collected in Viewpoint 6.0 or later
All HTML Files Size*: Size, in Gigabytes, of all HTML files (in Processing). *Only applies to data collected in Viewpoint 6.0 or later
All Files Size*: Size, in Gigabytes, of all files (in Processing):
(All Native Files Size) + (All Tiff Files Size) + (All Text Files Size) + (All HTML Files Size).
*Only applies to data collected in Viewpoint 5.5 or later.
Tagged by Custodian#
The Tagged by Custodian panel displays a chart of the number of documents grouped by tags or custodians (toggled by using the dropdown menu in the upper-right corner of the panel).
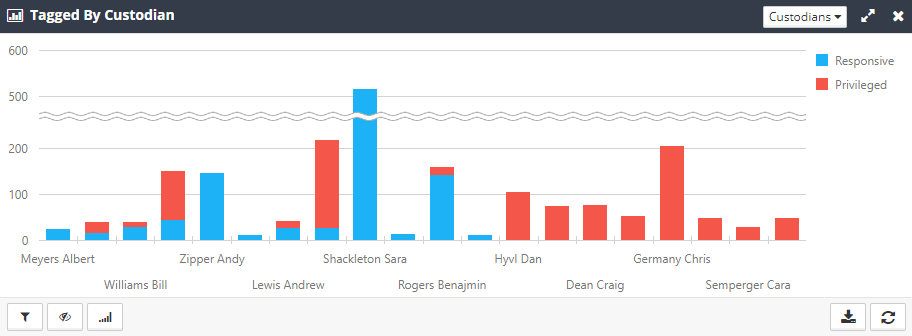
- Click the
 icon in the bottom-left corner to hide/unhide individual chart categories.
 - Click the
 icon to hide/unhide the chart legend. Click the
  icon to toggle on/off chart scaling.
 - Click the
 icon in the bottom-right corner to reload the results.
 - Click the
 icon in the bottom-right corner to save a .png file of the chart as it currently appears on the screen.
Documents by Production Tag#
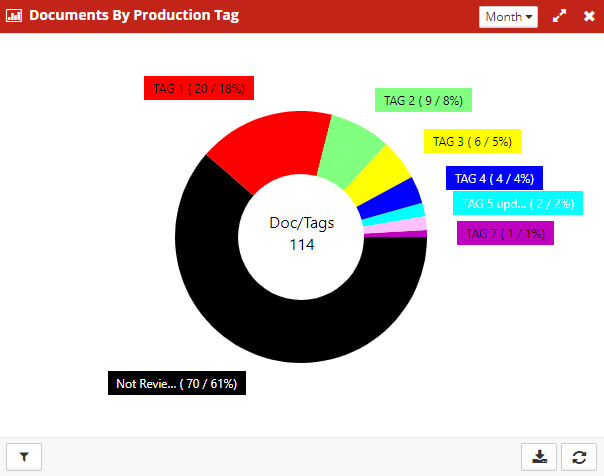
This panel provides a chart of the number of documents that have been tagged with each production tag within the timeframe selected at the top of the panel.
- Click the
 icon in the bottom-left corner to hide/unhide individual chart categories.
 - Click the
 icon in the bottom-right corner to reload the results.
 - Click the
 icon in the bottom-right corner to save a .png file of the chart as it currently appears on the screen.
Productions#
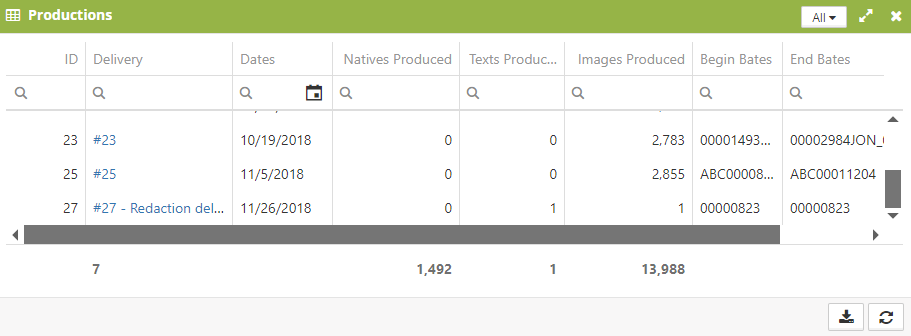
This panel lists information about the Viewpoint productions that have been completed within the timeframe selected from the dropdown at the top of the panel.
- Click the name in the Delivery column to go to a non-editable version of the Production Dashboard page, as shown in the following screen:
- Click the
 icon in the bottom-right corner to reload the results.
 - Click the
 icon in the bottom-right corner to save the .xlsx file that contains the records listed in the panel.
Documents by Issue Tag#
This panel provides a chart displaying the total number of documents or size of the documents that have been tagged with each issue tag within the timeframe selected at the top of the panel.
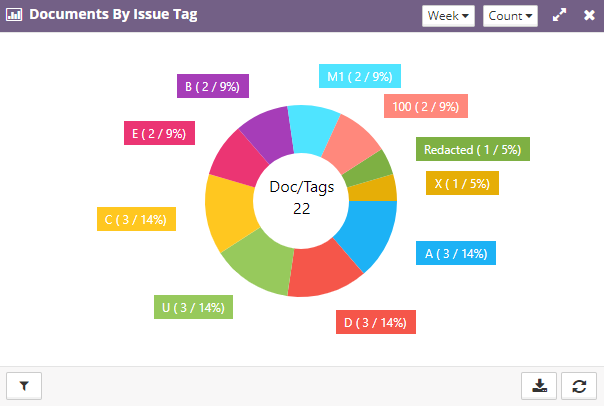
- Click the
 icon in the bottom-left corner to hide/unhide individual chart categories.
 - Click the
 icon in the bottom-right corner to reload the results.
 - Click the
 icon in the bottom-right corner to save a .png file of the chart as it currently appears on-screen.
Review Progress and Cost#
This panel allows the user to look at the progress being made in reviewing documents within the Project as a whole, or a selected View. It also provides the means to estimate the time and cost to finish reviewing the remaining documents.
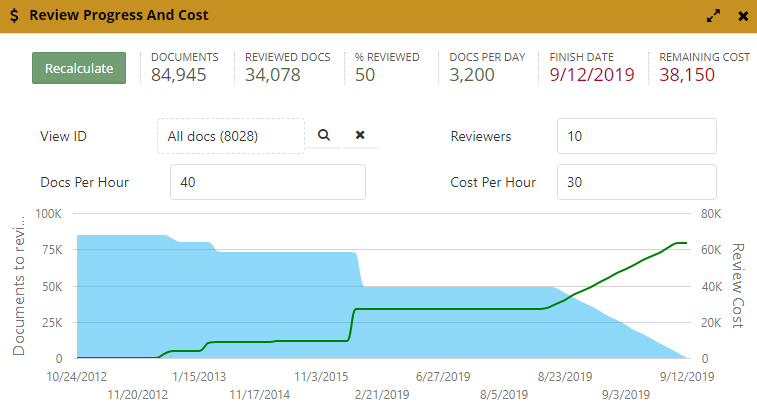
- To recalculate the chart based on the View, click the magnifying glass icon near the View ID field to search for a specific View.
- Click OK after selecting a View.
- Enter the number of Reviewers working on the Project/View, the number of documents per hour each Reviewer completes and if desired, the cost per hour per Reviewer.
- Click the Recalculate button to rebuild the chart with the new variables.
Note: Estimates are based on an eight-hour working day.
Data Posted by Date#
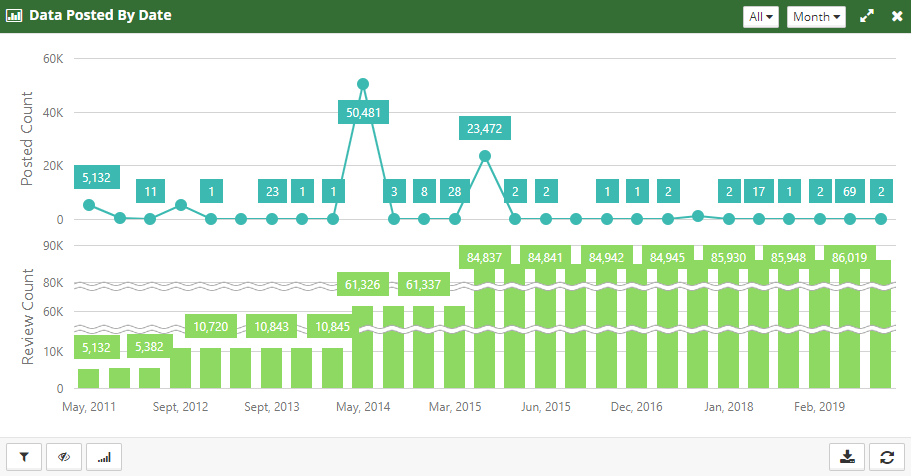
The top chart of the Data Posted by Date panel displays the total number of documents posted to the Project throughout a selected timeframe and grouped by a selected time interval. The bottom chart of the panel displays the aggregate number of documents over the same timeframe and interval.
Changing the left dropdown box will adjust the timeframe and only count the documents posted during that time. Changing the right dropdown box will adjust the length of time that makes up the grouping.
For example, if you wish the chart to show the number of documents posted per week for the past month, you would set the left dropdown to Month and the right dropdown to Week.
- Click the
 icon in the bottom-left corner to hide/unhide individual chart categories.
 - Click the
 icon to hide/unhide the chart legend.
 - Click the
 icon to toggle on/off chart scaling.
 - Click the
 icon in the bottom-right corner to reload the results.
 - Click the
 icon in the bottom-right corner to save a .png file of the chart as it currently appears on-screen.
Documents by Extension#
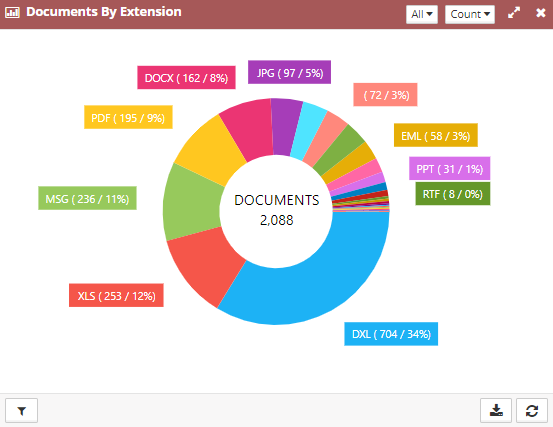
This panel displays a chart of the total size of documents or the number of documents for each file extension that has been posted to Viewpoint within the timeframe selected at the top of the panel.
- Click the
 icon in the bottom-left corner to hide/unhide individual chart categories.
 - Click the
 icon in the bottom-right corner to reload the results.
 - Click the
 icon in the bottom-right corner to save a .png file of the chart as it currently appears on-screen.
Documents Count by Stage#
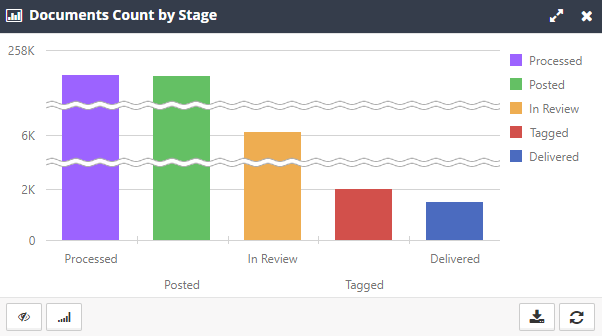
This panel displays a chart of the total number of documents that fall into each stage of the Viewpoint Project.
- Processed – This is the total number of documents present in the Viewpoint Processing application.
- Posted – This is the total number of documents posted to Viewpoint Review.
- In Review – This is the number of documents that exist in at least one View within the application.
- Tagged – This is the number of documents that have been tagged with a Production Tag.
- Delivered – This is the number of documents that have been delivered out of Viewpoint.
- Click the
 icon to hide/unhide the chart legend.
 - Click the
 icon to toggle on/off chart scaling.
 - Click the
 icon in the bottom-right corner to reload the results.
 - Click the
 icon in the bottom-right corner to save a .png file of the chart as it currently appears on-screen.
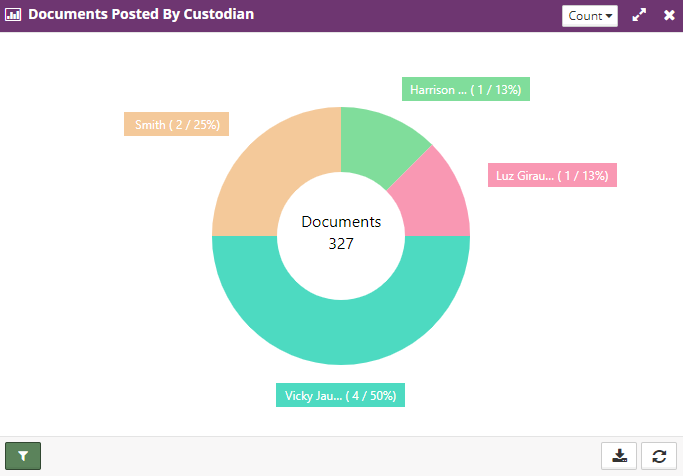
Documents Posted by Custodian#
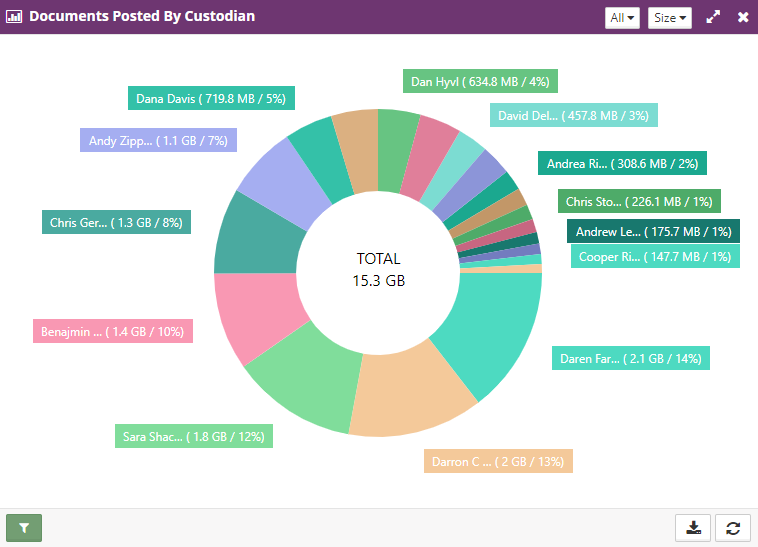
This panel displays a chart of the total size of documents or the number of documents for each custodian that have been posted to the Review application within the timeframe selected at the top of the panel.
- Click the
 icon in the bottom-left corner to hide/unhide individual chart categories.
 - Click the
 icon in the bottom-right corner to reload the results.
 - Click the
 icon in the bottom-right corner to save a .png file of the chart as it currently appears on-screen.
Custodians#
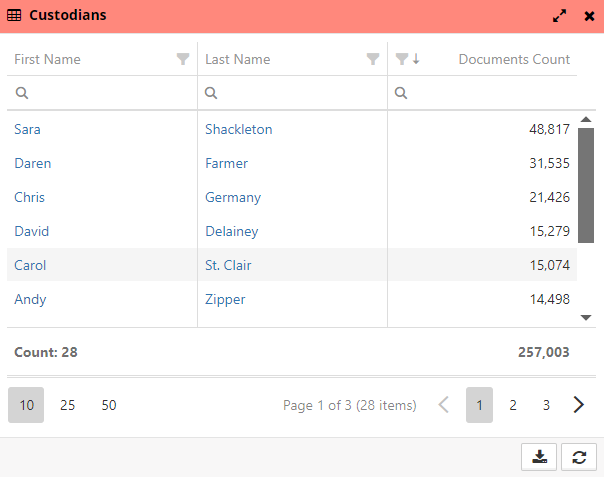
The Custodians panel lists all the custodians that are part of the Viewpoint Project and the number of documents associated with each of them. When you click a name, it will go to the Custodian Details page.
- Click the
 icon in the bottom-right corner to reload the results.
 - Click the
 icon in the bottom-right corner to save the .xlsx file that contains the records listed in the panel.
Automation Summary#
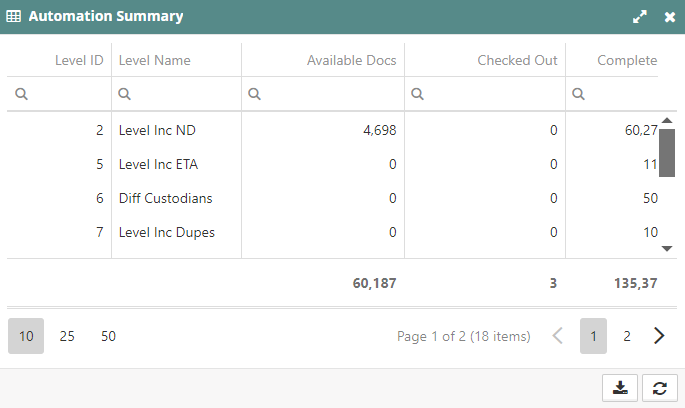
This panel provides an overview of the current status of Automation within the Project. Users can see the Automation levels and the number of documents that are available to be checked out, currently checked out and completed.
- Click the
 icon in the bottom-right corner to reload the results.
 - Click the
 icon in the bottom-right corner to save the .xlsx file that contains the records listed in the panel.
Active Users#
The Active Users panel displays all the Viewpoint users who have performed either tagging or redaction actions within the timeframe selected near the top-right section of the panel.
Changing the timeframe will limit the users and actions to those users who accessed projects during the selected timeframe and only count the actions performed during that same timeframe.
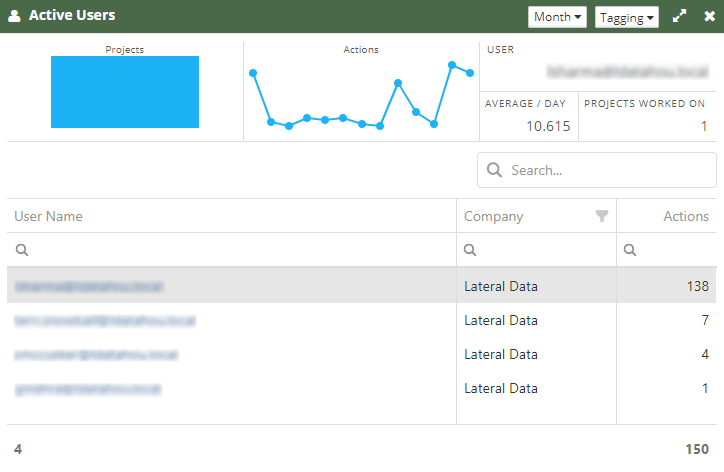
The list of users can be searched using the search bar above the list.
When you click the blue text of the User Name, it will go to a more detailed look at the specific user. These details will be covered in the User Details section.
When you click a user (though not the actual User Name) will populate the fields in the top section of the panel. Hovering over a data point on the charts will display information about the point.
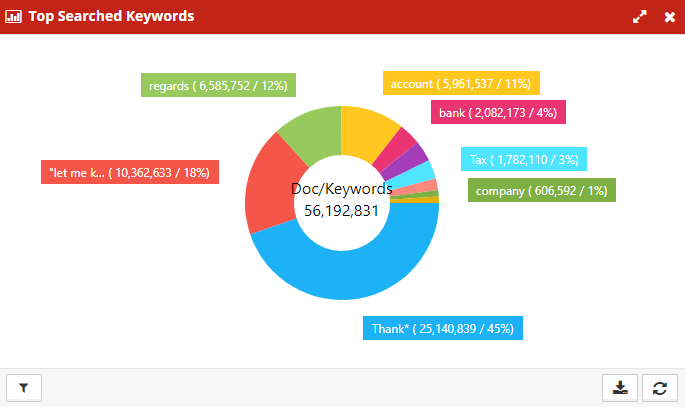
Top Searched Keywords#
This panel displays the top ten searched terms within the Project.
- Click the
 icon in the bottom-left corner to hide/unhide individual chart categories.
 - Click the
 icon in the bottom-right corner to reload the results.
 - Click the
 icon in the bottom-right corner to save a .png file of the chart as it currently appears on-screen.
Document Review#
To open Document Review, click the Documents Review button on the top tool bar from the Project Dashboard page.
Left Toolbar#
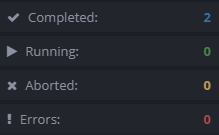
Job Counts#
The bottom of the left toolbar displays categories of Jobs that have been started on the currently selected Project. If you click anywhere in this section of the toolbar, it will open the Review Jobs Details window.
Note The numbers listed here also include any Jobs created from the Viewpoint Review desktop application.
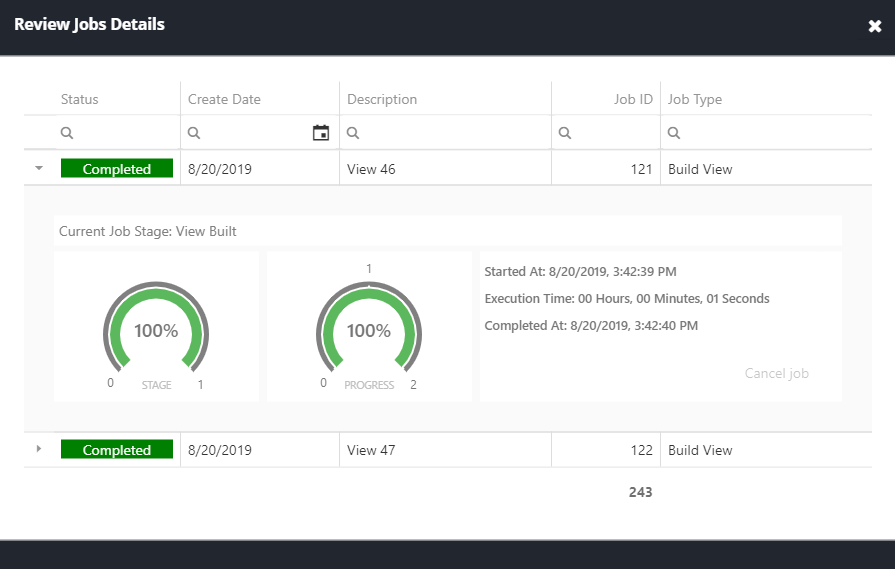
The Review Jobs Details window lists each of the Jobs performed on this Project. Click the small, grey triangle to the left of the record to expand/hide additional details about the Job. If a Job in progress becomes stuck for some reason, the Job can be canceled by expanding the details and then clicking Cancel Job.
Review Options#
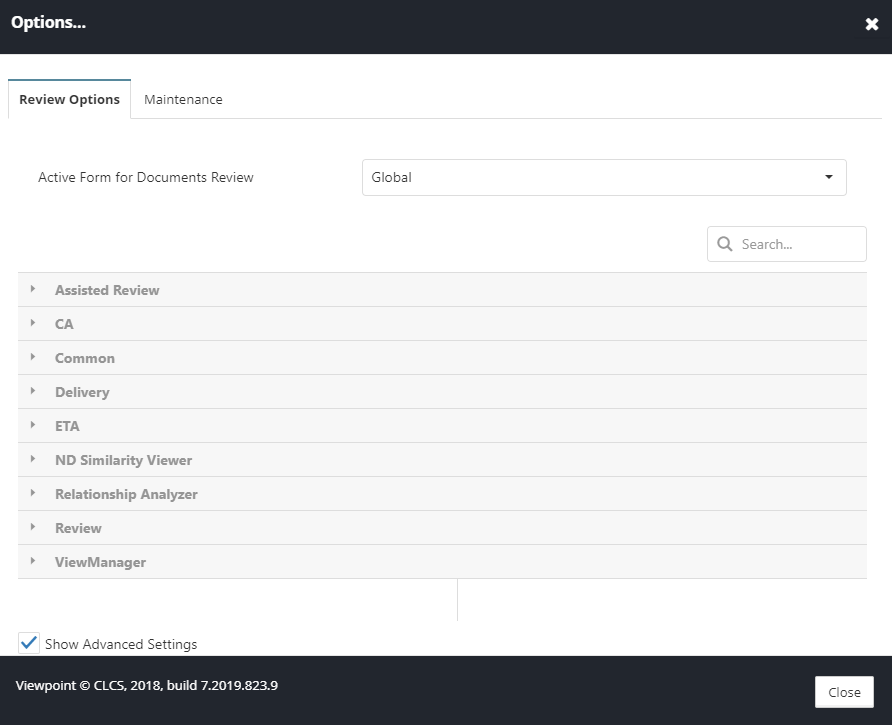
Click the Options button to open a list of options that affect the behavior of various parts of the application. Only the settings that belong to the Document Review page will be discussed in this section. Check the Show Advanced Settings box at the bottom to unhide the advanced settings and will highlight them in yellow.
Forms#
Viewpoint Forms are an entity allowing for multi-tenant document review. With Forms, opposing counsel, co-counsel or other parties can access the same Viewpoint Project without gaining access to one another’s work product. By using Forms, you can control the fields, tags, and redaction options that a user sees, as well as how they can interact with them. For more information on how to use Forms, refer to the Forms and Tagging Rules manual.
If multiple Forms are available in a Project, they can be switched to by selecting one of them from the Active Form for Documents Review dropdown box.
Common#
- Family Tagging Mode – When set to “TagPCAndTagIC”, any Production Tags or Issue Tags added/removed to one family member will be populated to all other family members. When set to “TagPC”, only Production Tag additions and removals will be copied to the entire family.
- Fast Mode – When ON, after selecting a Production Tag with no nested Issus Tags, the next document in sequence will automatically be selected. This option is compatible with single select Forms only.
- Include Family Members – When On, family members will be including when building a View or clicking the Review button.
Review#
- Copy Duplicate Documents Redactions – When ON, Viewpoint will search for any duplicate docs with redactions. If found, and redactions on all duplicated documents are the same, the user will be prompted if they wish to copy over the existing redactions to the current doc. If redactions are not the same on duplicate documents, the user will be given a message indicating which documents have different redactions.
- *Maximum File Size (MB) – Files over the designated size will not render in the applicable viewer. Instead, the user should click the “Download Native” button on the toolbar.
- *Ignore Keyword Colors – All keyword hits in the Highlights Viewer will be highlighted in green.
Note: Options denoted with an * are only available when the ‘Show Advanced Settings’ box is checked.
Maintenance Tab#
Refer to the Layout section of this document for more information.
Command Bar#
In Document Review, the top toolbar is a customizable Command Bar that provides the user with quick access to the most common and useful tasks. These Command Bar options are also available on many of the panels within the Documents Review page.

Click the grey  icon to customize the Command Bar. Add additional buttons by checking the box to the left of the name and click OK. The order of the buttons can be changed by clicking and dragging them into the desired order.
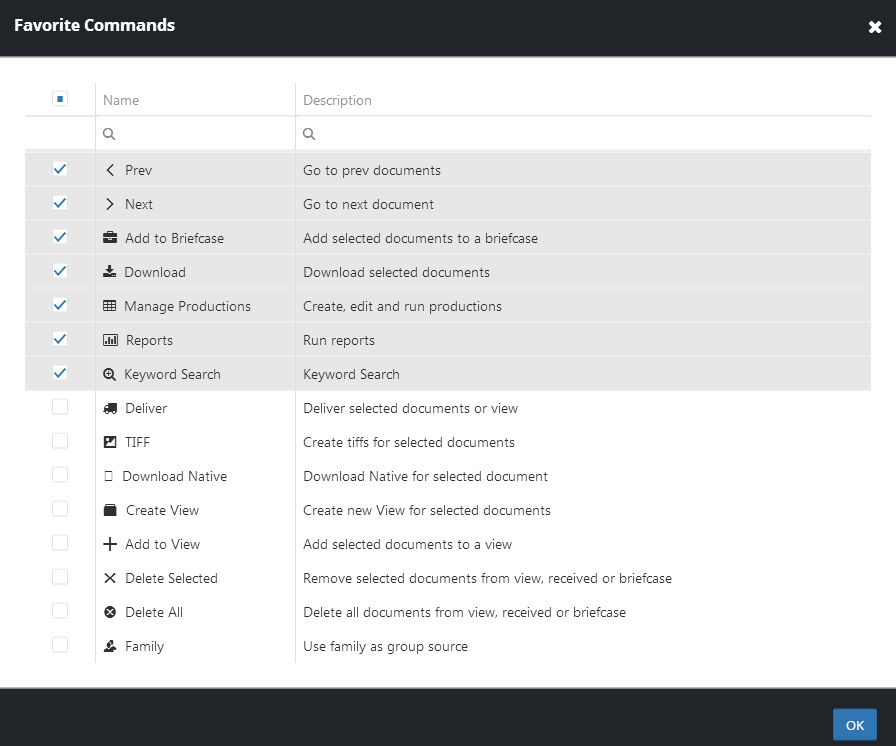
Note: The options checked in the image above are the default options for the top toolbar.
- Prev – Go to the previous document
- Next – Go to the next document
- Add to Briefcase – Add selected documents to the user’s Briefcase
- Download – Download selected documents (See below for more details)
- Manage Production – Create, edit and run productions (See Productions Dashboard for more details).
- Reports – Select and run reports (See Reports for more details)
- Keyword Search – Open the Keyword Search window (See below for more details)
- Deliver – Deliver selected documents or View (See below for more details)
- Tiff – Tiff selected documents on-the-fly
- Download Native – Download the native files of selected documents.
- Create View – Build a View from selected documents or all documents in the View (See below for more details).
- Add to View – Add selected documents to an existing View (See for more details)
- Delete Selected – Remove selected documents from the currently loaded View, Received, or Briefcase
- Delete All – Remove all documents from the currently loaded View, Received, or Briefcase
- Family – The Pivot panel will be filtered to show the selected documents grouped with their families, based on their ParentID values.
- ETA – The Pivot panel will be filtered to show the selected documents grouped based on ETA TreeID values.
- % Duplicates – The Pivot panel will be filtered to show the selected documents grouped based on ND and Dedupe Set values
- Received – Populate the Pivot panel with the documents the user has received via URL links (See below for more details)
- Export – Export an. XLSX file containing the currently added metadata fields in the Pivot panel for the selected documents
- Pivot Fields – Show the Fields Selector to add/removed fields from the Pivot panel
- Unselect All – Unselect all the currently selected documents in the Pivot panel
- Tagging Shortcut – Open the Tagging Shortcuts window (See below for more details)
- Copy Link – Copy a URL link to the currently selected documents which others can use to quickly see the same set of documents in their Received Documents list
- Briefcase – Populate the Pivot panel with the documents the user has added to their Briefcase (See below for more details)
- Refresh – Refresh the Pivot panel.
- Rapid Search – Build new Views with filters and keyword searching (See Rapid Search for more details).
- Keywords Manager – Open the Keyword Manager window to create and manage keyword highlighting lists (See below for more details)
Download#
Perform the following steps:
- When you click Download, it will open a dialog window to select the format in which the selected documents should be downloaded, as shown in the following screen:
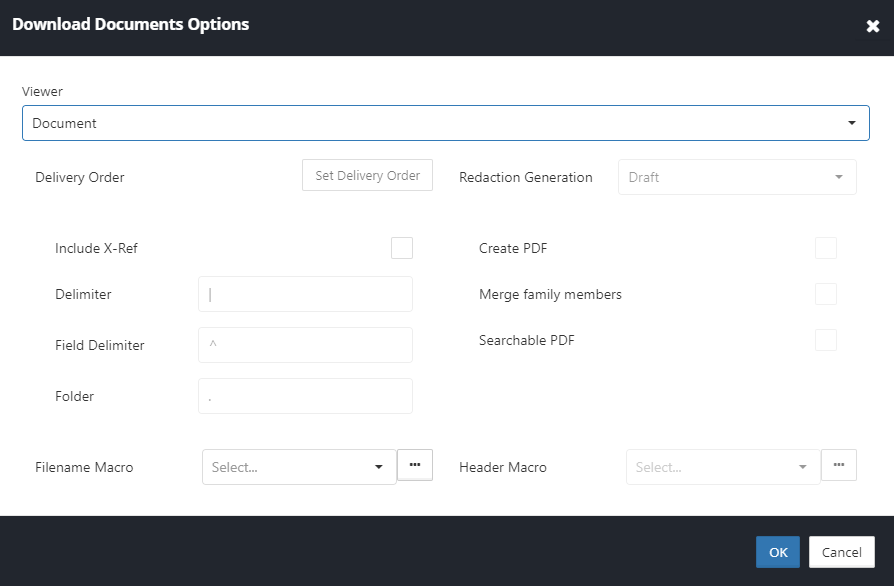
- In the Viewer dropdown option, select the desired Viewer. The Image, Production Image and Redaction options enable the PDF Options section.
- Check the Create PDF box to export the image-based Viewer in PDF format instead of individual images. The Searchable PDF option will allow the PDF to be saved in a text-searchable format instead of image-based. The Merge Family Members option will allow the family members of production tiffs to be merged into a single PDF.
Note: The Make PDF Searchable option requires an Impersonation Staging Area location to be used. This location can be set in the Configuration Settings found on the Project tab of the Processing application.
- Select the Redaction Viewer to enable the Redaction Generation options below the Viewer selection. This allows the user to either save the Final version of the redacted document as displayed in the Doc Viewer, or the Draft version of the redacted document as displayed in the Redaction Viewer.
- Select either Production Image or Production Text to enable the Set Delivery Order button. This allows the user to set the order of precedence if the documents were included in multiple deliveries. It will save the first production image/text that exists in the list, starting at the top. If a document does not have a production image/text in the first delivery in the list, it will check the next one, and down the list until it finds a delivery where that document does have a production image/text.
- If the Image Viewer is selected, the Header Macro option is enabled, allowing the user to click the ellipsis to the right of the Header field to select which field(s) to use as a header.
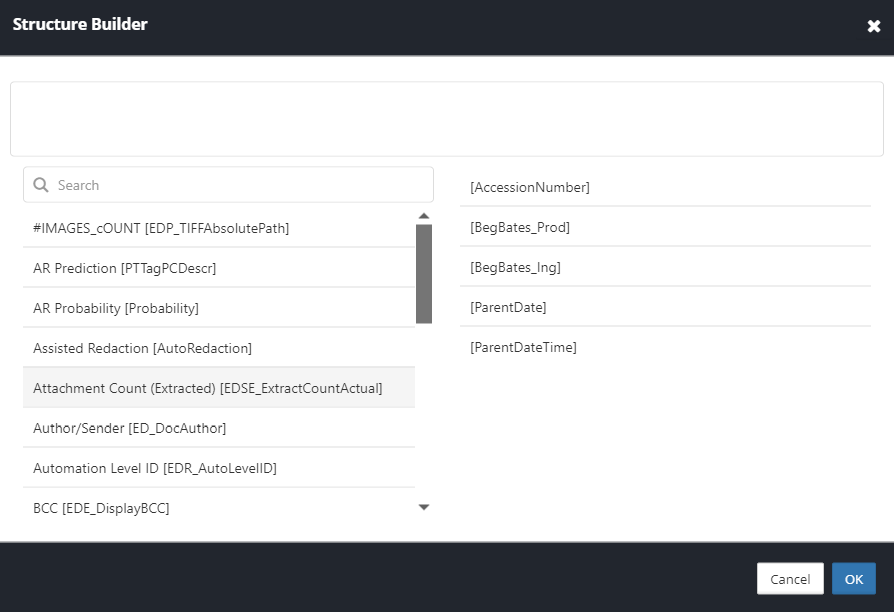
- Use the Structure Builder window to create a header. Anything typed or added into the top section will be included in the header. Double-click on a listed field to add it to the top section.
- To name the files that will be downloaded, click the ellipsis to the right of the Filename Macro field to open the Structure Builder. The top section is where the file name structure is displayed. It can be typed in directly or double-click on the fields below will add them to the naming structure at the top.
- Click OK to continue, as shown in the following screen:
- Check the Include X-Ref box if a cross-reference file is also needed. Adjust the Delimiter and Field Delimiter values as needed.
- The Downloaded files will be saved to the default download location set by the user’s browser settings.
Keyword Search#
Perform the following steps:
- Enter or paste in a list of terms one per line, as shown in the following screen:
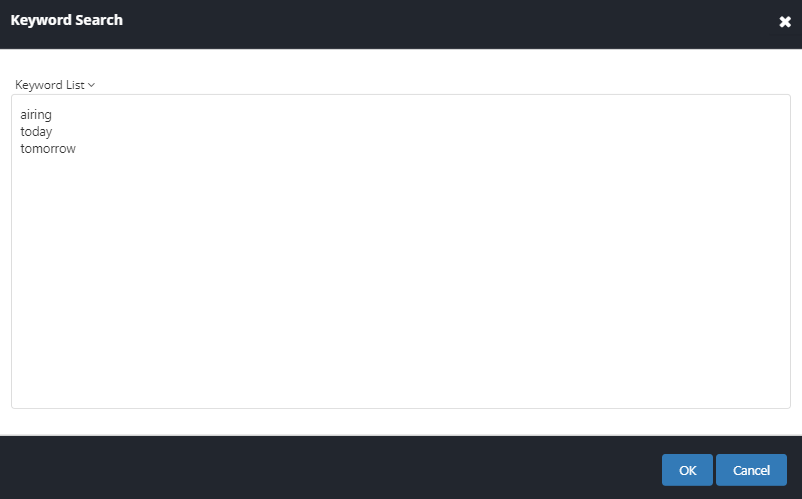
- Terms from Keyword Lists can be imported by clicking Keyword List at the top of the text box.
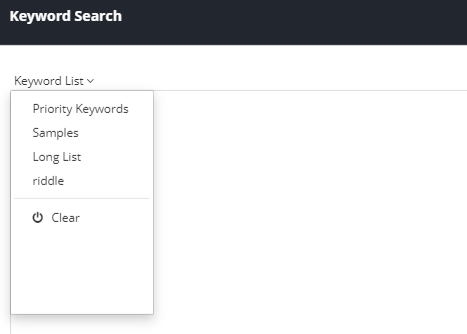
- Click OK to run the search and update the Pivot panel to list only the hits. The Search Terms panel will also be updated with the details of the new hit.
Deliver#
Perform the following steps:
- Click the Deliver button to open a dialog window and select which documents to use.
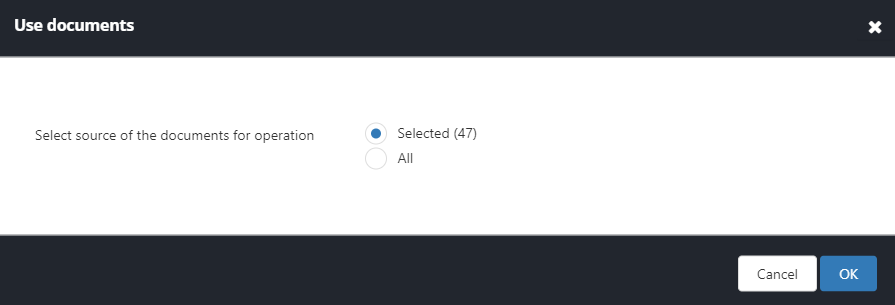
- Select the Selected check box, which will only use the documents the user currently has selected from the Pivot panel. The number of documents will be shown in parentheses.
- The All option will use the current View as the production source.
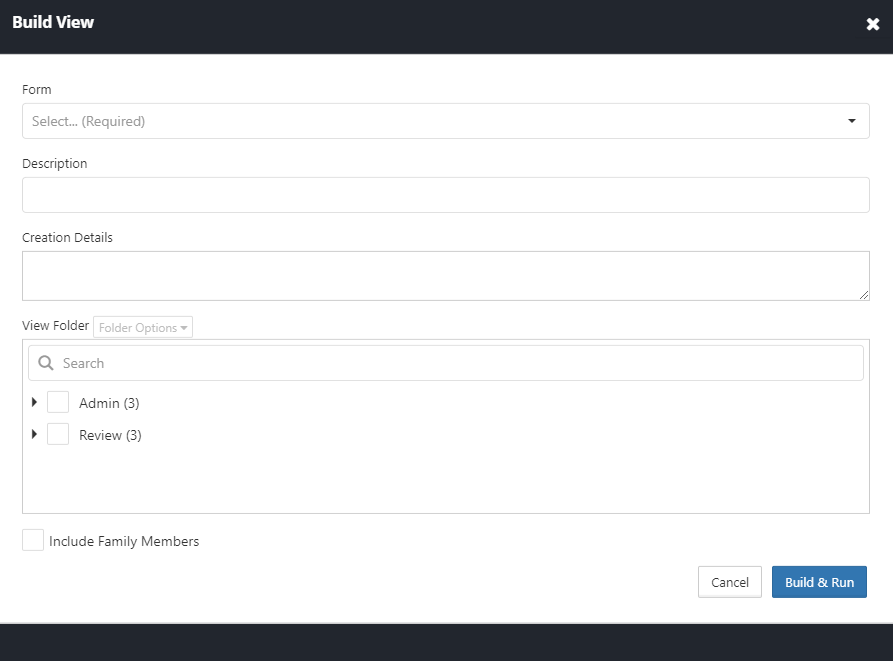
- When you click OK with the Selected option which will then ask the user to build a View for the selected documents and can be used as the source for the production.
- Select the Form that should be used for the View and add a description and creation details, if desired.
- Select the folder the View should be created in, and then whether the View should include any family members of the selected documents.
- Use the Folder Option dropdown menu to create/edit/delete View folders.
- Click Build & Run to continue, as shown in the following screen:
- After a View has been built for the selected documents, or if All was selected on the first window, the New Production window will appear. Give the production a name and verify the View and the Form selected.
- To use a template, check the Use Template box and then select a template from the dropdown box.
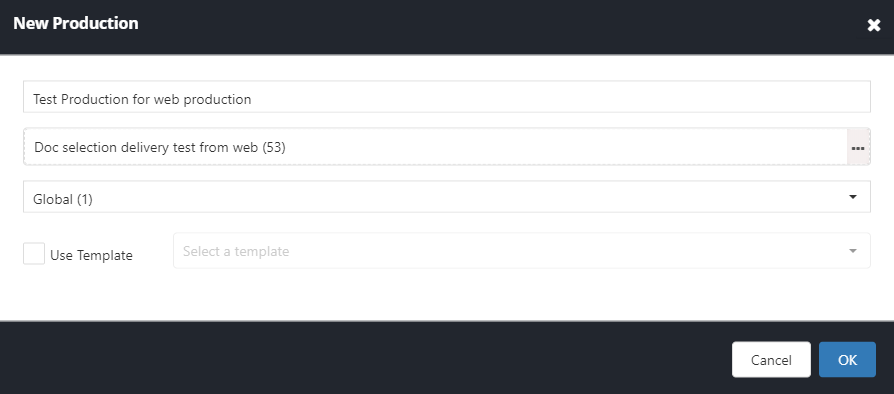
- Click OK. From here, the user will be taken to the Production page to finalize the production and start the job.
Note: Refer to the Productions section of this manual for more details on the production process.
Create View#
To create a view, perform the following steps:
- Click the Create View button, the following dialog box appears:
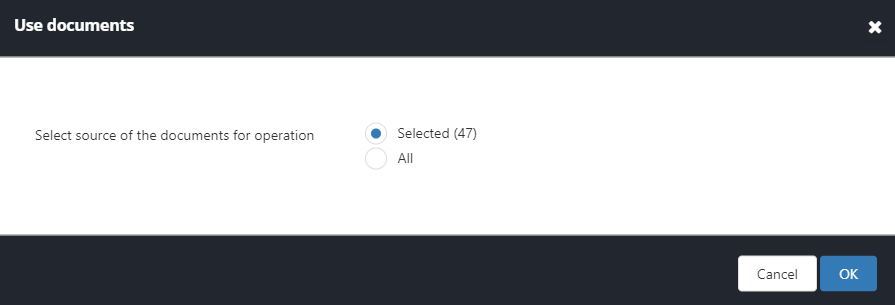
- Select the desired source of documents to be used from the available list.
- The Selected option will only use the documents the user currently has selected from the Pivot panel. The number of documents will be shown in parentheses.
- The All option will use the current View as the source.
- Click OK, the following Build View window appears:
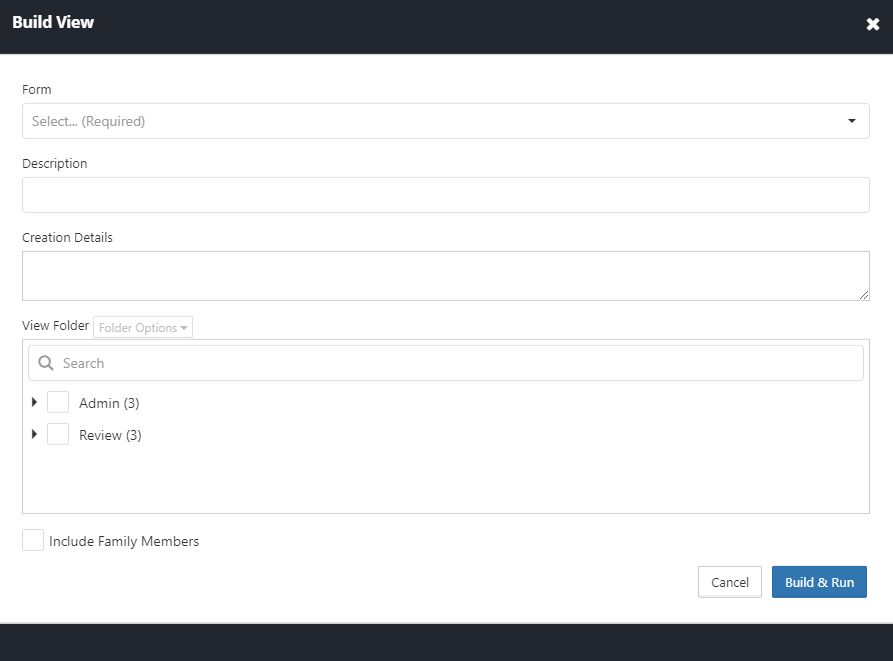
- Select the appropriate Form that should be used for the View.
- Add a description in the provided field.
- Provide creation details in the provided field, if desired.
- View Folder: Select the folder the View should be created in, and then whether the View should include any family members of the selected documents.
- Use the Folder Option dropdown menu to create/edit/delete View folders.
- Finally, click Build & Run to build the View.
Add to View#
Perform the following steps:
- Click the Add to View button, the following dialog window appears:
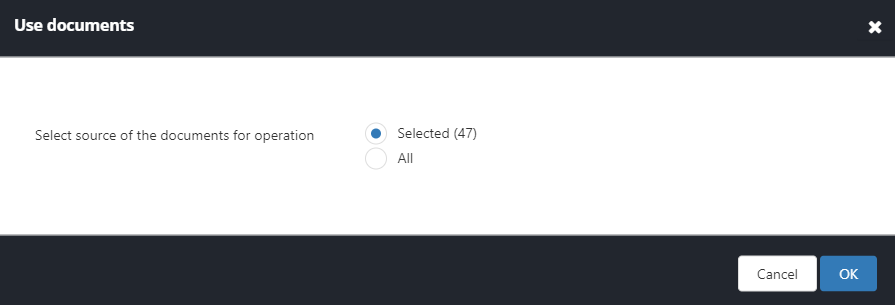
- Select the desired source of documents to be used from the available list.
- The Selected option will only use the documents the user currently has selected from the Pivot panel. The number of documents will be shown in parentheses.
- The All option will add all the documents in the current View to the View selected in the next window.
- Click OK, the following View Selection window appears:
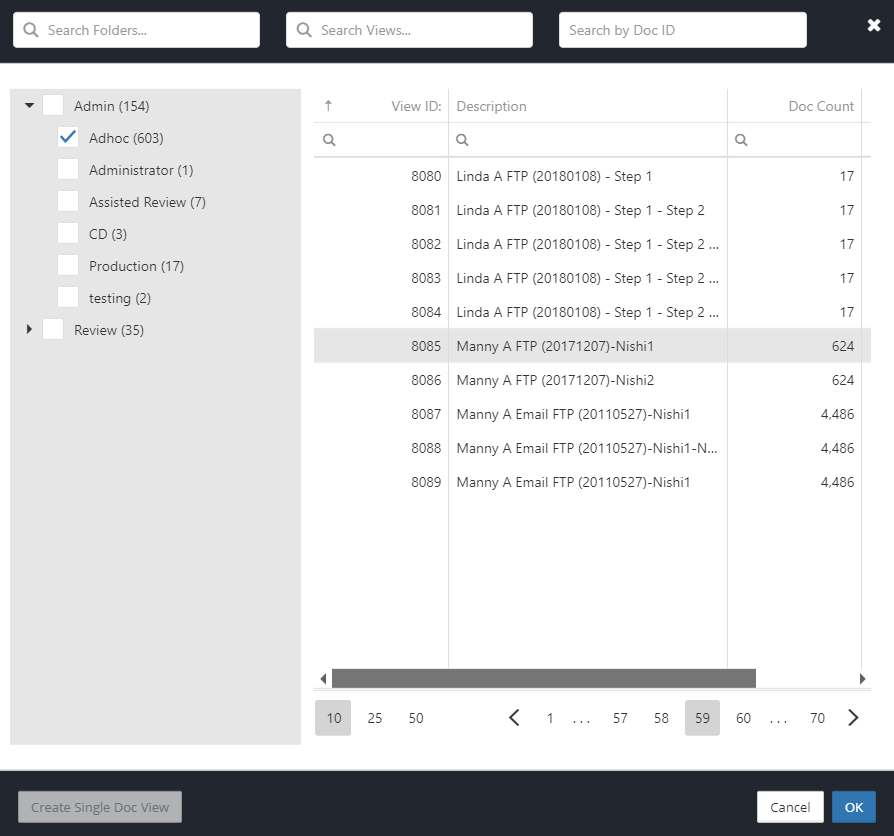
- Find the View to add documents using the filter/search options.
- Click View to select.
- Click OK to add the documents to the selected View.
Received#
- Received Documents are meant as a means to quickly share a group of documents between Viewpoint users without having to build a View.
- When a user selects a document(s) from the Pivot panel and click Copy Link from the Command Bar, a URL link is copied to the clipboard that can be sent to other users.
- Received documents are those documents that have been shared with a user via a URL link that the user browsed to. A typical URL would look something like: http://[servername]/review/review/387?docids=1770,2625,2618,2616,2605.
- When a user clicks on the link or enters that address in the browser. Those documents are automatically displayed in the Pivot panel and added to the user’s Received list of documents.
- Documents will remain in the Received list until the user deletes them from the list.
- To delete documents from the Received list, make sure that the Received list is what is being displayed in the Pivot panel.
- Select documents from the list and click Delete Selected, or click Delete All to remove all documents from the Received list.
Tagging Shortcuts#
Users may customize keyboard shortcuts for Production Tags and Issue Tags for each Viewpoint Project. The left side lists the Production Tags, while the right lists the Issue Tags, as shown in the following screen:
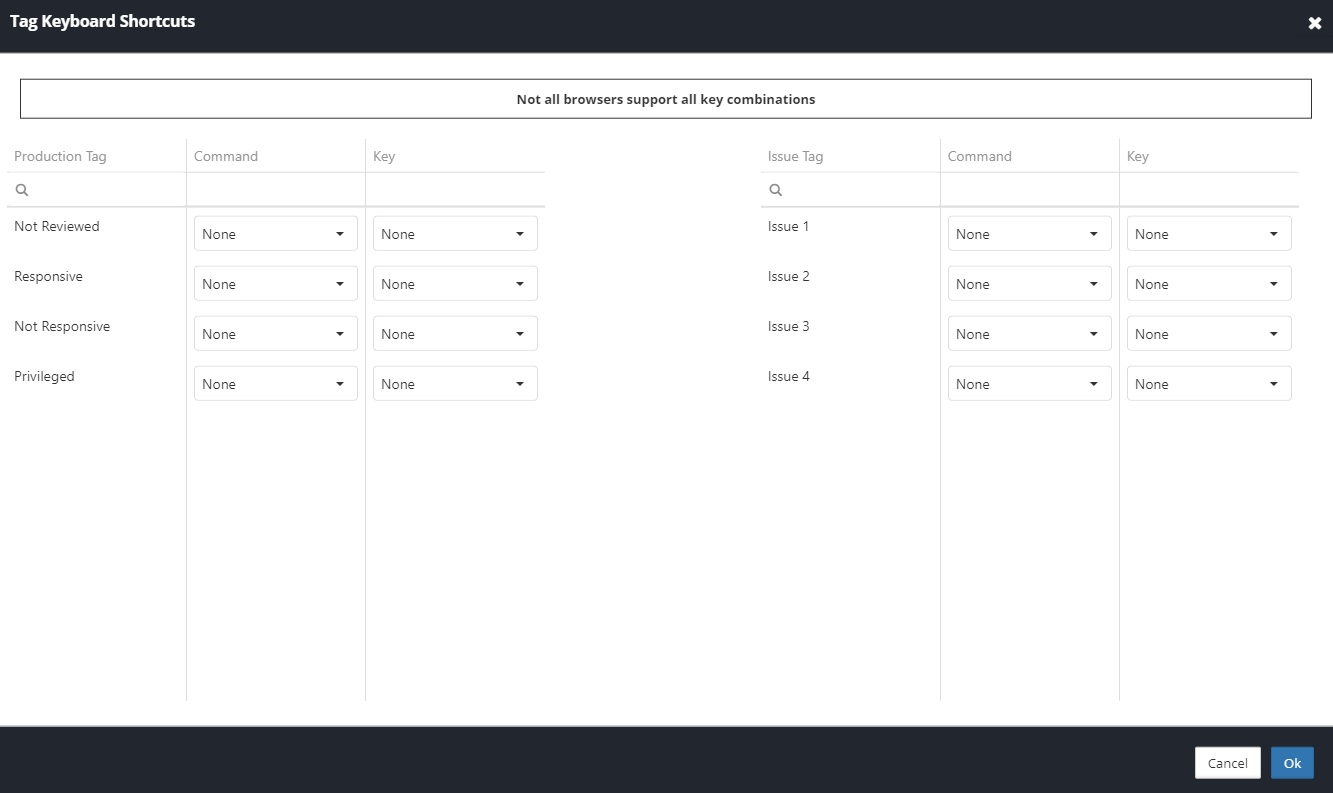
- Select a Command and Key for any desired tags.
- When ready, click OK to save any changes. Shortcuts are stored on a per-user-per-project basis.
Briefcase#
- The Briefcase is meant as a type of bookmark for a user. It is a collection of documents that a user is currently working on or may need to refer to frequently.
- Documents can be added to a user’s Briefcase by selecting a document(s) and clicking “Add to Briefcase” either from the top Command bar or from the command bar on the Pivot Panel.
- Documents will remain in the Briefcase until the user deletes them from the list.
- To delete documents from the Briefcase, make sure that the Briefcase is what is being displayed in the Pivot panel, then select documents from the list and click “Delete Selected,” or click “Delete All” to remove all documents from the Briefcase.
Keywords Manager#
The keyword lists control the term highlighting behavior in Viewpoint.
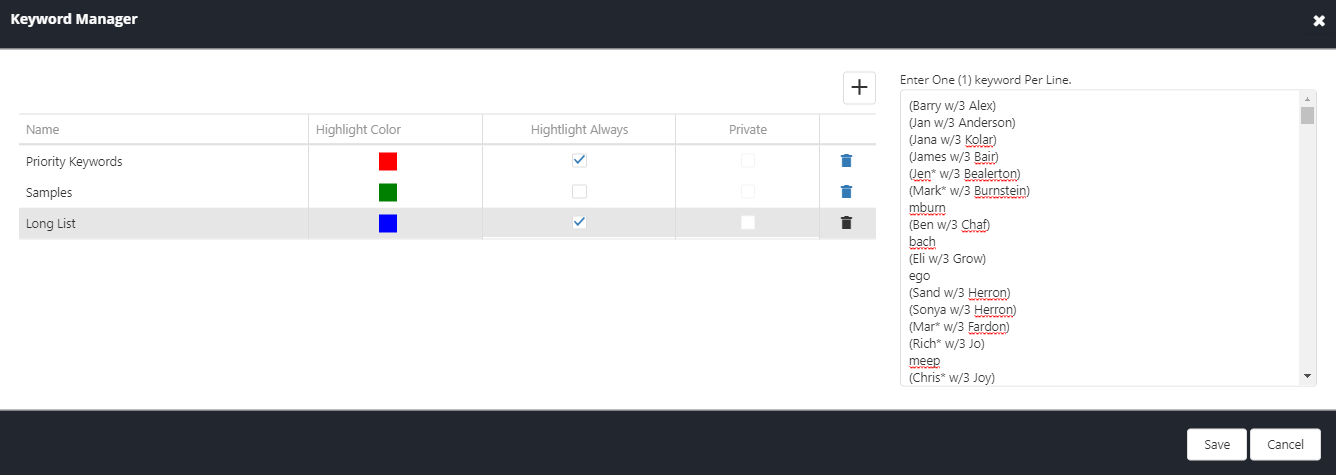
To create a new list, perform the following steps:
- Click the
 button near the top-middle of the window. This will create a new record in the list.
 - On the left-hand side in the Name field, enter in a new keyword list name.
- Check the Highlight Always box to have the list of terms always highlighted in the Highlights Viewer.
- On the right-hand side, input your list of terms (one per line) or paste in a list of terms.
- By default, terms will be highlighted in green. To change the highlight color for a list, make sure the Highlight Always box is checked and then click the color box to select a new color.
- Click Save when complete. The terms will be validated before the window closes.
Note: Currently, Private keyword lists can only be created through the Viewpoint Desktop application.
- Click the
 icon to delete a Keyword List.
Pivot Panel#
- The Pivot panel serves as the main document grid within the Viewpoint Web Review.
- Users can add/remove metadata fields to display the most pertinent information about each document.
- Selecting a document from the Pivot panel will also trigger the other panels on the screen to refresh with the information relevant to the selected document.

- The
 and
and  buttons moves between the displayed command options on the next row down.
 - The
 button will reload the current list of documents.
 - The
 button will quickly switch the documents list to display the contents of the user’s Briefcase, which is covered in a previous section.
 - Click the
 button to quickly switch the documents list to display the contents of the user’s Received Documents, which is also covered in a previous section.
Source Selection#
The dropdown box in the middle of the toolbar is the source selector.
Perform the following steps:
- Click the button to display the options.
- Select a View or display All Scopes.
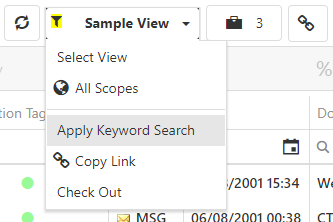
- The option “Apply Keyword Search” controls whether the currently loaded list of documents is filtered based on keywords in the Search Terms panel. If the View name or All Scopes has a highlighted filter icon
 next to it, then the list of documents in the Pivot panel are only displaying documents that hit on the terms specified in the Search Terms panel.
 - Click the “Apply Keyword Filter” option again to turn off keyword filtering.
- The “Copy Link” option will copy a URL link to the user’s currently loaded View to the user’s clipboard.
Note that this is different than the “Copy Link” option in the Command Bar options, which copies a link to specific documents.
- If the Viewpoint Automation is being used in the project, and the user has been set up with access to check out batches of documents to review, the dropdown box will also include a “Check Out” option.
- When you click, a window will open containing the list of Automation levels the user is assigned to and the number of documents contained in each level.
- Select a level and click OK, it will check out a batch of documents for the user to review.
- After the documents have been reviewed, the user can then select “Check In” from the same source selection dropdown box.
- Click “All Scopes” to populate the Pivot panel with the documents from all the Scopes posted to Review. Clicking “Select View” will open the View selection window.
- Click View.
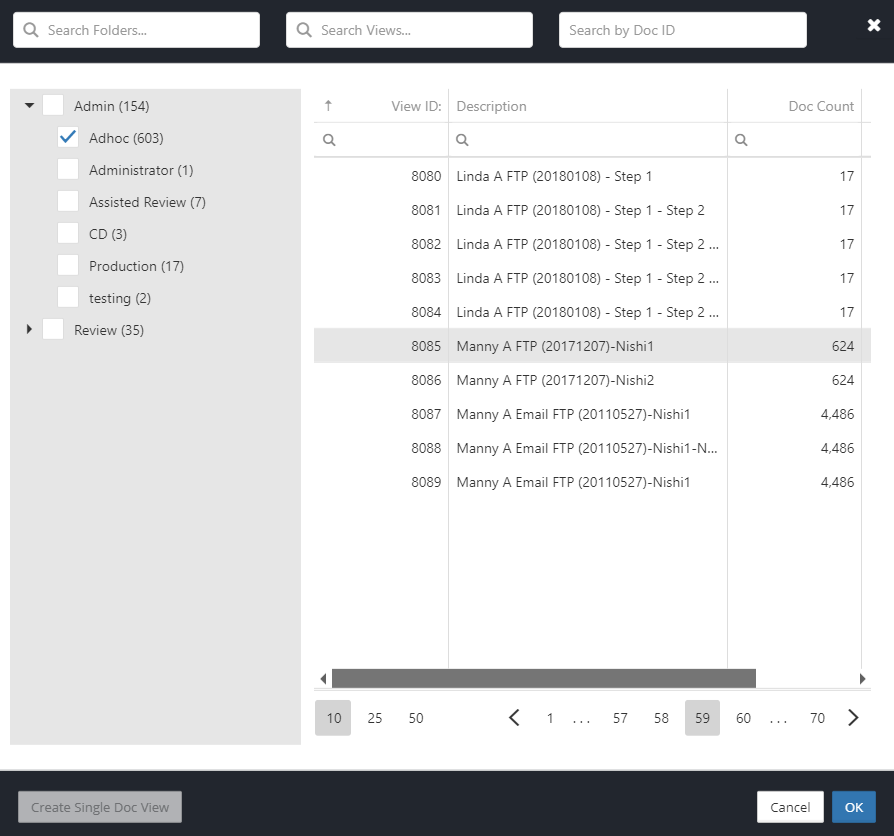
- Click “OK” to populate the Pivot panel with the documents in that View.
Command Options#
Much like the Command Bar at the top of the window, the Pivot panel has many of the same options built into the panel. All these options are covered in the Command Bar section.
Metadata Fields#
The fields displayed in the Pivot panel is customizable by each user.
- Fields can be reordered by clicking on a field name and dragging the column to a new place.
- Refer to the Sorting and Filtering section for specifics on sorting and filtering lists in Viewpoint.

- To add a field(s), click the Pivot Fields button on the Command Options bar to open the Fields Selector.
- The list can be searched by using the Search box at the top.
- Click and drag the field on to the Pivot panel and add it.
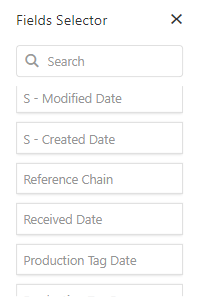
- To remove a field(s), use the same Fields Selector to click and drag fields from the Pivot panel back in to the Fields Selector.
Document Viewer Panel#
When a document is selected in the Pivot panel, the Document Viewer panel will render the document using the selected Viewer type.
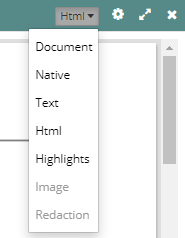
- Select a Viewer type by clicking the dropdown box near the upper-right corner of the panel.
- Click the desired option from the available list. Each of the Viewers will be covered in the following details. Not all Viewers are available for all documents.
Note: The default maximum file size for the Viewers to display is 10MB. This limit can be changed by updating the WebViewerMaxFileSize value in the Configuration table of the LDControl database.
- For the Native and Document Viewers, a document navigation and display toolbar can be added by clicking the
 button and selecting “Show Main Viewer Toolbar.”

- This allows the user to switch between the pages, zoom in/out, select text, find text, and display the document full screen.
- Using the Document and Native Viewers, many multimedia files can be played directly in the application without the need to open the file outside of Viewpoint.
- If the file is compatible with the player and the Doc or Native Viewer is visible, the Viewer will display control buttons.
- Media files can be made to play automatically when you select in the Pivot panel.
- Click the
 button and select the “Autoplay media files.”
Toolbar#
Command Bar buttons can also be added directly to the Viewer panel.
- Click the
 button at the top.
 - Click Show Commands.
- Click the gear-looking button that appears underneath which allows the user to add or remove Command buttons as needed.
These commands are the same as Command Bar at the top.
Document Viewer#
The Document Viewer is the default viewer which displays the preferred version of each document, typically depending on the type of document. For example, .msg file will display the HTML render of the document, while the .docx file will display the native render.
Native Viewer#
The Native Viewer displays an emulated render of the native document.
Text Viewer#
The Text Viewer displays the extracted text of the document.
Delivery Text#
If the document has been produced in at least one Delivery, the delivery text can be displayed by selecting a Delivery from the box that reads Select a Delivery, as shown in the following screen:
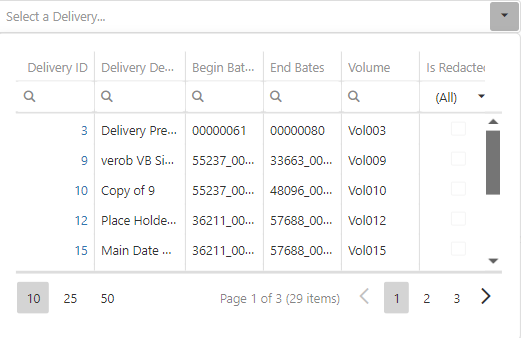
The delivery text will display the final version of the produced text. If the document was redacted or had a Bates number appended, the post-redaction OCR and Bates numbers will be visible.
Highlights Viewer#
The Highlights Viewer is used to display keyword highlighting within the text of the document. The highlighting is controlled using the Search Terms panel.
- Check or uncheck terms and then click Apply in the Search Terms panel which will change what terms or lists of terms are highlighted in the Viewer.
- Hits from searches using the Keyword Search function will always be highlighted yellow and take precedence over other highlight colors. Keyword Lists highlighting colors are controlled through the Keywords Manager.
- There are some options that can help the user easily find highlighted terms in a document.
- When you click the
 button at the top, it will display two options specific to the Highlights Viewer.
 - Highlights – Show areas around hits – This will hide large blocks of text between the highlighted terms and only display the text surrounding the highlight. The hidden text can be expanded out by clicking the boxes between the visible text areas that read “[x] more word(s).” Turn this feature off by clicking the options button again and select “Highlights – Show full document.”
- Highlights – Show hits map – This will extend the document scroll bar out to the side in order to display where the highlights appear within the document. Turn this feature off by clicking the options button again and selecting “Highlights – Hide hits map.”
Image Viewer#
The Image Viewer displays the generated image of the document. Click the left or right arrow buttons to move between the pages, or just type in a page number in the text box between the arrows.
Perform the following steps:
- Click
 to zoom in on the image.
 - Click
 to zoom out on the image.
 - Click
 to fit the image the page.
 - Click
 to display the image at its original size. The image can be rotated by choosing an option from the Rotate dropdown box.
Note: Rotating an image is a temporary change. The orientation will revert when another document is selected.
Delivery Image#
If the document has been produced in at least one Delivery, the delivery image can be displayed by selecting a Delivery from the box that reads, “Select a Delivery.” The delivery image will display any existing redactions and branding.
Redaction Viewer#
Note: In order to redact a document, a Tiff rendering of the document must exist and the user must have the Redaction permission.

Place a Redaction#
To place a redaction, perform the following steps:
- To redact a document, select the desired document in the Pivot panel.
- In the Viewer panel, switch to the Redaction Viewer.
- Within the Redaction Viewer, there are options at the top to help configure the document before redacting.
- Click
 to zoom in on the image.
 - Click
 to zoom out on the image.
 - Click
 to fit the image the page.
 - Click
 to display the image at its original size.
 - The image can be rotated by choosing an option from the Rotate dropdown box.
Note: Rotating an image is a temporary change. The orientation will revert when another document is selected.
- Select a color from the Draft Color selector at the top-left. The color selector is useful for differentiating redaction draft sets. One reviewer, for instance, can be assigned green, while another could be assigned red.
- Select an option from the Final Color drop down. This will be the color of your final redacted segments.
- Using the Label box, type in or select from among the existing redaction labels and select a font size.
Note: If using a global Form, users can type in a custom label or select from any existing redaction labels. If using a non-global Form, users can only select from the labels in the dropdown list. Available labels are controlled from the Redactions tab in the Forms Manager of the desktop application.
- Holding down the left-click button on the mouse, drag a box around the portion(s) of the document to be redacted. Multiple boxes can be placed on each page of the document.
- To adjust the size or placement of a redaction, click on the redaction to select it. Click and drag the redaction to move it, or adjust the size as needed. To change the label, draft color, or final color, refer to the Modify Redaction section below.
- Redactions are saved as coordinates and the final redactions will only be “burned in” then the document is delivered.
Note: Viewpoint does support multiple redaction sets per document. Redaction sets will be tied to Forms in this case. Upon delivery, redactions will be based on the Form selected. To turn this feature on, the KeyName, ‘StoreFormIDsWithRedactions’ must be added with a KeyValue of ‘True’ to the Configuration table of the project database.
Reset a Redaction#
To reset the current page, click the Reset button at the top. To reset the entire document, click the Reset All button.
Note: Resetting redactions will also affect any auto redactions that may exist.
Modify a Redaction#
To Modify a Redaction, perform the following steps:
- Enter in the desired changes to the Draft Color, Final Color, and/or Redaction Label.
- Click on the redaction that needs to be modified.
- Click the Modify button and select the desired modification option.
Delete a Redaction#
Click on the redaction to select it. Press the Delete key to remove the selected redaction.
Reverse Image Redaction#
- Holding down the left mouse button, drag a box around the portion(s) of the document which should not be redacted for that page/document.
- Click the Invert button.
- Click Invert again to invert only the current page or click Invert All to invert the entire document. Except for the section(s) that was not redacted, the document will now be displayed with the selected draft color in the Redaction Viewer.
Copy/Paste Redaction#
Redaction coordinates of a page (not individual redactions) can be copied and pasted to other pages of the same document, or to other documents.
Note: Be aware that only the redaction coordinates are copied. The draft color, final color and redaction label will use the user’s current settings when redactions are pasted.
- Go to the page with the redactions to be copied and click the
 icon to copy all the redaction coordinates on the page.
 - To paste a redaction, go to the document you wish to paste redaction coordinates into.
- Enter the page range the copied redaction coordinates should be pasted into by using the Start and End Page fields in the toolbar.
- Click the
 button on the redaction toolbar to paste the redaction coordinates.
Note: Copy/Pasted redactions are categorized as Auto Redactions within Viewpoint. This means they must be checked for accuracy and marked as either approved or unapproved before delivery. If pasted redactions have not been approved/unapproved, the document will cause the Delivery to receive a numbering error. Currently, Auto Redactions can only be approved/unapproved from the Viewpoint Review desktop application.
Work Product Panel#
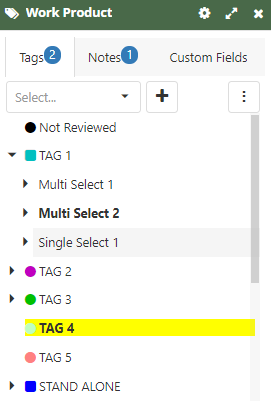
The Work Product Panel is where tags, notes, and custom fields are found within the Viewpoint Review. Each of these tabs are explained in the following sections. Small, blue numbered circles next to the tab name denote how many tags, notes, or editable custom fields have been applied to the currently selected document.
Toolbar#
Command Bar buttons can also be added directly to the Viewer panel.
- Click the
 button at the top and click “Show Commands.”
 - Click the gear-looking button that appears underneath which allows the user to add or remove Command buttons as needed.
These commands are the same as is available in the Command Bar at the top.
Tags#
Review teams can setup production tags and issue tags to facilitate their document review. Common production tags include Not Responsive, Responsive or privileged, while common issue tags might be a confidentiality designation, privilege claim or issue codes specific to the case. Tags are created in the Setup menu in View Manager within the desktop application.
Production tag is the highest-level tag and will always be listed at the root of the tagging panel. Usually, a document is assigned one production tag; however, Viewpoint Forms can be setup to allow users to select multiple production tags. Issue tags are nested under production tags and grouped into issue tag categories. A production tag can have multiple issue tag categories. Also, issue tags can be setup as a single (circle) or multiple (square) values.
Applying Tags#
To tag a document, select one or more documents from the Pivot panel.
- Click the desired tag.
- The selected Production tags will be highlighted yellow.
- The selected categories and Issue tags will be bolded.
Tagging Macros#
Combinations of frequently used tags can be setup as a macro to speed up the tagging process.

To create a Macro, perform the following steps:
- Select a document that is tagged with the desired tagging.
- Click the
 icon. This will add the tagging combination to the dropdown list.
 - To apply this macro to another document, or group of documents, select the document(s) before selecting the macro from the dropdown list.
- Click the
 icon.
icon. - To remove a macro from the dropdown list, select it from the list and then click the
 icon.
icon.
Tagging Shortcuts#
Customizable keyboard shortcuts can be created by the user to help speed up the individual document tagging process.
- To tag shortcuts, click the
 icon from the Command Bar at the top of the page, or by adding the icon to the Work Product panel by opening the Customize Command Bar menu.
 - Check the box for Tagging Shortcuts.
- To create shortcut, select a combination of a command and key values that is distinct from any other pre-existing shortcut.
- Click “OK.”
Adding Issue Tags#
If a user has the “Add Issue Tag On-The-Fly” permission, they can add a new Issue tag.
- Right-click on the desired Issue tag category and select “New Issue Tag.”
- Give the tag a name.
- Click “OK.”
Managing Tags#
Setting up tags within Viewpoint is handled through the Tags Manager in the View Manager of the Viewpoint Review desktop application.
Notes#
Document notes are used to attach notes to the selected document. These notes are visible to anyone with the “Access Notes” permission. There is not a set limit to the number of notes that can be attached to a document.
- To add a note, click the
 icon. This will automatically create a new row in the Notes list and the user can immediately start typing a note.
 - To edit a note, click the text of the Notes field and enter text.
- The contents of notes can be searched by using the search field provided on the right side of the panel.
- To delete a note, click the
 icon on the far-right side of the note record. A confirmation window will pop up before the note is deleted.
Custom Fields#
- Custom fields are user-created fields that contain information specific to the individual Viewpoint Project. Custom fields are created either in the Viewpoint Processing application or Viewpoint Review desktop application.
- Custom field names and values can be searched by using the search field provided on the right side of the panel.
- Custom fields shaded grey are static and cannot be changed by users. Unshaded fields are editable by the user.
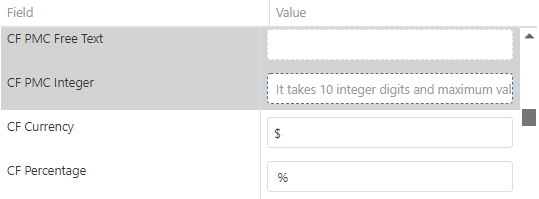
Note: Custom fields that were created in the Processing application and posted to Review will also be listed here. By default, custom fields from the Processing application are not editable in Review. To make one of these fields editable, it needs to be made editable in the Processing application and then an Update Post performed to make it editable in the Review application.
Search Terms Panel#
Viewpoint Search Terms Panel lists all the search terms that contains the selected document. It is also used to control which terms and keyword lists are highlighted in the Highlights Viewer.
- Check or uncheck terms and then click “Apply” in the Search Terms panel. This will change which terms or lists of terms are highlighted in the Highlights Viewer.
- Click the small filter icon to the right of a search term to filter the current list of documents in the Pivot panel to only show the documents with that specific term. This filter option is not available keyword list terms.
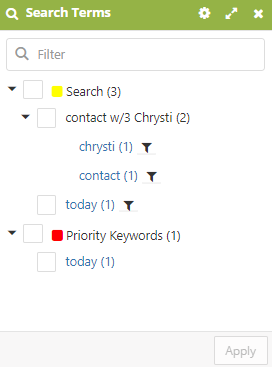
Hits from searches using the Keyword Search function will always be highlighted yellow and take precedence over other highlight colors. Keyword Lists highlighting colors are controlled through the Keywords Manager.
The Keyword Search and Keywords Manager buttons can be added directly to the Search Terms Panel.
- Click the Options button at the top of the panel.
- Check the “Show Commands” box.
- Click the Command Options icon.
- Check the boxes for Keyword Search and/or Keywords Manager.
Note: Access to the Keywords Manager requires the user to have the View Manager permission.
Production History Panel#
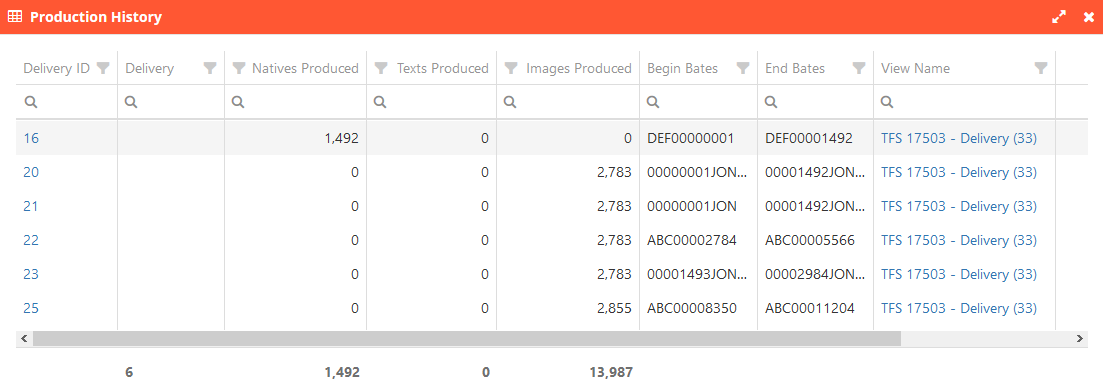
The Production History Panel makes it easier for the user to see in which Productions the selected doc was included.
- Click the blue text of a View Name value to load that View in the Pivot panel.
- Click the blue text of a Delivery ID value to open the dashboard for that specific Production.
Vertical Fields Panel#
The Vertical Field panel is used to provide a more efficient look at the currently selected document’s metadata field values.
- To add/remove fields from the list, click the
 icon.
icon. - Select the Field Selector.
- Check/uncheck the box next to the field name to add/remove it from the panel. The order of the fields can be rearranged by clicking and dragging the field text to the desired order.
- All the fields with empty values can be hidden/unhidden.
- Select the “Hide Empty Fields” option from the Options menu at the top of the panel.
- Field names and values can be searched by using the search field provided on the top-right side of the panel.
Rapid Search#
The Rapid Search is a tool to quickly and efficiently perform complex, multi-step filtering. The tool also provides visibility into how each step affects the final results. These results can then be built into a View for users to review.
Getting Started#
Perform the following steps:
- To begin, a View must be selected as a source.
- Click the ellipsis on the right side of the field “Select View…” to open the source selector, the following screen appears:
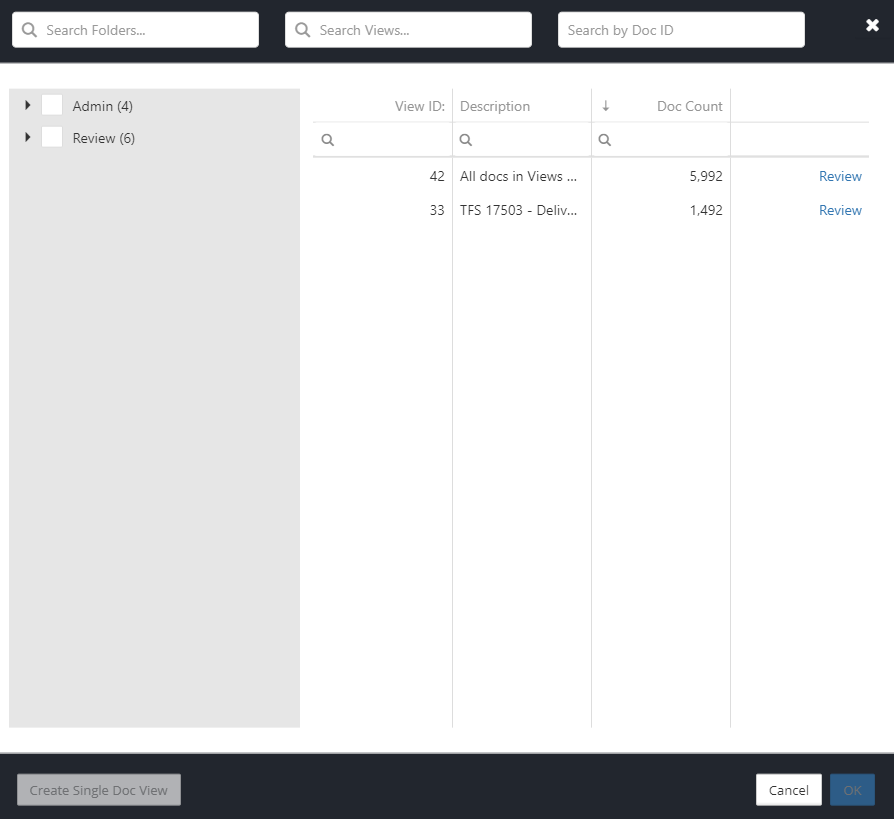
- The top row has several search options to help the user find a specific View. Alternatively, the user can manually browse to the View using the folder structure on the left.
- Click View to select and then click “OK” to use it as the source.
- With a source View selected, a new step can be added.
- Click one of the step options to create a new step. Each of these will be explained in detail as follows:

- Steps can be deleted by clicking the red X in the upper-right corner of the step.
- The order of steps can be changed by clicking on the step name and dragging them into the desired order.
- Steps that are used frequently can be marked as favorite by clicking the yellow star in the upper-right corner of the step.
- To reuse a favorite, click the gear-looking icon to the left of the step to open the context menu.
- Click “Favorites,” and then select an item from the list before clicking “Add to Step.”
Parallel Conditions#
A step can have multiple conditions that run in parallel. These are conditions that are connected by an OR.
- The image would return documents that have a Production Tag of “Not Reviewed” OR documents that have an Author/Sender value that starts with “Andy.”, as shown in the following screen:

- To add an additional condition to a step, click the gear-looking icon to the left of the step to open the context menu, the following screen appears:
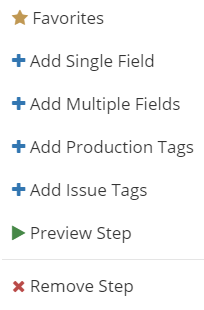
- Click one of the options with a blue plus icon to add it as a new condition.
Sequential Steps#
Sequential steps will be performed in the order they appear. The results of the first step will be used as the source for the second step, and so on.
- The image would first return documents that have a Production Tag of “Not Reviewed” and then from those documents return only those documents that have an Author/Sender value that starts with “Andy.”, as shown in the following screen:
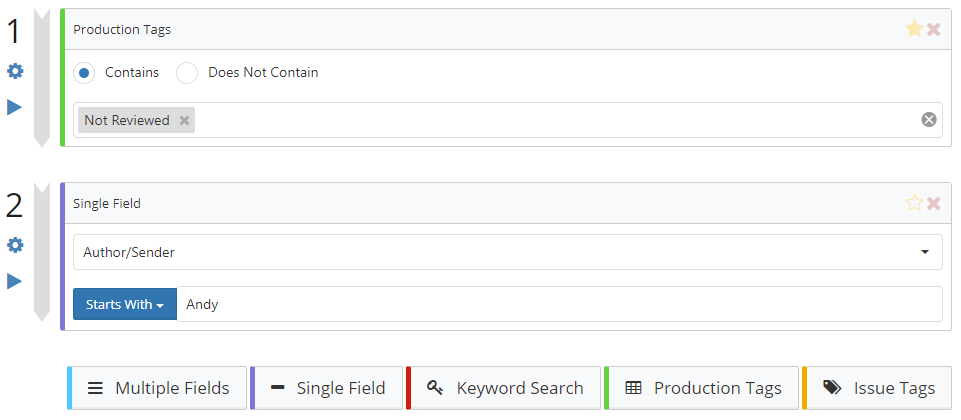
- To add an additional step, click one of the step options underneath the existing steps—except for Keyword Search.
- If the Keyword Search is selected, for efficiency purposes, it will always appear as the last step.
Note: Rapid Search is currently limited to a maximum of 9 sequential steps.
Multiple Fields#
The Multiple Fields option allows the user search multiple metadata fields for specific values.
- To select the fields, click the middle row and place a checkbox next to the desired fields.
- Then in the bottom row, enter the field values to search on.
- White spaces between words are treated as an OR.
- Adding “and” between words will connect the two words with an AND condition.
- For example, the filter will search the Ori File Name and Doc Title fields for values containing “(October OR finalized) AND contract”, as shown in the following screen:
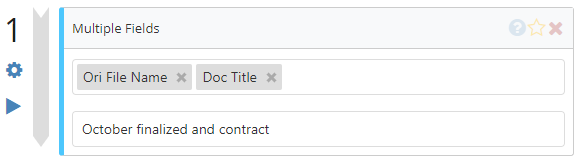
- However, the entire search must be found in the field for it to count as a hit.
- In other words, using the previous example, a document would not count as a hit if its Ori File Name contained “October” and the Doc Title contained “contract.”
Note: Quotation marks and parentheses are ignored. Each word in the text field is treated as a separate term. Exact phrase searching is not currently supported.
Single Field#
The Single Field option allows the user search a single metadata field.
To select a field, perform the following steps:
- Click the middle row and select a field from the dropdown menu.
- Enter the value to search on in the bottom row. Depending on the data type of the field being searched, the bottom row provides various filter options.
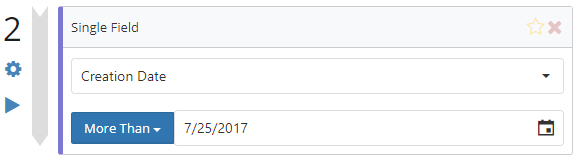
- For example, searching the Email Subject field, the user “Contains,” “Starts With,” and “Ends With” as available search operators, while searching the DocID field has “Equals,” “More Than,” and “Less Than” as available search operators.
Production Tags#
The Production Tags option allows the user filter based on whether documents are tagged with one or more Production tags.
- Select either “Contains” or “Does Not Contain”, as shown in the following screen:
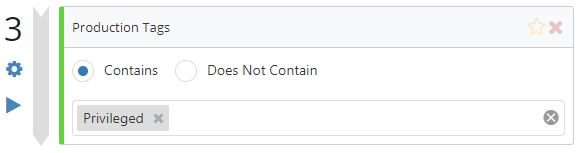
- Click on the bottom row to place a checkbox next to the desired Production tags.
- When multiple tags are selected, the search logic connects the tags with an OR condition.
Issue Tags#
The Issue Tags option allows the user filter based on the documents that are tagged with one or more Issue tags.
- Select either “Contains” or “Does Not Contain”, as follows:
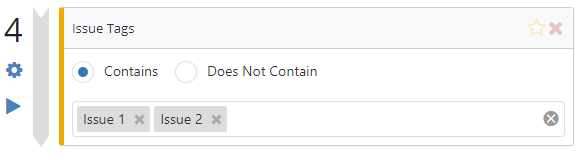
- Click the bottom row to place a checkbox next to the desired Issue tags.
- When multiple tags are selected, the search logic connects the tags with an OR condition.
Keyword Search#
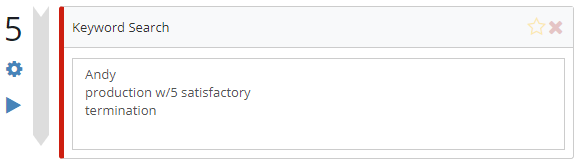
The Keyword Search option lets the user search based on a list of keywords.
If the Keyword Search step is used, it will always be placed as the last step in the process for efficiency purposes. Terms should be entered one per line. DtSearch syntax can be used for more advanced search capabilities, as shown in the following screen:
Preview#
At any point while setting up the steps and conditions, the user can preview the effect the step(s) will have on the number of documents that would remain after the step is completed.
- To preview a step, click the small blue triangle on the left side of the step, as follows:
- This will run the query up until it gets to the selected step and then populate the panels below with the results.
- As an example, if the user previews Step 3, the Document Count Reduction panel below will display the results for steps 1-3.
- To preview the entire list of steps, either click the Preview button on the last step or click the “Run” button at the top of the page.
Document Count Reduction#
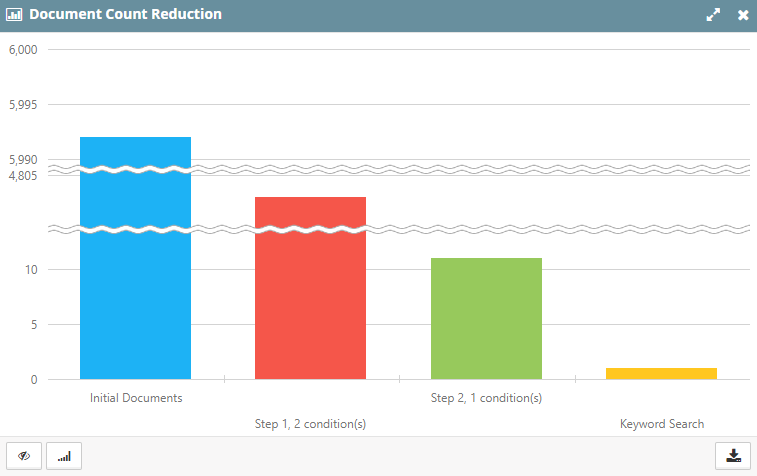
This panel displays a chart that allows the user to see how each step affects the number of documents that remain after each step is applied. Each category in the chart applies to the individual filter steps used above.
- The first category will always display the initial number of documents and the last category will always be Keyword Search, if a search is being used.
- If the user clicks the Preview Step button on one of the steps above, the chart will populate with results going from the beginning until it gets to the step the user clicked to preview on. Any steps that follow afterward will not show in the chart.
- Click the
 icon to hide/unhide the chart legend.
 - Click the
 icon to toggle on/off chart scaling.
 - Click the
 icon in the bottom-right corner to save a .png file of the chart as it currently appears on the screen:
Documents by Production Tag#
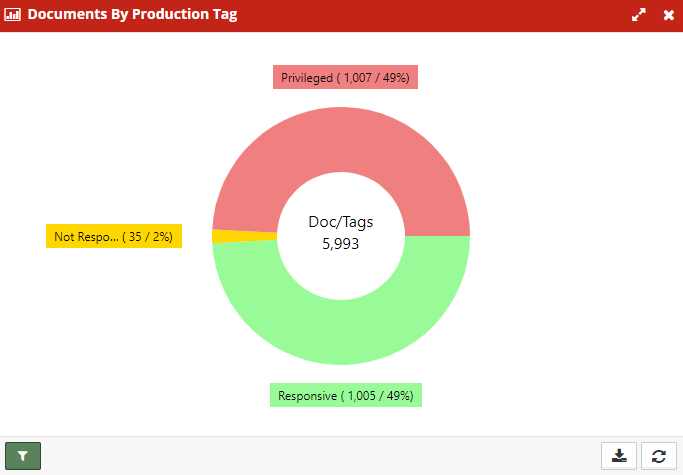
This panel provides a chart of the number of documents that have been tagged with each production tag within the results of the filtering.
- Click the
 icon in the bottom-left corner to hide/unhide individual chart categories.
 - Click the
 icon in the bottom-right corner to reload the results.
 - Click the
 icon in the bottom-right corner to save a .png file of the chart as it currently appears on the screen.
Documents by Issue Tag#
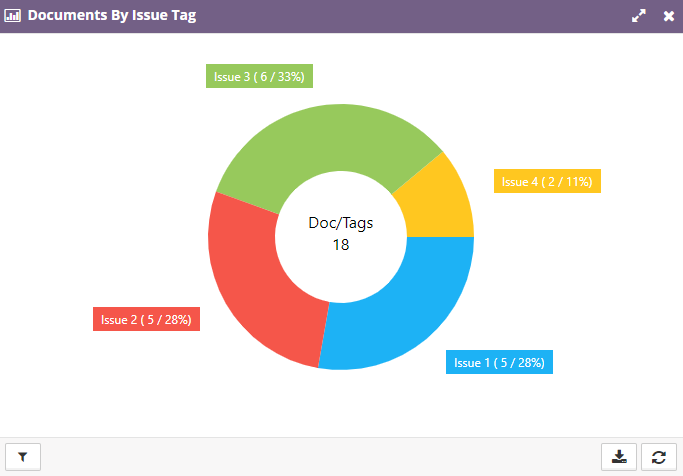
This panel provides a chart displaying the number of documents that have been tagged with each issue tag within the results of the filtering.
- Click the
 icon in the bottom-left corner to hide/unhide individual chart categories.
 - Click the
 icon in the bottom-right corner to reload the results.
 - Click the
 icon in the bottom-right corner to save a .png file of the chart as it currently appears on the screen.
Build View#
Perform the following steps:
Once the steps are finalized and the user is ready to build a View of the results, click the “Build View” button near the top of the page, the following screen appears:
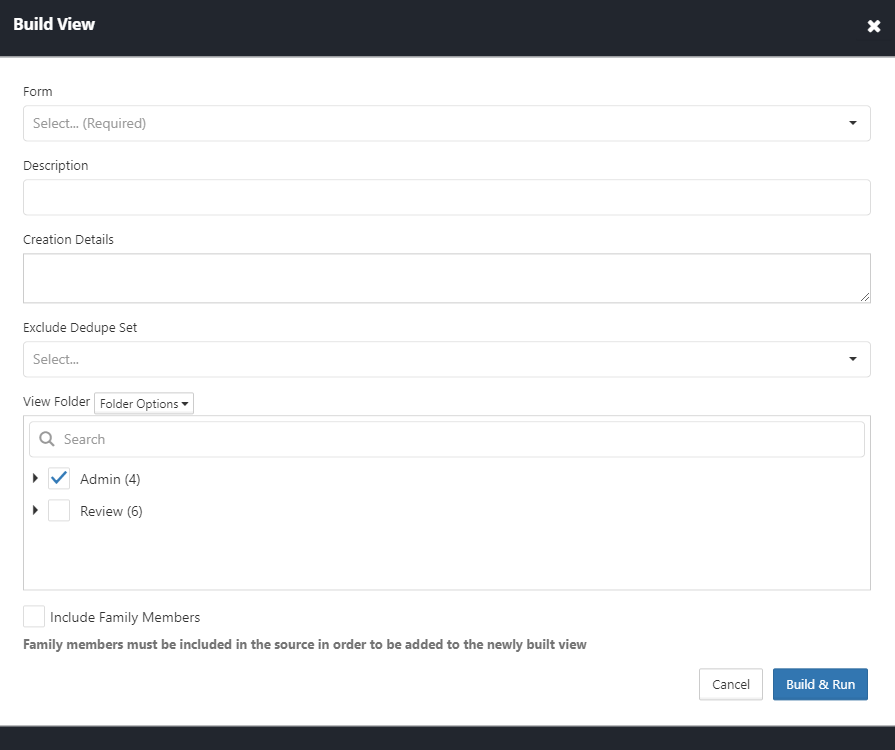
This is a window for the user to set up the View options.
- Select which Form should be used to build the View.
- Name the View by typing in the Description field.
- If desired, enter any details or notes in the Creation Details field.
- Select whether a Dedupe set should be used to build the View.
- Check the box for the folder the new View will be created in.
- Finally, check/uncheck the box whether the new View should also include the family of the documents.
- Click “Build & Run” to kick off the process and build the View.
Note: Only family members that exist in the source View can be added to the new View when using the “Include Family Members” option.
Reports#
Most of the reports available in Viewpoint Desktop Review are available in Viewpoint Web Review.
To open the Reports module, perform the following steps:
- Click “Reports” from the left toolbar or click “Run Reports” on the top Command Bar on a Project dashboard page, the following screen appears:
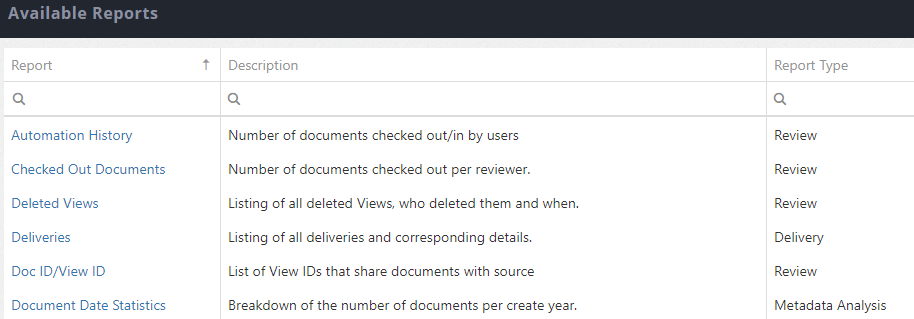
- Both will display the list available reports. Click the blue text of the report name to select it.
Parameters#
- After selecting a report from the main list, click the box labeled “Select Project…” to continue.
- After a Project has been selected, the Parameters section will be enabled. The Parameters section provides various filters depending on the selected report.
Note: The application will remember and populate the Project and filter settings that were used the last time the user ran the same type of report. To reset all cached reports and report parameters, click the Options button on the left toolbar and click the “Clear All Storage” option. This will also reset any other saved panels and settings. A confirmation warning will appear before clearing the local storage.
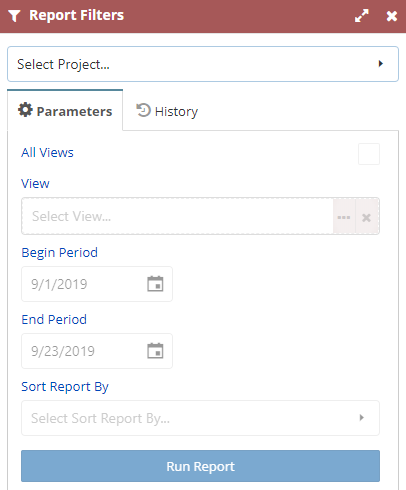
- Click the “Run Report” to immediately begin the process of building the report.
- The generated report is available in .PDF format.
- Click Open PDF in the upper-right corner of the Report panel, as shown in the following screen:
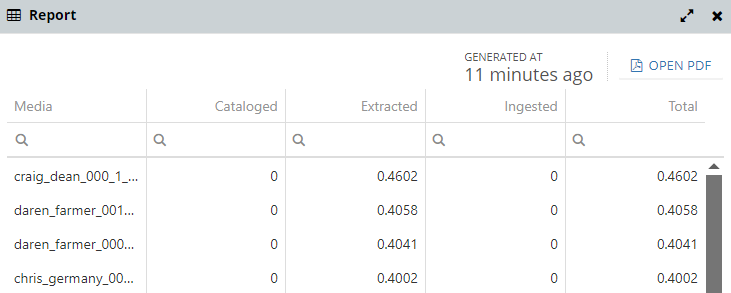
- Depending on the report selected, some reports will display a table of report data in the Report panel that can be searched and filtered.
- A custom filter can be created for this table data. Click the “Create Filter” at the bottom of the panel.
- Click the
 icon in the bottom-right corner to save an .xlsx file that contains the records currently listed in the panel.
 - Reports with displayed table information can also display the information in various types of charts.
- If the Chart panel is not visible, click the Options button on the left toolbar and check the box for the Charts panel.
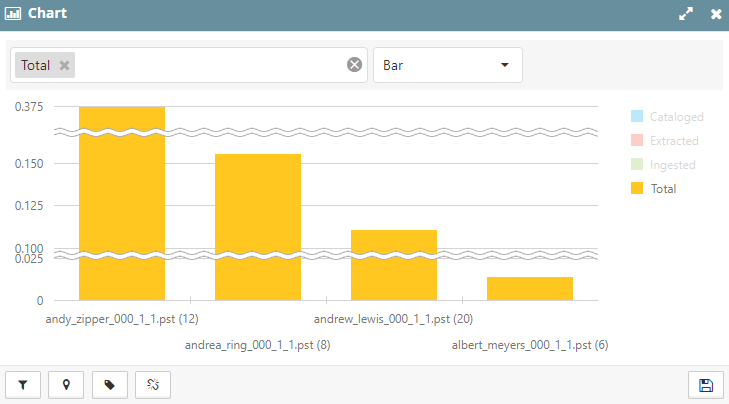
- Click “OK.”
History#
After the report is completed, a record of it will appear in the History tab next to the Parameters. The history will keep each of the reports a user has generated unless the user clears the local storage from the Options menu on the left toolbar.
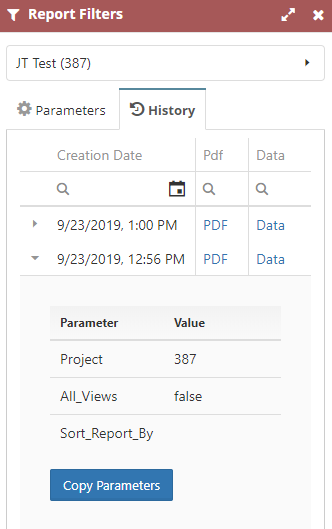
- Click the small arrow on the left side to expand report record to display the parameters used for that record.
- To use the same parameters for a new report, click the “Copy Parameters” button.
- To repopulate the Report panel with the data from the previously run report, click “Data” next to the record.
- To open a previously run report, click “PDF.”
User Details#
The Users Details page provides information on individual user accounts within the Viewpoint.
To access the respective page, perform the following steps:
- Click the “Users” button on the left toolbar, or by click user name in the Active Users panel on the Review or Project Dashboards.
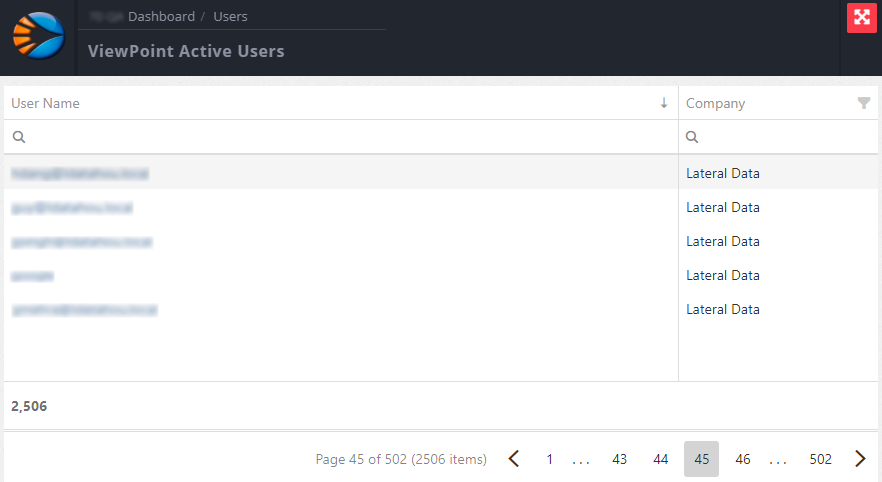
- Click the blue text of a user name to load the user details.

Along the top of the user details page are several general metrics. Each of the panels below contains more specific information about what work product the user has contributed to individual Projects, along with a list of Viewpoint Projects they have access to.
Existing Tags#
This panel displays a chart of the number of documents the user has tagged per Project, or per tag (right dropdown box) within the timeframe selected (left dropdown box).
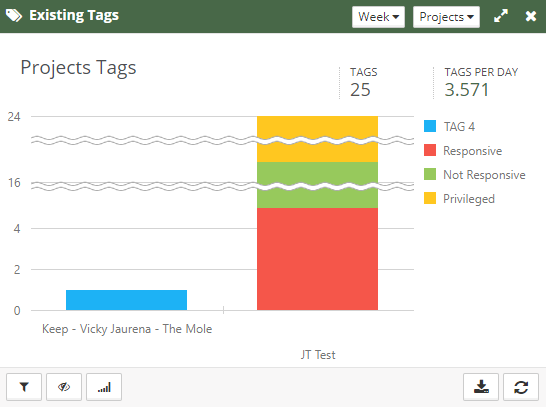
- Click the
 icon in the bottom-left corner to hide/unhide individual chart categories.
 - Click the
 icon to hide/unhide the chart legend.
 - Click the
 icon to toggle on/off chart scaling.
 - Click the
 icon in the bottom-right corner to reload the results.
 - Click the
 icon in the bottom-right corner to save a .png file of the chart as it currently appears on the screen.
Automation Summary#
This panel provides an overview of the user’s usage of Automation, per project.
- Click the blue text of a Project Name value to navigate to the Project Dashboard page.
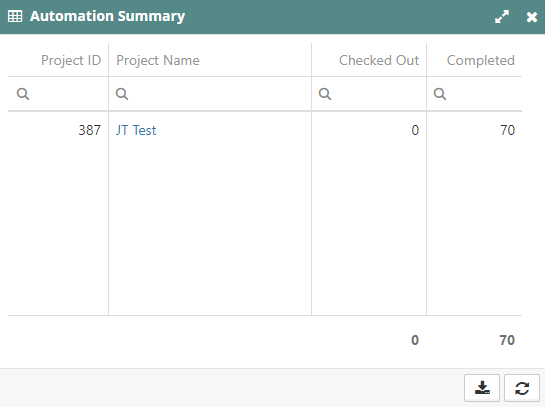
- Click the
 icon in the bottom-right corner to reload the results.
 - Click the
 icon in the bottom-right corner to save an .xlsx file of the list as it currently appears on the screen.
Existing Redactions#
This panel displays a chart of the number of documents the user has redacted (image or native) per Project within the timeframe selected at the top of the panel.
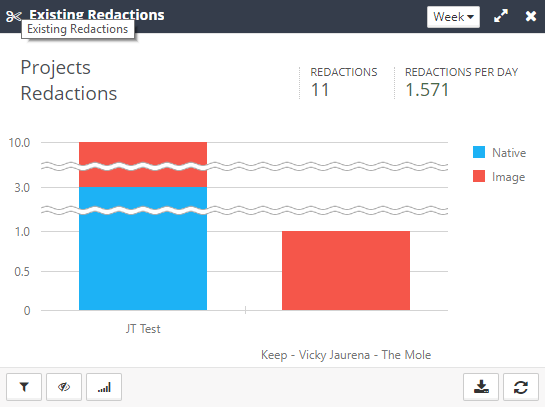
- Click the
 icon in the bottom-left corner to hide/unhide individual chart categories.
 - Click the
 icon to hide/unhide the chart legend.
 - Click the
 icon to toggle on/off chart scaling.
 - Click the
 icon in the bottom-right corner to reload the results.
 - Click the
 icon in the bottom-right corner to save a .png file of the chart as it currently appears on the screen.
Access to Projects#
This panel lists all the Viewpoint Review Projects the user has access to.
- Click the blue text of a Project to navigate to the Project Dashboard page.
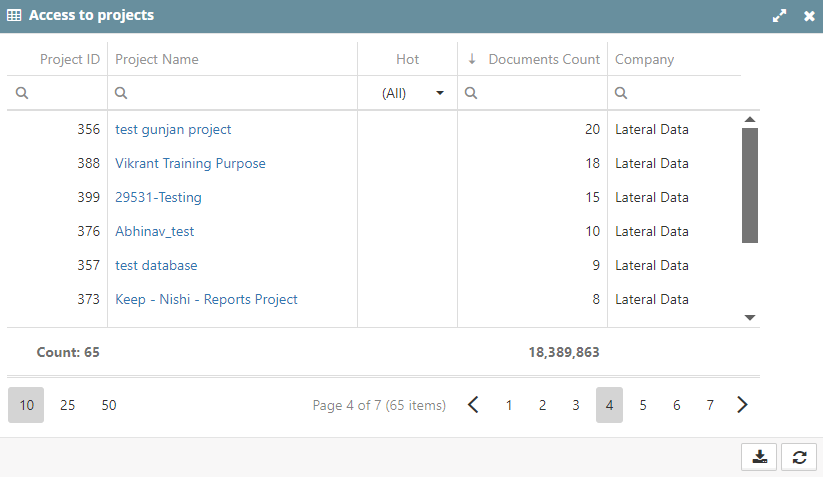
- Click the
 icon in the bottom-right corner to reload the results.
 - Click the
 icon in the bottom-right corner to save an .xlsx file of the chart as it currently appears on the screen.
Productions#
To edit a production or create a new one, click the “Manage Productions” button on the top Command Bar from the Project Dashboard page or from a Production Dashboard page.
A read-only version of the Production Dashboard page can be reached.
Clicking the blue text of a Delivery name in the Productions panel on the top-level Dashboard or Project Dashboard pages.
Manage Productions#
The Manage Productions window lists all the productions created in the current Project, along with their statuses and other pertinent information. The fields displayed in the list can be changed.
- Click the
 icon near the upper-right corner of the window.
 - Click on the field name to remove fields and drag it into the Fields Selector list.
- Click on a field name to add fields in the Fields Selector list and dragging it into the desired position.
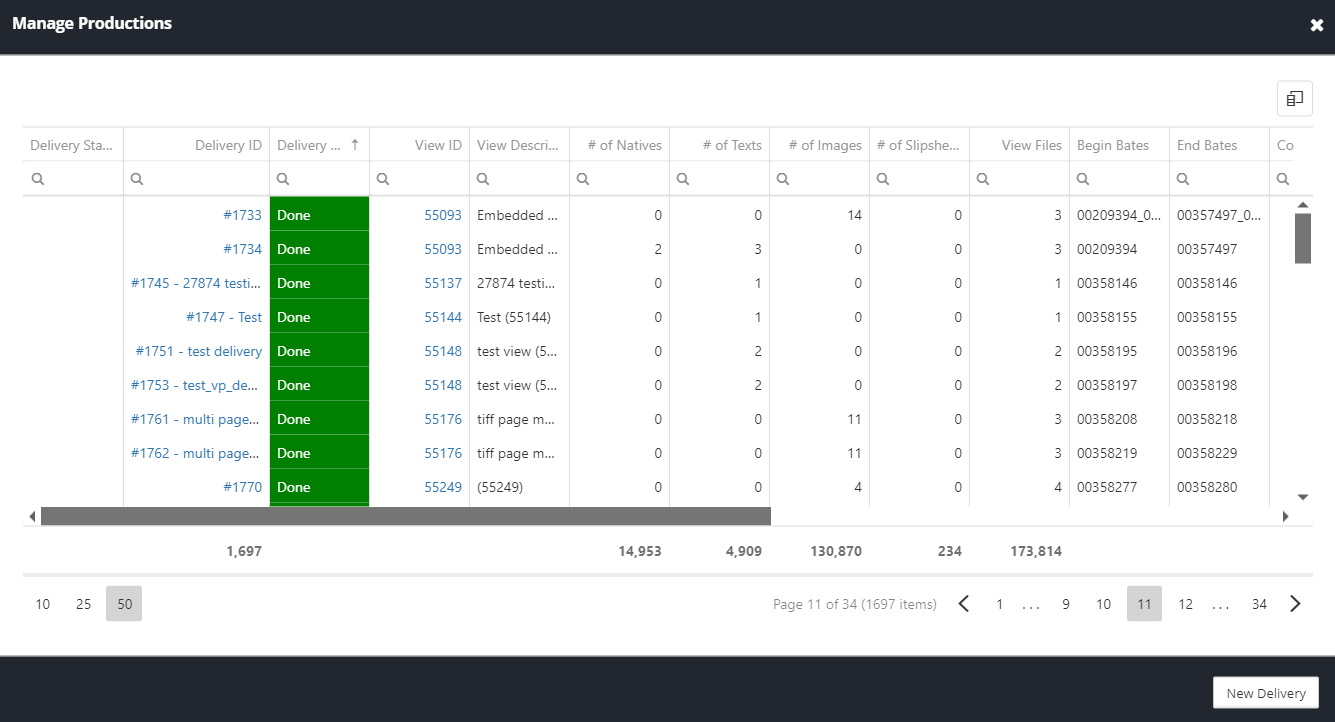
- Click on the blue text of a Delivery ID value will go to the Production Dashboard page where the production is in an editable state.
- Click the blue text of a View ID value to go to the Document Review page and load that View.
New Production#
- To create a new production, click the “New Delivery” button in the lower-right corner, the following screen appears:
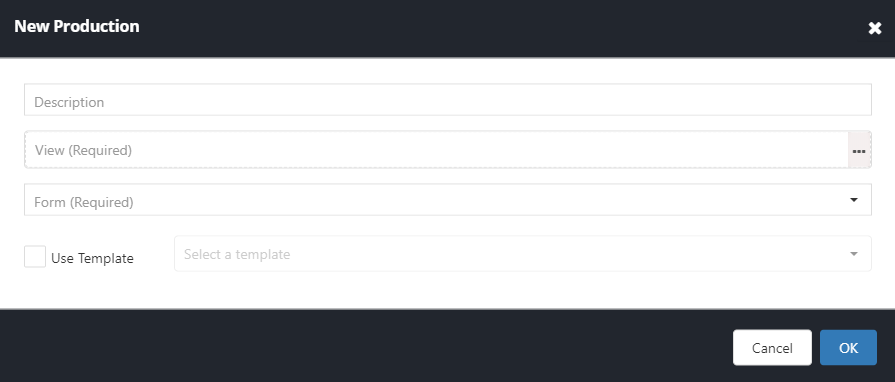
- Select a source View to produce and the Form that will be associated to the new production. An optional description of the production can be added as well.
- To use a production template, check the “Use Template” box and then use the dropdown box to select a template.
- If nothing needs to be changed in the settings, the user can check the “Immediately run and download production” box to save time.
- Click “OK” to create the new production. This will take the user to the Production Dashboard page where the production settings can be selected, and the production can be numbered and ran.
Production Dashboard#
The Production Dashboard contains all the details and settings of the production. It also contains several panels that provides insight into the documents contained in the production.
Note: If the Command Toolbar, Numbering Details, and Options panels are not visible, this means the user is in the read-only version of the Production Dashboard. To open the editable version of the dashboard, open the Production through the “Manage Productions” button on the Project Dashboard Page.
Top Toolbar#
- Manage Productions – Opens the Manage Productions window to select another production or create a new one.
- Clear – Clears the currently applied numbering, deletes the production volume on the file server, and sets the production status back to New. A confirmation warning will pop up before the action is performed. Production settings cannot be changed until the numbering is cleared.
- Save – Saves the production’s current settings.
- Number – Starts the production numbering, where Viewpoint will assign Bates numbers, update any needed paths, and perform other tasks needed to meet the production specifications. The production must be saved before it can be numbered.
- Create Xref – Starts the Xref file creation on the server. This button is only enabled for productions that have been numbered. If the production has already been run and completed, the Xref does not need to be re-created in order to download.
- Download Xref – Downloads a .zip file of the Xref to the user’s machine.
- Download Production – Downloads a .zip file of the completed production to the user’s machine.
- Run – Runs the production. The job will be picked up the Workers, and the production folder will be created on the file server. Redacted images that are included in the production will automatically have OCR text generated as the last step of the production process.
- Delete – Deletes the production. A confirmation warning will pop up before the action is performed.
Left Toolbar Options#
The Review Options available in the Options menu on the left toolbar contains a Delivery section, which affects the behavior of some production processes.
- Lock View – When ON, this locks the documents in the produced View. Locked documents are set as read-only and cannot be tagged or redacted. Locked Views and documents are designated with a black highlight. Views can be unlocked from the View Manager.
- Redaction Text OCR Engine – Selects which OCR engine will be used to generate OCR text for redacted documents. Selecting WebService requires a Worker machine with a valid Expervision or Nuance OCR license and have “WebServiceOCR” in the Supported Features field of the Worker Selector panel in the Viewpoint Processing application.
General Settings Panel#
The General Settings panel contains all the general information about the production, such as name, source View, who created it, and the range of Bates numbers. The panel contains three tabs covering different groups of information.
Settings#
In the edit mode, the Settings tab controls the name, source View, Form, and Comments attached to the production. If so long the production is not currently numbered, these values can be changed by the user.
- In the read-only mode, the Settings tab lists all the individual settings used in the production, as shown in the following screen:
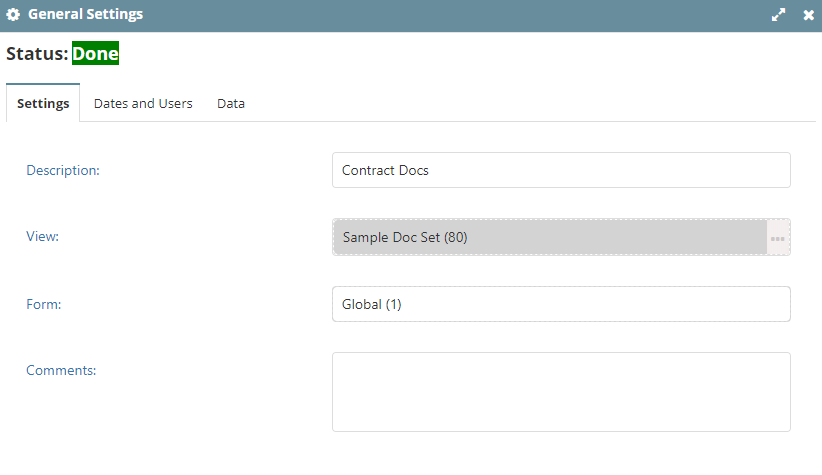
Dates and Users#
The Dates and Users tab tracks when and who created, numbered, and ran the production.
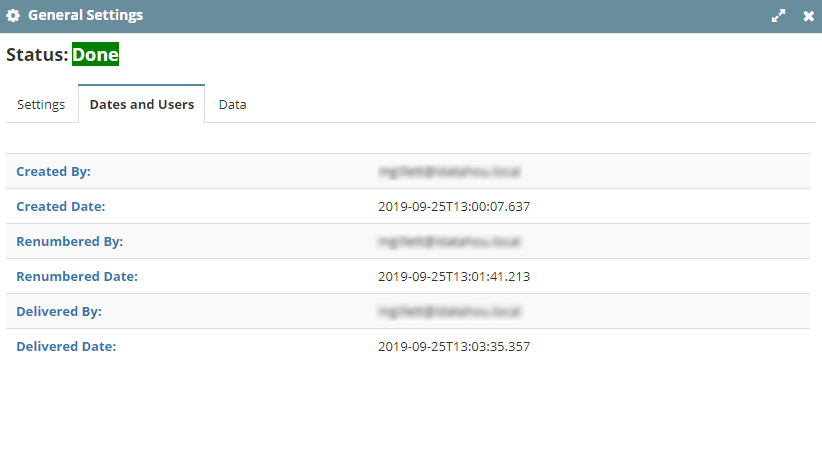
Data#
The Data tab tracks the total number of documents in the production as well as how many natives, text, image, and slip sheet files are included. It also tracks the begin and end Bates numbers as well as the total size of the production volume.
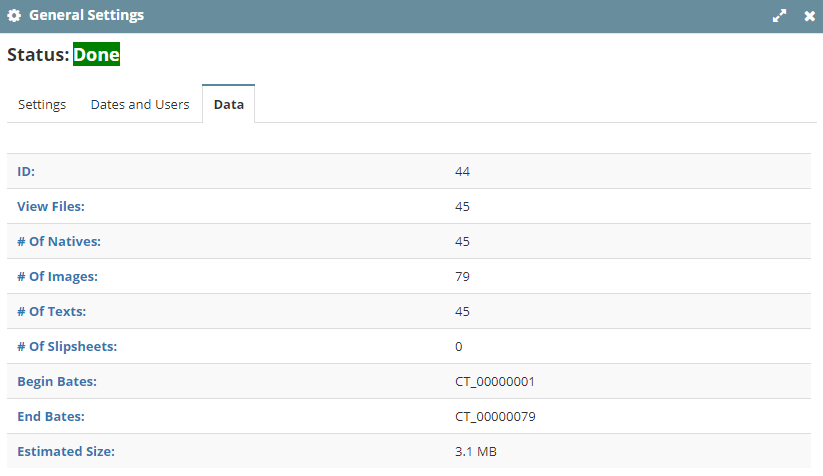
Numbering Details Panel#
The Numbering Details panel helps to QC and troubleshoot the production on a document level. The panel will populate once the production has been numbered. The fields displayed in the list can be changed.
- Click the
 icon near the upper-right corner of the window.
 - Remove fields by clicking on the field name and dragging it into the Fields Selector list.
- Add fields by clicking on a field name in the Fields Selector list and dragging it into the desired position.
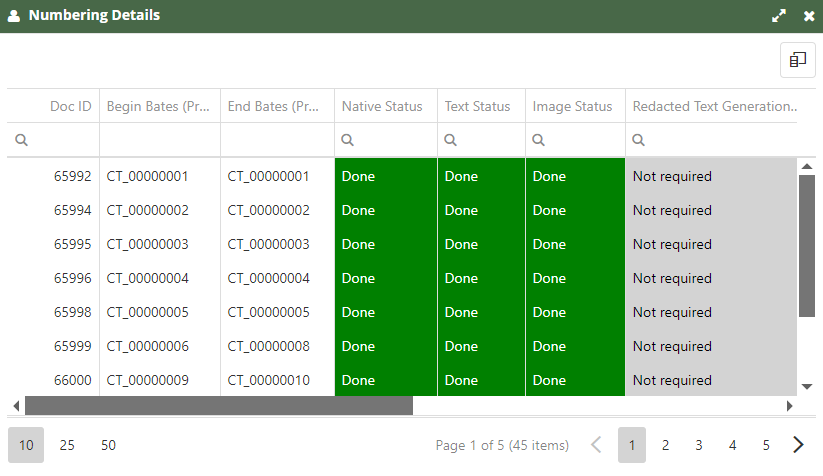
Troubleshooting#
When a user numbers a production and gets a numbering error, if the Numbering Details panel still populates, then the error is likely due to an issue with a document and the currently applied production settings. If the Numbering Details panel does not populate, then the issue is likely due to the Document Sort Structure setting.
To help identify which documents are causing an error, use the Native, Text, and Image Status fields. These fields can be filtered to only list ones that say “Error.”
To see what the error is, use the Native, Text, and Image Status Message fields. This might be something like, “No tiff files were located for DocID XYZ,” for example.
Options Panel#
The Options panel contains all the production settings, divided into eight tabs.

Folder Tab#
Root Path
This is the UNC path for the completed production output. The default location is contained in the “Prod” folder of the Project network storage location.
Users may change the output location. Click the ellipsis in the field value and navigate to the desired output location. A new folder can be created, click the parent folder, type in a name where it says, “Enter child folder name,” and then click the “Create child folder” button.
Volume Prefix
Enter a prefix for numbering of the production volume. Typically, this would be a prefix that makes sense to the case and continue with that prefix for that type of production. (Example: Company is ‘Enron’. The Volume Prefix could be ‘ENR’.)
Volume ID Length
The length of the numeric portion of the volume name.
Volume Starting Number
The starting number for the numeric portion of the volume name. Viewpoint will automatically increment to the next production volume starting number if previous productions have been created using the same Volume Prefix.
Document Tab#
Numbering Type
Allows the user to designate a new production numbering sequence or to re-use a previous production’s numbering sequence:
- New Delivery: Basic sequential numbering using a new production numbering sequence.
- Re-deliver Using Previous Bates Number: Re-delivers documents using a Bates sequence already used to deliver the selected source View. This option is not available if the View has not already been delivered previously.
- When this option is selected, the Previous Delivery option will appear. Select the previous delivery from the drop-down menu. The drop-down menu will list all the available previous deliveries of the source View.
- Images for Previous Native Delivery: Used when redelivering native files as images. This will add a “_0001, _0002” numbering scheme to the Bates number for each individual page within the document. To use this option, the source View must be built using the Beg Bates (Production) section of the MISC filter tab in the View Manager. This can also be used to re-deliver a subset of previously produced documents from multiple other productions by building the source View using the Bates numbers from various productions.
Document Prefix
Sets a prefix for the numbering scheme. Click the ellipsis to open the Prefix Structure Builder. Specific text can be typed in the top section, or field values can be added to the prefix by double-clicking the field name below. Refer the Structure Builder section for specifics on how it is used.
Document Suffix
Sets a suffix for the numbering scheme. Click the ellipsis to open the Suffix Structure Builder. Specific text can be typed in the top section, or field values can be added to the suffix by double-clicking the field name below. Refer the Structure Builder section for specifics on how it is used.
Document Number Length
Sets the number of digits in the numeric portion of the Bates number. For example, a setting of 8 would result in the first Bates number being 00000001.
Document Sort Structure
The sort structure dictates the order that files will be assigned a Bates number. The sort structure is [C_LastName], [C_FirstName], [ED_BaseDocID], [DocID] by default. With this structure, Bates numbers are assigned based on the custodian’s last name, then first name, then BaseDocID then DocID. Having the DocID immediately follow BaseDocID ensures that families will be kept together. You can change what is before BaseDocID to assign numbers based on Date, Author, etc. To keep family together, you should always end with BaseDocID followed by DocID.
To customize the Document Sort Structure, click the ellipsis at the end of the field and define a sort structure using the Structure Builder window.
Sort criteria can be typed directly into the top text box or fields. Select and double-click the desired field in the bottom-left panel.
Note: It is extremely important that all field macros are enclosed in brackets AND separated by commas. If a comma or bracket is missing, the production will error when a user attempts to number it.
Document Starting Number
Sets the starting Bates number for the first document in the delivery. If documents have been already produced using the selected Document Prefix, Viewpoint will automatically choose the next unused number as the Document Starting Number.
Break Family Relationships
When enabled, Viewpoint will ignore the traditional renumbering and delivery rules that keep families together, and consecutively numbered. Instead, renumbering and delivery rules will be applied as if the documents in the source View were standalone documents. Delivered X-Ref files will also treat each document as a standalone file. This means that any exported field that relates to a parent/child relationship, such as Parent Main Date or Parent Bates #, will be populated as if the document is a standalone document and did not have any parent or child present.
Note: Because Viewpoint will no longer be using the family relationships to determine the order in which Bates numbers are assigned, this option can have a drastic effect on the assigned Bates number.
Placeholder Tab#
A placeholder can be used to produce a slip-sheet for documents in the source View based on a document’s Production Tags, Issue Tags, File ID, Organization Codes, or Slip-sheet.
In terms of Viewpoint, a slipsheeted file is not the same as a file with a placeholder. A file can be slipsheeted in the Viewpoint Processing application for various reasons, and these slipsheets are already created and visible within the Viewpoint Review application. Placeholders are slipsheets that are generated at the time of production, based on the criteria selected per production.
The Placeholder tab settings apply to documents production-wide. This means the production native, text, and image of the document will be replaced with the placeholder file. To apply placeholders for just the image of the document, refer to the Image Tab section in this document.
Font Name
Font used for the placeholder file, which will be provided in place of the actual document.
Font Size
Font size of the text in the placeholder file.
Note: Font size is 3x normal font size. Size 12 in a MS Word document = 36 in Viewpoint.
Placeholder Production Tag
Apply placeholders based on the document’s Production Tag. Click the ellipsis to display a list of all the Production Tags that are used within the production’s source View and Form. To indicate that a placeholder should be produced for that Production Tag, a Reason Structure must be supplied by clicking the “Edit” button on the right side of the list and then either double clicking a field value or by typing text into the top section of the Structure Builder. Refer the Structure Builder section for specifics on how it is used.
Placeholder Issue Tags
Apply placeholders based on the document’s Issue Tag(s). Click the ellipsis to display a list of all the Issue Tags that are used within the production’s source View and Form. To indicate that a placeholder should be produced for that Issue Tag, a Reason Structure must be supplied by clicking the “Edit” button on the right side of the list and then either double clicking a field value or by typing text into the top section of the Structure Builder. Refer the Structure Builder section for specifics on how it is used.
Placeholder File IDs
Apply placeholders based on the document’s File ID. Click the ellipsis to display a list of all the File IDs that are used within the production’s source View. To indicate that a placeholder should be produced for that type of file, a Reason Structure must be supplied by clicking the “Edit” button on the right side of the list and then either double clicking a field value or by typing text into the top section of the Structure Builder. Refer the Structure Builder section for specifics on how it is used. For large Views, a splash screen may appear while the system loads all the File IDs contained in the source View.
Note: The File ID of a document is the type of file Viewpoint recognized it as during processing, typically using the file header information. The File ID will not always match the claimed file extension.
Placeholder Organization Codes
Apply placeholders based on the document’s Organization Codes. Click the ellipsis to display a list of all the Organization Codes that are used within the production’s source View. To indicate that a placeholder should be produced for that type of Organization Code, a Reason Structure must be supplied by clicking the “Edit” button on the right side of the list and then either double clicking a field value or by typing text into the top section of the Structure Builder. Refer the Structure Builder section for specifics on how it is used.
Slipsheet as Placeholder Structure
Apply placeholders based on the document’s Viewpoint Processing Slipsheet Reason value. To indicate that a placeholder should be produced for slipsheeted files, click the ellipsis to open the Structure Builder. Type in the top section to add custom text or double click [SlipsheetReason] to automatically insert the document’s Slipsheet Reason value. Refer the Structure Builder section for specifics on how it is used.
Text Tab#
Folder Sequence as Image
This option ensures that the text file for a given document will be in a sequence folder with the same number as the corresponding image. No matter the file server path, the sequence folder for the text will match the sequence folder for the images. When this option is checked, the Max Files in Folder and Folder Start ID options are hidden and will instead use the values specified in the Image tab.
Max Files in Folder
Sets the limit for number of files copied into a folder. Default setting of 1,000 is recommended for text productions.
Folder Structure
Dictates the folder structure of the delivered text. Click on the ellipsis to customize. Refer the Structure Builder section for customization options.
- By default, text files will appear in a folder called “TEXT” in the production root path.
Copy Folder Structure
This option provides the ability to produce a second set of text files to a different location.
File Structure
Dictates the naming convention of the delivered text files. Click on the ellipsis to customize.
- By default, delivered text files will be named based on the Delivery DocID (Bates number) plus a ‘.TXT’ extension. Refer the Structure Builder section for specifics on how it is used.
Deliver Non-Redacted
Dictates how redacted documents will be produced if they have been selected to produce text.
- Checked: Redacted files will produce the non-redacted text, unless exceptions are made using Organization Codes and/or Issue Tags options that become visible when this option is checked.
- Unchecked: Redacted files will have a temporary placeholder text file created in the production folder. As the last step of the production process, redacted images will be run through an OCR process to generate the redacted text files, which will replace the temporary placeholder files in the production folder.
Always
Allows selective overriding of the Deliver Non-Redaction option based on certain Organization Codes or Issue Tags.
- Checked: Viewpoint will produce non-redacted text for ALL redacted documents.
- Unchecked: Users can specify which documents should produce non-redacted text based on Organization Codes or Issue Tags
- Organization Codes: Click the dropdown box to specify which Organization Code(s) should produce non-redacted text of redacted documents.
- Issue Tags: Click the dropdown box to specify which Issue Tag(s) should deliver non-redacted text of redacted documents.
Folder Start ID
Starting sequence folder number.
Encoding
By default, text files will be delivered in their original encoding format. Use this option to switch between ASCII, UTF-16, UTF-8, and ASCII ISO 2859-1.
Generate From Redacted Native
- Checked: Generate redacted text for documents that have been natively redacted.
- Unchecked: Produce the full non-redacted text for documents that have been natively redacted.
Note: This option is hidden if the Deliver Non-Redacted option is checked.
Insert Bates #
When checked, the files’ beginning Bates numbers will be inserted into the top-left corner of the produced text files.
Force Text File
When checked, Viewpoint will produce a blank text file for all documents that do not have a corresponding text file.
- Force Text File Content: If Force Text File is checked, instead of a blank text file, the user can type in a custom message to be included in the text file created for documents that do not already have a corresponding text file.
Native Tab#
Folder Structure
Dictates the folder structure of the delivered natives. Click on the ellipsis to customize. Refer the Structure Builder section for specifics on how it is used.
- By default, natively produced files will appear in a folder called “NATIVES” in the production root path.
File Structure
Dictates the naming convention of the delivered native files. Click on the ellipsis to customize.
- By default, natively delivered files will be named based on the Delivery DocID (Bates Number) plus the original native extension of the file. Refer the Structure Builder section for specifics on how it is used.
Folder Start ID
Starting sequence folder number. For example, if the Folder Structure setting is left as default (NATIVES\ [Seq: 000]) and Start ID was set to 1, the first subfolder under NATIVES would be named “1.”
Max Files in Folder
Sets the limit for number of files copied into a folder. Default setting of 1,000 recommended for native productions.
Prevent Redacted
Dictates how redacted documents will be produced if they have been selected to be produced natively.
- Checked: Image redacted files will be prevented from being produced natively. Depending on the other options selected below, native redacted files can be set to produce the redacted version of the native, the original version of the file, or no native at all.
- Unchecked: Original natives will be produced, regardless of native or image-based redactions.
Allows selective overriding of the Prevent Redacted option based on certain Org Codes or Issue Tags.
- Checked: Image redacted files will not be produced natively. Native redacted files will produce the redacted version of the native file.
- Unchecked: Allows certain redacted files to be produced in a non-redacted native format based on the selected Organization Codes and/or Issue Tags. This allows the Organization Codes and Issue Tags options to be edited on the lines below.
- Organization Codes: Specify redacted documents to produce natively. Click the dropdown box and place checkboxes on the necessary Organization Codes. Image-redacted documents with the checked Organization Codes will not produce a native file. Conversely, image-redacted documents that do not have the checked Organization Codes will produce the non-redacted native. This option is only visible if Prevent Redacted Always is unchecked.
- Issue Tags: Specify redacted documents to produce natively. Click the dropdown box and place checkboxes on the necessary Issue Tags. Image-redacted documents with the checked Issue Tags will not produce a native file. Conversely, image-redacted documents that do not have the checked Issue Tags will produce the non-redacted native. This option is only visible if Prevent Redacted Always is unchecked.
- Deliver Redacted Native: Dictates how natively redacted documents will be produced if they have been selected to be produced natively. This option is only enabled when Prevent Redacted is checked AND Prevent Redacted Always is unchecked.
- Checked: Files with a native redaction will produce the native in its redacted form. This is the default option.
- Unchecked: Files with a native redaction will deliver the original, non-redacted native file.
Email as HTML
By default, emails are delivered in HTML format. Unchecking the box will deliver the native email file.
Note: We do not recommend disabling this option as producing emails in the original native format may have unintended consequences, including inadvertent production of email attachments.
Deliver Original Spreadsheet
This relates to spreadsheet files that were processed using the Expose All Excel Content option in the Processing application to expand any hidden content. When this option is enabled, the original spreadsheet file will be produced rather than the version with all content exposed.
Archive Slipsheet As
Dictates how slipsheeted compressed archives, such as .zip files, are to be produced. By default, the slipsheet generated in the Processing application will be produced in place of the native. Options include delivering the slip-sheet, delivering the original native archive, or deliver both the slip-sheet and the original native archive.
Non-Archive Slip-sheet As
Dictates how non-archive slip sheeted files are to be produced. By default, the slip-sheet generated in the Processing application will be produced in place of the native. Options include delivering the slip-sheet, delivering the original native archive, or deliver both the slip-sheet and the original native archive.
Slip-sheet Reasons As
By default, a document slip sheeted in the Processing application will produce that slip-sheet in place of the native. This option allows you to produce the native file for slip sheeted files based on specific slip-sheet reason codes. Click the dropdown box and check the slip-sheet reason(s) to produce as a native rather than the slip-sheet.
Folder Sequence as Image
This option ensures that the native file for a given document will be in a sequence folder with the same number as the corresponding image. No matter the file server path, the sequence folder for the natives will match the sequence folder for the images.
When this option is checked, new options appear that allow the user to only produce native files for specific File IDs, Organization Codes, or Issue Tags.
- File IDs: Produce native files for documents based on File ID values. Click the ellipsis and check the FileIDs that should produce a native file.
Note: The File ID of a document is the type of file Viewpoint recognized it as during processing, typically using the file header information. The File ID will not always match the claimed file extension.
- Organization Codes: Produce native files for documents based on selected Organization Codes. Click the dropdown box and check the Organization Codes that should produce a native file.
- Issue Tags: Produce native files for documents based on selected Issue Tags. Click the dropdown box and check the Issue Tags that should produce a native file.
Image Tab#
Folder Start ID
Starting sequence folder number. For example, if the Folder Structure setting is left as default (IMAGES\ [Seq:000]) and Start ID was set to 1, the first subfolder under IMAGES would be named “1.”
Folder Structure
Dictates the folder structure of the delivered images. Click on the ellipsis to customize. Refer the Structure Builder section for specifics on how it is used.
- By default, image files will appear in a folder called “IMAGES” in the production root path.
Max Files in Folder
Sets the limit for number of files copied into a folder. Default setting of 10,000 is recommended for image productions.
File Structure
Dictates the naming convention of the delivered image files. Click on the ellipsis to customize.
- By default, produced image files will be named based on the Delivery DocID (Bates Number) plus the appropriate extension for the selected image output format. Refer the Structure Builder section for specifics on how it is used.
Image Numbering
Select whether Viewpoint should increment the Bates number by page or by document:
- Increment by Page: Increment the Bates number for each image.
- Increment by Document: Assigns each document a new Bates number, with each individual image having a suffix of _0001, _0002, etc.
NBR Pages File IDs
Allows one to specify the number of pages to produce based on file types. Click the ellipsis and type the number of pages you would like to produce into the field to the right of the file type. For large productions, a splash screen may appear while the system loads all the FileIDs contained in the source View.
Image Delivery Mode
Dictates the image output format for the production:
- TIFFSinglePage: Produce files as single-page tiffs.
- TIFFMultiPage: Produce files as multi-page tiffs.
- JPG: Produce files as JPGs.
- JPGs for color, single-page TIFFs for non-color: Produce files tiffed in color as JPGs and files tiffed in black and white as single-page tiffs.
- JPGs for color, multi-page TIFFS for non-color: Produce files tiffed in color as JPGs and files tiffed in black and white as multi-page tiffs.
- PDF: Produce files as image-based PDFs.
Deliver Non-Redacted
Dictates how redacted documents will be produced if they have been selected to produce images.
- Checked: Viewpoint will produce the non-redacted images for redacted images, unless exceptions are made using Organization Codes and/or Issue Tags options that become visible when this option is checked.
- Unchecked: Viewpoint will burn-in redaction coordinates and produce redacted images.
Always
- Checked: Viewpoint will produce non-redacted images of ALL redacted documents.
- Unchecked: Users can specify which documents should produce non-redacted images based on Organization Codes or Issue Tags.
- Organization Codes: Click the dropdown box to specify which Organization Code(s) should produce non-redacted images of redacted documents.
- Issue Tags: Click the dropdown box to specify which Issue Tag(s) should deliver non-redacted images of redacted documents.
Place Holder File IDs for Non-Redacted
Produce a placeholder slipsheet instead of a non-redacted document’s image file based on the document’s File ID. Click the ellipsis to display a list of all the File IDs that are used within the production’s source View. To indicate that a placeholder should be produced for that type of file, a Reason Structure must be supplied by clicking the “Edit” button on the right side of the list and then either double clicking a field value or by typing text into the top section of the Structure Builder. Refer the Structure Builder section for specifics on how it is used. For large Views, a splash screen may appear while the system loads all the File IDs contained in the source View.
Note: The File ID of a document is the type of file Viewpoint recognized it as during processing, typically using the file header information. The File ID will not always match the claimed file extension.
Place Holder Organization Codes for Non-redacted
Produce a placeholder slip-sheet instead of a non-redacted document’s image file based on the document’s Organization Codes. Click the ellipsis to display a list of all the Organization Codes that are used within the production’s source View. To indicate that a placeholder should be produced for that type of Organization Code, a Reason Structure must be supplied by clicking the “Edit” button on the right side of the list and then either double clicking a field value or by typing text into the top section of the Structure Builder. Refer the Structure Builder section for specifics on how it is used.
Place Holder Text for Redacted Natives
Produce a placeholder slip-sheet instead of an image file for natively redacted documents. Click the ellipsis to customize the text that will appear in the placeholder.
Branding Tab#
Font Name
Change font of the branding text.
Font Size
Change font size of the branding text.
Note: Font Size is 3X normal font size. Size 12 in a MS Word document = 36 in Viewpoint.
HQ File IDs
Required option for pre-populated File IDs to produce branded images with better than normal resolution. Additional File IDs can be added by clicking the ellipsis and checking the boxes for the desired file types and then clicking “OK”. It is recommended to use this cautiously as it can result in much larger production sizes, as well as longer production times.
First Page Only
Applies the brand settings only to the first page of each document.
Structure Builder for Brand Placement
Brands can be placed on the top-left, top-middle, top-right, bottom-left, bottom-middle, and bottom-right of production images. A separate structure builder is provided for each page location. Click the ellipsis to open the structure builder. Field macros, like [Bates], can be quickly added by double clicking the field to add it to the top structure text box. Additionally, custom text can be typed or pasted into the top structure text box.
Note: Branding will cause the image on the page to be slightly scaled down so that the brand text does not unintentionally overlap page content. Adding extremely long brands could potentially scale the image small enough to affect its legibility.
X-Ref Tab#
X-Ref Type
Dictates the type of cross-reference file that will be produced
- None: An X-Ref file will not be produced.
- Text: An X-Ref file will be produced in text format. Users will need to define the appropriate Delimiter Types in an option below.
- CSV: An X-Ref file will be produced in comma delimited format.
- Ringtail: Generates a Ringtail load file. Ringtail Extra Fields setting will also need to be defined.
- XML: An X-Ref file will be produced in XML format.
Encoding
Dictates the encoding format when Text is the selected as the X-Ref type.
- UTF8 (Default): The text X-Ref file will be produced in Unicode UTF8 format.
- UTF16: The text X-Ref file will be produced in Unicode UTF16 format.
- ASCII: The text X-Ref file will be produced in ASCII format. This option is not recommended for productions containing non-English language documents.
- ASCII ISO 2859-1: The text X-Ref file will be produced in ASCII Extended format.
Delimiter Type
Dictates the delimiter type when Text is the selected as the X-Ref type.
- Concordance: Populates the Delimiter and Wrapper settings to the standard Concordance characters.
- Summation: Populates the Delimiter and Wrapper settings to the standard Summation characters.
- Custom: Allows the user to manually edit the Delimiter and Wrapper settings to characters of their choice.
Delimiter: User may define a custom delimiter character.
Wrapper: User may define a custom text wrapper character.
You can use the shortcut ASCII character codes to place certain characters in the delimiter and wrapper fields. For example, if you want ASCII character 059 (semi-colon) type ALT+059 in the desired field. For a full list of all ASCII characters codes and shortcuts, refer the following web page. http://www.ascii.cl/
File Name
Sets the name of the X-Ref files. By default, the File Name value will be the same as the Volume Name used for the production.
CSV, Text, XML, and DII X-Ref Fields
Each of these settings follow the same logic to manage the metadata fields included in the specific type of X-Ref file. Click on the ellipsis to the right of the desired X-Ref type to open the field selector.
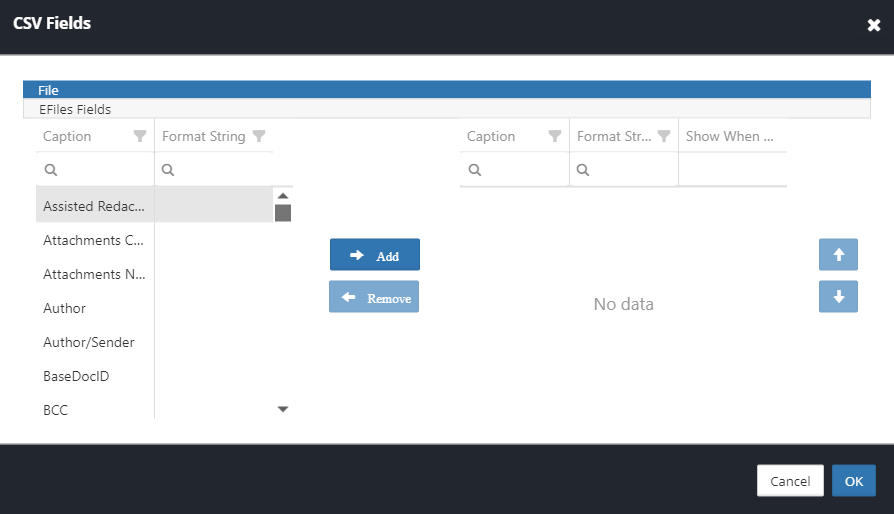
- The list of metadata fields on the left side are all the available fields that can be included in the X-Ref file. The Format String column is used to define the format of date/time fields.
- To add fields to the X-Ref, click a field and click the “Add” button, which will move it to the list on the right side.
- To reorder the fields on the right side, click the field to be moved and click either the up or down arrow buttons. The order of the fields in this list determines the order they appear in the X-Ref file.
- Use the Format String column on the right side to make any modifications to the way those fields should display the date and/or time in the X-Ref file.
- The Show When Redacted column is checked by default. When the user unchecks the box for a metadata field, that metadata field will not be populated for any of the redacted files included in the X-Ref file.
- To remove a metadata field from the X-ref setup, click the field on the right side and then click the “Remove” button in the middle to move it back to the left side.
Ringtail Extras Fields
Ringtail X-Refs are separated by Email and Efile fields. The process for adding fields to a Ringtail Load File follows the same logic as other X-Ref types, but fields that apply to Efiles are treated separately from fields that apply to Emails. The top section is used to define metadata fields that apply to Efiles. The bottom section is used to define metadata fields that apply to Emails.
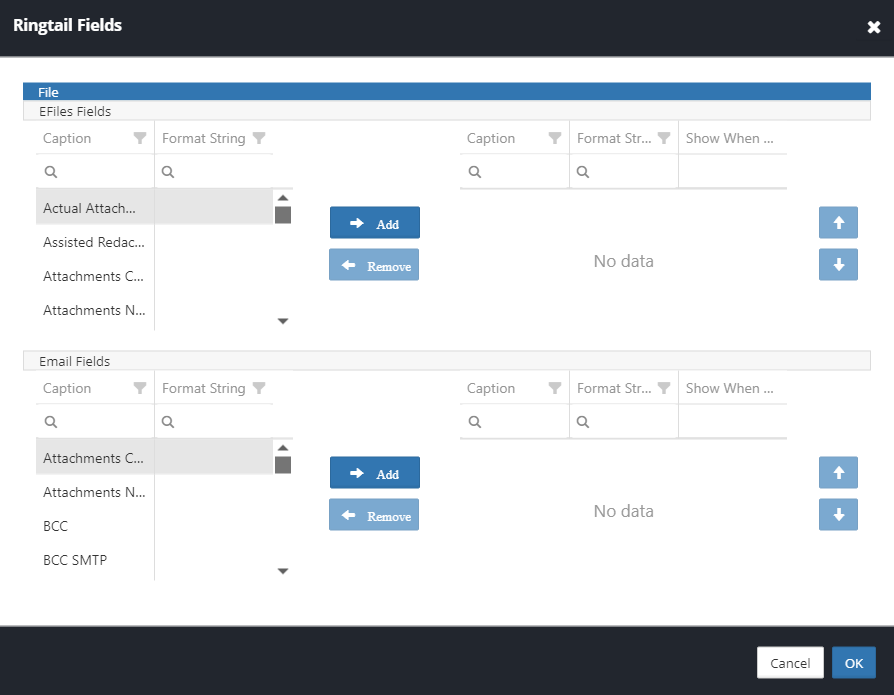
Add fields to the X-Ref by clicking on a field and clicking the “Add” button, which will move it to the list on the right side. Fields on the right side can be re-ordered by clicking on the field to be moved and clicking either the up or down arrow buttons. The order of the fields in this list determines the order they appear in the X-Ref file.
Use the Format String column on the right side to make any modifications to the way those fields should display the date and/or time in the X-Ref file.
The Show When Redacted column is checked by default. When the user unchecks the box for a metadata field, that metadata field will not be populated for any of the redacted files included in the X-Ref file.
To remove a metadata field from the X-ref setup, click the field on the right side and then click the “Remove” button in the middle to move it back to the left side.
Ringtail Keyword Labels
To add a Keyword Label to the Ringtail Load File, click the ellipsis to open the label window. Type a label into the Label field and click “OK.”
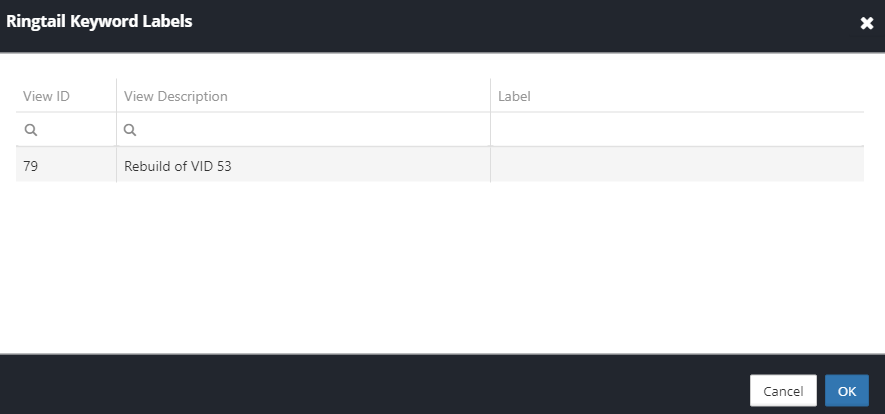
Date and Time Format Strings#
Format String | Description | Sample Output |
|---|---|---|
yy | The last two digits of the year. | 03 |
yyyy | Four-digit year. | 2003 |
MM | The number of the month. | 09 |
MMM | The short text description of the month. | Sep |
MMMM | The full name of the month. | September |
dd | The number of the day. | 02 |
ddd | The short text for the day of the week. | Tue |
dddd | The full name of the day of the week. | Tuesday |
/ | Date Separator. | N/A |
Format String | Description |
|---|---|
hh | Hours. |
mm | Minutes. |
ss | Seconds. |
tt | If present, represents data in AM/PM format. |
: | Time separator. |
Structure Builder#
The Structure Builder window is used to configure several production settings.
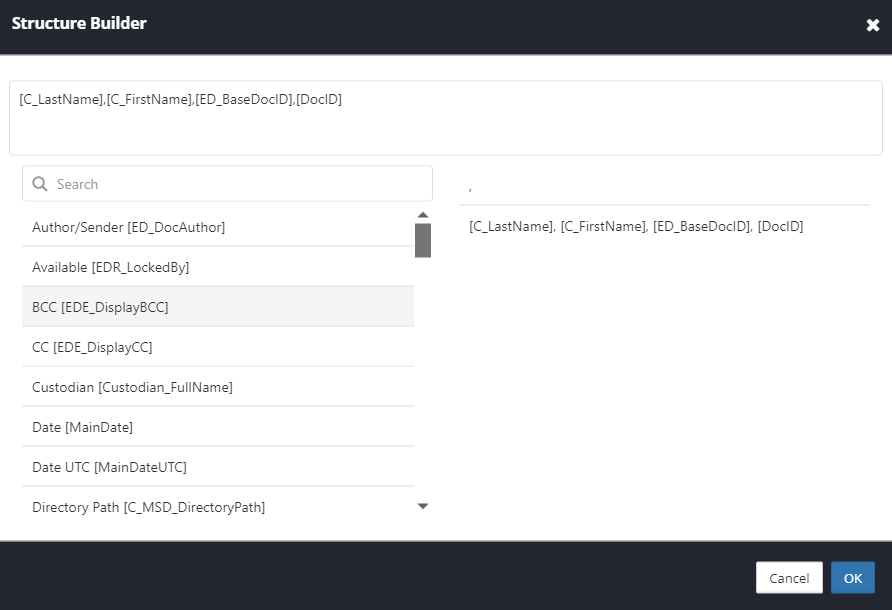
Note: The above image is for the Document Sort Structure setting; however, all other structure builders contain the same available fields and function the same way.
The Structure Builder is divided into three sections:
- Structure Text: Located at the top section of the Structure Builder. Any text placed in this field will be used as the structure for the chosen option. For example, to display the original file folder information on a placeholder file, type [EDFS_OriFileFolderRelativePath] into the Structure Text section, or simply find the field macro in the list of fields below. Text without brackets is taken literally and will be used as it was entered in. A combination of free text and field macros can also be used.
- Individual Field Selection: Located at the bottom-left of the Structure Builder. This section lists the available field macros that can be used. Double-click on a field(s) to place the entry in the top section.
- Preset Text Selection: Located at the bottom-right of the Structure Builder. This section lists the commonly used fields or text in the context of which production setting the user is currently working on. Double-click on an entry to place it in the top section.
Documents by Production Tag Panel#
This panel provides a chart of the number of documents that have been tagged with each production tag. Click the  icon in the bottom-left corner to hide/unhide individual chart categories. Click the
  icon in the bottom-right corner to reload the results. Click the
  icon in the bottom-right corner to save a .png file of the chart as it currently appears on-screen.
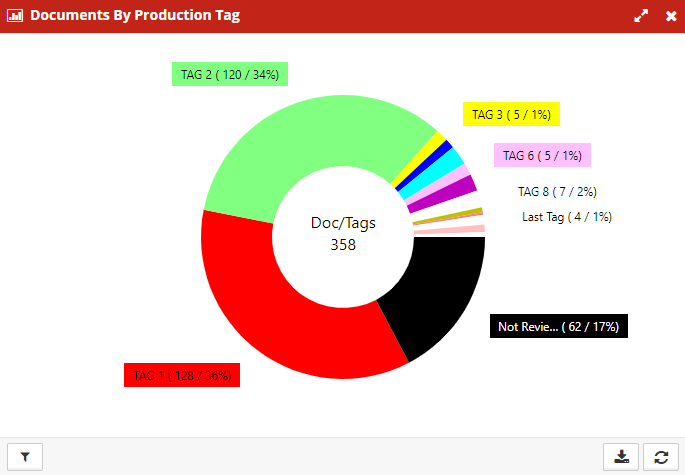
Documents by Issue Tag#
This panel provides a chart displaying the number of documents or size of documents that have been tagged with each issue tag.
- Click the dropdown box near the upper-right corner to toggle between Count and Size.
- Click the
 icon in the bottom-left corner to hide/unhide individual chart categories.
 - Click the
 icon in the bottom-right corner to reload the results.
 - Click the
 icon in the bottom-right corner to save a .png file of the chart as it currently appears on the screen:
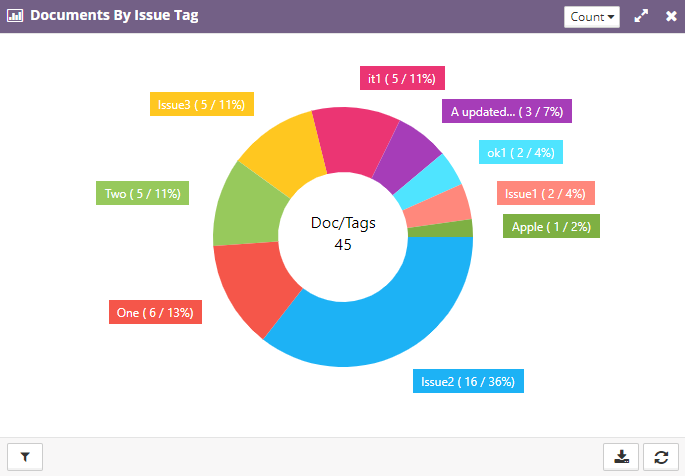
Top Searched Keywords Panel#
This panel displays the top ten searched terms within the production View.
- Click the
 icon in the bottom-left corner to hide/unhide individual chart categories.
 - Click the
 icon in the bottom-right corner to reload the results.
 - Click the
 icon in the bottom-right corner to save a .png file of the chart as it currently appears on the screen.
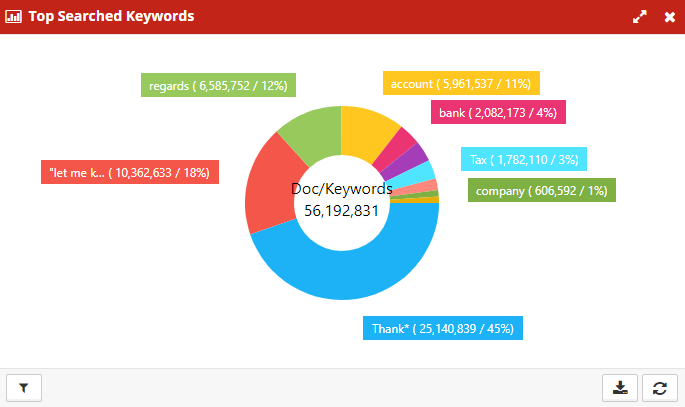
Documents by Extension#
This panel displays a chart of the total size of documents or the number of documents for each file extension that exists in the production View.
Click the dropdown box near the upper-right corner to toggle between Count and Size.
Click the  icon in the bottom-left corner to hide/unhide individual chart categories.
Click the  icon in the bottom-right corner to reload the results.
Click the  icon in the bottom-right corner to save a .png file of the chart as it currently appears on the screen:
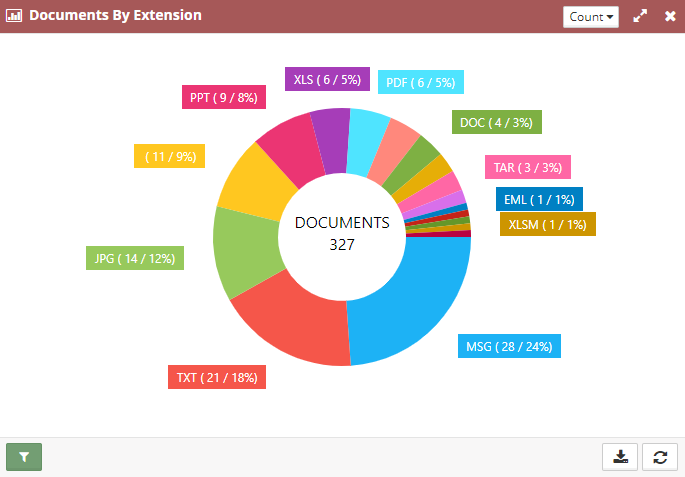
Documents Posted by Custodian#
This panel displays a chart of the total size of documents or the number of documents for each custodian that exists in the production View.
- Click the dropdown box near the upper-right corner to toggle between Count and Size.
- Click the
 icon in the bottom-left corner to hide/unhide individual chart categories.
 - Click the
 icon in the bottom-right corner to reload the results.
 - Click the
 icon in the bottom-right corner to save a .png file of the chart as it currently appears on the screen: