
Sections View Templates
Manual informationView Templates
1.1 | Sept 13, 2021 | Rebranded adhering to the latest Conduent brand central documentation standards/guidelines. | Technical Writer
Document conventions
Convention | Explanation |
|---|---|
Bold | For file names, commands, fields, menus, options, and window names. |
Courier New | Commands as you should type them. |
Lucida Console | Example output generated by the system. |
Italics | For configuration variables, including variable portions of file names and URLs. Also indicates a document name. |
Note / Blue Callout | The Blue Callout text indicates information that is of special interest or importance, an idea that could be useful or additional information about a product or a feature. |
| The Caution icon along with the text indicates actions that can lead to problems in system operation or configuration settings if the instructions are not followed properly. |

Revision history
This section tracks the initial creation of the document after each major version thereafter.
Ver: | Date | Description | Reviewed / Approved By |
|---|---|---|---|
1.0 | Feb 28, 2020 | Initial Version | Team |
1.1 | Sept 13, 2021 | Rebranded adhering to the latest Conduent brand central documentation standards/guidelines. | Technical Writer |
Introduction#
Viewpoint Automation and View Template features are designed to simplify and automate the document review process. With this technology, complicated culling workflows can be stored, reviewed, and applied over and over without the need to create separate instructions outside of Viewpoint or spend time providing detailed project-specific training to your staff. After review sets are created via predefined automated View Templates, reviewers are restricted to specific subsets of data without the need to create complicated permissions settings. Throughout the course of the Project, documents will automatically be pushed to subsequent groups of reviewers using a set of predefined coding rules, completely eliminating the need for human interaction to keep the review moving forward. The benefit of this technology is a more cost-effective and speedy way of performing a document review than traditional means.
Access and Permissions#
The following are the minimum recommended permissions:
- Administrators – Users creating and modifying all Automation and View Templates rules.
- Access Automation Levels
- Access Issue Tag Category
- Access Mass Folders
- Access Project
- Access Scope
- Access View (Recommended that admins have access to all Views in the Project.)
- Access View Folder (Recommended that admins have access to all View Folders in the Project.)
- Automated Review User (Allows admin user to easily ascertain the overall progress of review.)
- Access View Templates
- Build View
- Edit View
- Linear Review
- Manage Organization Codes
- Rebuild View
- Tag Documents
- View Manager
- Reviewers – Users reviewing automatically batched assignments.
- Access Issue Tag Category
- Access Project
- Automated Review User
- Linear Review
- Tag Documents
View Templates#
Viewpoint’s View Templates functionality can be used to create a repeatable and defensible project management methodology. It is recommended that users create standard View Templates when first beginning a new Project. However, new View Templates can be created at any time. Whenever possible, View Templates should feed directly into Viewpoint’s Automation functionality. This will create the quickest and most consistent method of getting data to Reviewers.
Creating a View Template#
View Templates are generated within the View Manager. To create a new View Templates, choose Setup->View Templates from the menu bar as seen below.
Note: In order to access the View Templates window, the user must be granted the ‘Access View Templates’ permission.
A new window will appear called View Templates. This screen is divided into three distinct sections. The left section is used to name each View Template. Typical names may be ‘Responsive Review’, ‘Privileged Review’, or ‘Hot Review’ depending on the design and goals of your Project.
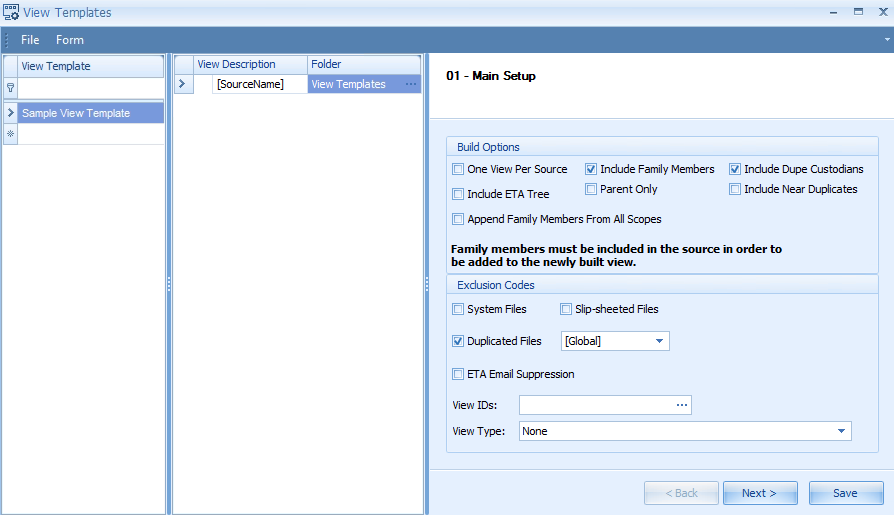
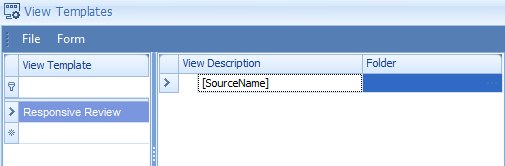
To create a View Template, type a name into the empty box found in the left panel labeled View Template and press Enter.
After the View Template has been named make sure it is selected before proceeding further. Next, users will create the first step in the View Template to be created. To do this, right-click and select New in the middle section of the window.
This will create a record called ‘[SourceName]’ in the View Description field. These can be renamed by clicking on the name and typing a new name. Each View generated should be considered a step in the process of searching and culling. When Views are created using Templates, [SourceName] will keep the name of the View(s) or Scope(s) selected. In the below example the View name was appended to include information that a date range was applied at this step.
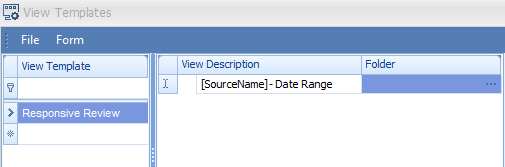
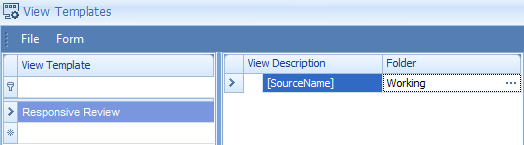
After the View has been named, a folder must be selected. The View created during this step will be placed in the designated folder. If this is a culling assignment only, the View should be placed somewhere that is inaccessible to the review team. To choose the appropriate folder, click on the ellipsis on the right hand side of the Folder selection. In the window that appears select the appropriate folder and click ‘OK’. In the example below, we are putting the View in a folder named ‘Working’.
The next step is to designate the filters that should be applied in this step of the View Template. This is done using the right section of the View Templates window. This section of View Templates is designed to mimic the functionality of the tabs found within the View Manager. The initial section shown is the main setup window.
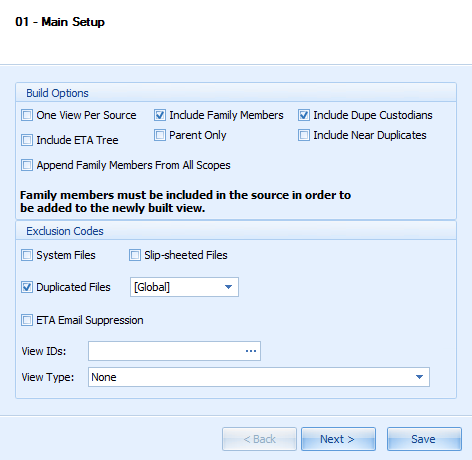
As users hit the Next button they will be taken through the following screens:
- 01 – Main Setup
- 02 – Date Range
- 03 – Addresses
- 04 – Metadata
- 05 – Tagging
- 06 – Custodian
- 07 – Custom Fields
- 08 – Search Terms
A full description for each of these screens can be found in the Viewpoint Review Manual under the View Manager section. Users can choose to apply filters from as many different screens as is necessary. If selections are chosen from multiple screens, please note that they will be applied cumulatively.
Adding Additional View Template Steps#
Most View Templates will require more than just a single step. One named View Template can have multiple Views created in a series of steps or in parallel processes. To create a new View in the View Template, select an existing View in the middle section, right-click, and then click New. This will create a new View indented below the original. An indented entry means that this View in the View Template will be performed using the View created in the previous step. In the example below, the View named ‘[SourceName]-DomainFiltering’ would be using the ‘[SourceName]-DateRange’ View as the source for culling.
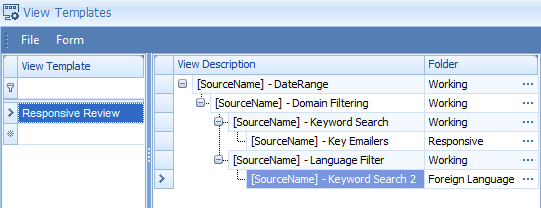
View Templates can also have parallel steps. If the View Template required two different culls to be run over the same set of data, the steps should be run in parallel. To do this, select the View that requires a parallel process to be run, right-click, and then click New. A straight line between two Views will indicate steps that will be run in parallel.
Finalizing a View Template#
Once a View Template is finished, click on the Save button on the lower-right hand corner of window. This will allow users with access to the View Manager to run these same processes over a given source.
Executing a View Template#
To execute a View Template, users must first select one or more sources in the View Manager. These selections can be either Scopes or Views. After selecting the source(s), users should return to the View Templates window by choosing Setup 🡪 View Templates from the menu bar. In the window that appears, select the name of the desired View Template, right-click, and then click Execute.
This will run all steps of the View Template on the selected sources. No matter the number of sources chosen initially, only one View will be created for each source.
Note: By default, these Views will be created using your local computer. Views can be created with the available workers by turning ‘Build View on Workers’ to On from the File 🡪 Options menu of the View Manager.
Deleting a View Template#
Any View Template can be deleted by right-clicking on the View Template’s name and then clicking Delete. Users can also delete steps from a View Template. To delete a step right-click on the View Name for that step and then click Delete.
Duplicating a View Template#
A View Template can be duplicated in its entirety by right-clicking on the View Template and clicking the Duplicate option. The copy can be renamed and edited to handle any necessary changes without having to rebuild the structure from scratch.
Project Pipes#
Pipes provides administrators the ability to automate some of the traditional project management tasks for data that is posted to the Review application. When setup and combined with processing automation/scripts and the Review Automation (batching) system, Pipes will enable administrators to simply point the PMC at new data, set up their processing options, and have the data be processed, pushed to Review, and batched out to reviewers. More information about processing automation can be found in the Process Data section of the Processing manual.
Pipes is accessed through the Setup menu in the Review application’s View Manager window.
Note: In order to access the Pipes window, the user must be granted the ‘Access Pipes’ permission.
Setup#
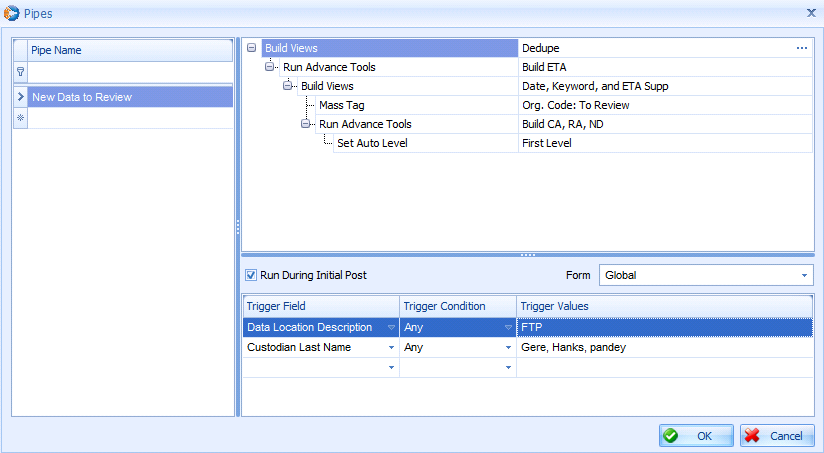
To create a new Pipe, click the first row of the Pipe Name section and type in a name. Before steps can be added to the Pipe, a Form must be selected from the Form field on the middle-right side of the window. There are four kinds of steps that can be created—Build Views, Run Advanced Tools, Mass Tag, and Set Auto Level.
Build Views#
The very first step of any Pipe is automatically set to 'Build Views,' and cannot be changed by the user. This step is dependent on View Templates. To create new View Template, click the + on the right side of the row. This will open the View Templates window. Please refer to the View Templates section of this manual for more information on creating View Templates.

Existing View Templates will be listed in the drop down list.
Run Advanced Tools#
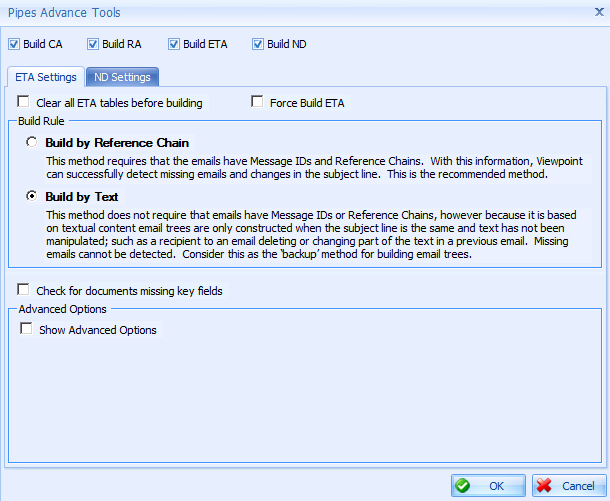
This step allows any combination of CA, RA, ETA, and ND to be built. Clicking on the ellipsis on the right side of a Run Advanced Tools step will open a window to select which advanced tools to run. For specifics on these advanced tools, please refer to the Advanced Tools section in the Viewpoint Review Manual.
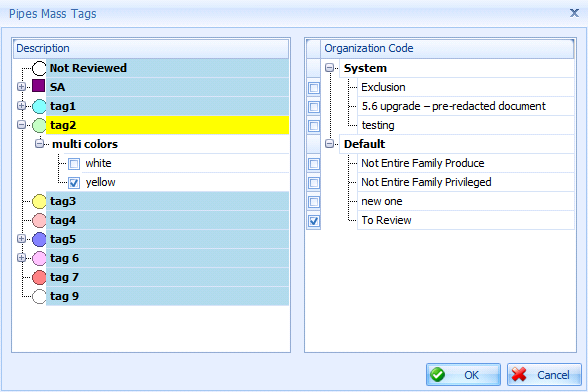
Mass Tag#
This step allows the user to apply specific tags and/or Organization Codes to all the documents applicable to that step of the Pipe. Clicking on the ellipsis on the right side of a Mass Tag step will open a window to select which tags and/or Organization Codes to apply.
For information on setting up tags and Organization Codes in Viewpoint, refer to the Viewpoint Review Manual.
Set Auto Level#
This step allows users to automatically assign an Automation Level to documents applicable to that step of the Pipe. Those documents will then be available for users to check out and review. Automation levels must be set up prior to using this type of step in Pipes. Available Automation Levels will be displayed in the drop down list, using the arrow button on the right side of a Set Auto Level step.
For information on setting up Viewpoint Automation, please refer to the Automation section of this manual.
Adding Additional Pipes Steps#
Most Pipes will require more than just a single step. One named Pipe can have multiple tasks performed in a series of steps or in parallel processes. To create a new step in the Pipe, select an existing step in the top section, right-click, and then click Add Child. This will create a new step indented below the original. An indented entry means that this step in the Pipe will be performed using the previous step as its starting point. In the example below, the first step will build a View(s) using a View Template named ‘Dedupe.’ Then, the second step will build ETA on that new View(s).
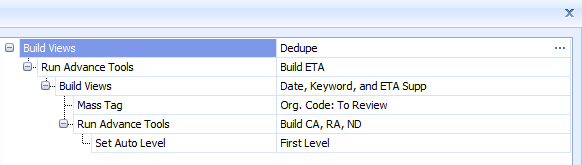
Pipes can also have parallel steps. If the Pipe has steps that are not dependent on the results of one another, the steps can be run in parallel to be more efficient. To do this, select the step that requires a parallel process to be run, right-click, and then click Add. A straight line between two steps will indicate steps that will be run in parallel. In the example above, the steps to mass tag and build advanced tools are performed in parallel.
Triggers#
Triggers can be used to automatically run a Pipe when a new data is posted to the Review platform. However, Triggers are not a required step. To enable the Triggers panel, click the ‘Run During Initial Post’ checkbox.
Note: Only Add Post workflows will check for Pipes Triggers. Update Post and Delete Post workflows will not take into account any Pipes Triggers.
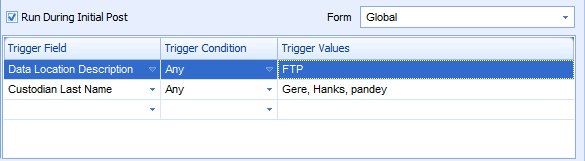
Triggers can be created based on a custodian’s first or last name, Custodian Reference Key field, Data Location Description field, or the Media Source Label field.
A Trigger Condition can be set to Equals, Not Any, or Any.
The Trigger Values field will populate a drop down list with the currently available values for the selected Trigger Field.
When new data is posted to Review, the list of Triggers will be analyzed in the order they appear in this list. The Pipe will not execute unless all of the Triggers in the list match the values of the data set being posted.
Finalizing a Pipe#
Once a Pipe is finished, click on the OK button on the lower-right corner of window. This will allow users, with access to Pipes, to run these same processes over a given source.
Executing a Pipe#
To execute a Pipe, users must first select one or more sources in the View Manager. These selections can be either Scopes or Views. After selecting the source(s), users should return to the Pipes window by clicking Setup and then Pipes from the menu bar. In the window that appears, select the name of the desired Pipe, right-click, and then click Execute.
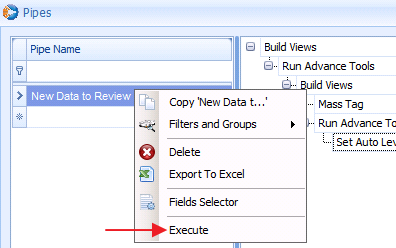
This will run all steps of the Pipe on the selected sources. No matter the number of sources chosen initially, only one View will be created for each source.
Note: By default, Pipes will be executed using your local computer. Views can be created, and Advanced Tools built with the available Workers by turning ‘Build View on Workers’ and ‘Build Advanced Tools on Workers’ to On from the File 🡪 Options menu of the View Manager.
Deleting a Pipe#
Any Pipe can be deleted by right-clicking on the Pipe’s name and then clicking Delete. Users can also delete steps from a Pipe. To delete a step, right-click on the step and then click Delete.
Automation#
Viewpoint Automation is specially designed for Projects with a large number of users and Projects with complex workflows. Utilizing automation allows users to ‘Check Out’ sets of documents without the need for an administrator to assign new permissions or create nightly batches based off of certain criteria. To get the most out of this process we recommended that Project administrators set-up all known users and View Templates at the beginning of the Project. This will provide the best possible results.
Creating Mass Folders#
The Create Mass Folders option in Viewpoint allows an administrator to make a private workspace for each document reviewer. Once these folders have been created, Viewpoint will automatically provide individual permissions to the created folders. Creating these folders is a prerequisite to utilizing Viewpoint Automation.
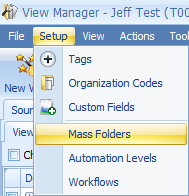
Mass folders are generated within the View Manager. To create mass folders, choose Setup->Mass Folders from the menu bar as seen below.
Note: In order to access the Mass Folders window, the user must be granted the ‘Access Mass Folders’ permission.
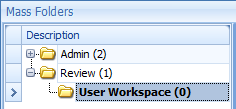
A new window will appear called Mass Folders. This screen is divided into three distinct sections. The left section is used to indicate where these mass folders should be generated within the review. These folders are often place directly under the ‘Review’ top level folder, but can be instead placed in a ‘User’ or ‘User Workspace’ folder, if preferred. Click on the folder to select it as the parent folder for the mass folders you will be generating.
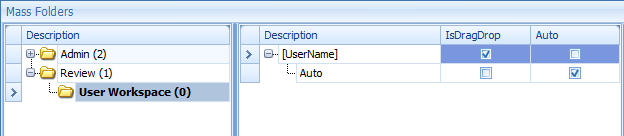
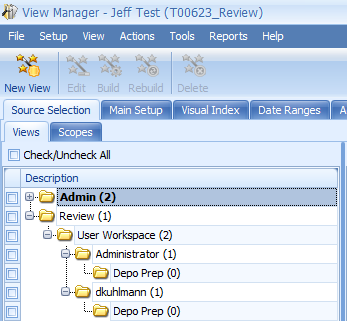
After the folder has been selected the middle panel is used to indicate the names of the folders to be generated for each user. The default structure is a top level folder named after each username and a subfolder named ‘Auto’. The ‘Auto’ folder is where users in the review will Check In and Check Out groupings of documents. It can be renamed if desired.
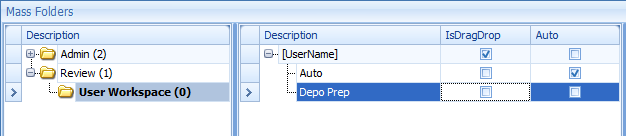
Users can create additional folders by right-clicking and selecting New from the drop down list. A common example of this is a ‘Depo Prep’ or ‘Workspace’ folder that users can use to set aside documents of interest. There is no limit to the number of folders that can be created for each user. However, only one folder can be given the Auto designation.
Selecting a folder as IsDragDrop allows users to click and drag documents from the Documents panel within the review platform directly to the DragDrop folder on the source selector panel.
Note: It is not possible to make a folder both a DragDrop folder and an Auto folder.
The right section of the window is used to indicate which users will have these folders created for them. Users will only display in this View if they have the permission AllowAutomation for this Project. Place a checkbox next to each user that will be utilizing the Viewpoint Automation process.
Note: Users can only have mass folders created for them one time. After mass folders have been created, the selected users will be removed from the user selection list.

Confirm each setting and click OK for Viewpoint to create the appropriate folders. After the process completes you will be able to see the generated folders in the source selector. Note that the created Auto folders are hidden and not visible from the View Manager. The Auto folders will only be visible from the Source Selector within the review application. Each user selected will automatically receive permissions to their created folders.
Creating Automation Levels#
The Automation Levels option in Viewpoint allows an administrator to create levels of documents for user review. The users that are allowed to access each level are set by the administrator. Once these levels are set up, users will be able to pull their review set from predefined levels of documents. When users are finished with their review, all documents pass through a series of user-defined rules to automatically continue through the next phase or phases of the workflow. All of these actions start with the creation of automation levels.
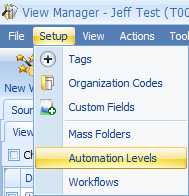
To create a new automation level, choose Setup->Automation Levels from the menu bar as seen below.
Note: In order to access the Automation Levels window, the user must be granted the ‘Access Automation Levels’ permission.
A new window will appear called Automation Levels. This screen is divided into three distinct sections. The top section is used to indicate the default start and end point for each level. A level can be considered a step or phase of the Project review cycle. Typical reviews will have a standard linear review workflow. Consider the below example:
- All documents start in a basic relevancy review. Documents that are coded privileged move to the privileged review team.
- Documents are confirmed for privileged and added to a privileged log. Any document requiring redaction goes to a redaction team.
- Documents are redacted as required.
In the above example, documents flow between users with different roles and responsibilities in a sequential manner. Within Viewpoint Automation, each of the three phases above would become a distinct level. Each one of these levels will be defined in the top section of the Automation Levels window.
To create your first level, type the desired name in the first row in the Level Name field.
Batch Size indicates the number of files that will be checked out per View at this level. By default, this number will be 1,000 files. This number should change based on the number of total files to review and the number of document reviewers in your Project.
Checkin Level relates to the default behavior for files that have finished review in this level. For each level, a series of rules can be applied to all documents that are being Checked In (returned) to review. These rules are defined in the bottom left of the window. After these rules have been applied, whichever level is chosen in the Checkin Level represents where any files not accounted for in the rules will go next.
There are three approaches to handling the default level:
- Have the documents return to the same level they came from. This means that any documents that don’t meet any of the criteria for promotion to the next level of review will return to the same level it came from.
- Have the documents move to the next level of review.
- Have the documents move to an ‘End’ level. This ‘End’ level acts as the final stage of review when no other reviewer coding needs to occur.
Grouping used to set the top-level grouping (if any) used to determine the order that documents will be checked out of this level.
Group Sort must be used if you are using Grouping. Pressing the ellipsis button will bring up a list of custodians currently in the Project. Custodian order can be set by dragging and dropping names, or right-clicking a name and using one of the sort options available in the context menu.
Sorting Order sets the checkout order within the previously set groupings or, if no groupings are applied, across the entirety of the documents in the level. Custom fields available in Review can also be used as a Sorting Order value.
The remaining columns offer the ability to batch out documents based on duplicates, near duplicates and/or email threads. Option can be set to recursive so that near duplicates for email threads will be added and then email threads for those new near duplicates will be added. This process will continue as a loop until there are no more documents to be added to the batch.
Once all columns in the top section of the window have been filled out, hit Enter. This will move you to the next row where additional automation levels can be created.
The second step in configuring automation levels happens in the bottom-left panel. This second panel controls rules that can be created for determining the next level in the workflow. For example, on the ‘Responsive’ level, users may decide to have anything that has no tag is returned to the responsive level. Then a rule will be applied for anything with a ‘Privileged’ tag moved to the ‘Privileged’ review. Using the default level, anything remaining that doesn’t meet these two criteria will move to an ‘End’ review level.
Note: Each rule will be applied in order. To the extent that a document hits multiple criteria, the first criteria found in the list (performed from top to bottom) will be applied. It is extremely important that these rules are thoroughly considered to make sure documents progress through the workflow as intended.
Nine columns are used to configure the rules. The first column, Description, is purely informational and is used to set a brief description of the criteria behind the rule.
All Filters is used to set the majority of the criteria for your rule. After pressing the ellipses button, a window will open that allows the user to set the Check In Level (upper-left panel), production tag rules (upper-middle and upper-right), and issue tag rules (lower-middle and lower-right). The Rule Description (lower-left) displays a textual description of the tagging logic that will be applied by the rule.
Include Family indicates whether family members will be included with this rule. If this box is checked, the family members will progress with the documents that meet this rule’s criteria. Family members are not required to meet the document’s criteria to be included. As it is recommended to always include family members when configuring rules, this box will be checked by default.
Check In Level, Contains Production Tag, Does Not Contain Production Tag, Contains Issue Tag, and Does Not Contain Issue Tag display the check in level and tagging logic set from the All Filters column. They can also be used to adjust the individual rule criteria.
After these columns are filled out, press Enter to move to the next rule. There is no limit to the number of rules that can be applied per level. Any documents that do not meet the rules entered will move to the level designated by the default level in the top section.
The bottom-right section of the Automation Levels window controls user who have access to this level. To provide users access to this level of document review, simply place a check-box next to their name. Permissions are handled on a per-level basis. Access must be granted at each stage of the document review for each user.
Note: Users will only appear in this list if they had Mass Folders created for them previously.
Once all of the levels are set-up appropriately, click OK to finish. You will now need to assign documents to at least the first level created. To assign documents to a level, check the desired View(s) in the View Manager go to Actions and select Set Auto Level. You can then choose from among the list of available levels.
Adjusting Automation Levels#
Automation levels can be moved up or down if the review workflow changes. To do so, simply click on the automation level name and use the up and down arrows to the right to adjust levels up and down. These changes will happen instantaneously. This process may take some time to complete if a large number of files will be affected by the change. This can be done at any time during review. Before any level adjustments are made, it is strongly recommended that users consider other rules that may be affected by this change.
Deleting Automation Levels#
To delete an automation level, select it, right-click, and then click Delete. Levels can only be deleted if there are no documents currently checked out for that level. Rules applied during each level can also be deleted using the same steps.
Automation Review Walkthrough#
This section of the manual will describe the steps that occur during each stage of the Automation review. Although all steps of automation process occur based on the parameters set in the Project, each step will be clearly visible and tracked within the View Manager.
User Check Out/Check In#
The first step of automation is for each user to Check Out a subset of the documents they have access to. These users must have received an automated folder in the Create Mass Folder process and given access to at least one level in the Automation setup. To access these documents users must identify their automation folder in the review Source Selector, right-click and select Check Out or they can simply hit the Check Out button in the top right hand corner. This button will only be visible if the user has a mass folder created and does not currently have a View checked out.
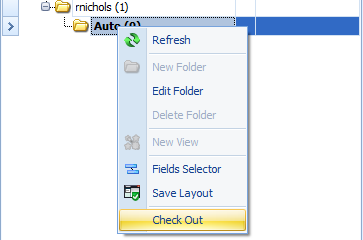
Note: The Automation folders of users are not visible in the View Manager. They are only visible in the Source Selector of Viewpoint Review.
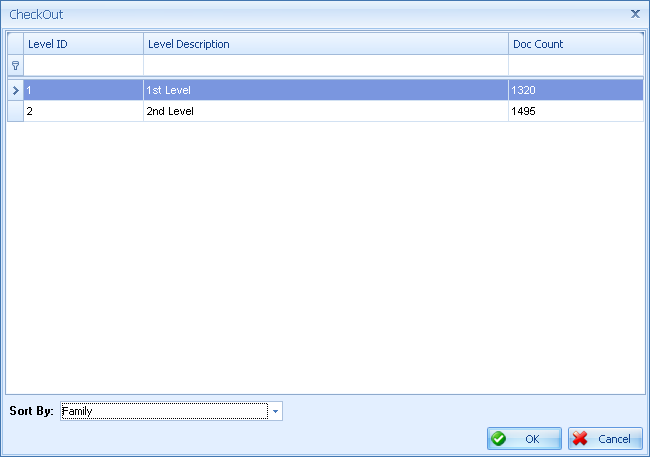
Users will then be given a dialogue box which displays all current levels they have access to and the number of documents in each of these levels. To check out a View of documents, they will click the appropriate level and then click OK. This will then provide them a View from documents within that level. The number of documents checked out is dependent on the setting for this level in the Automation setup. Once these documents have been checked out, no other user will be able to check out those documents. Family members will be kept together as long as all family members are part of the same level.
By default, documents will be checked out in order of family (Parent ID). If desired, a user can change the Sort By option to ‘Custodian’ to check out documents in order of custodian last name.
Note: Users are only able to Check Out one View of documents at a time.
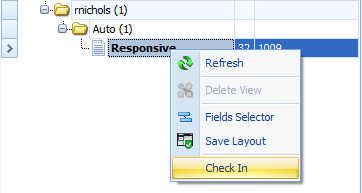
After Check Out, the created View will be visible within the Source Selector. The name of the View created will be based on the selected level. The user will then perform their document review. Upon completion of the View, the user will again right-click the View in the Source Selector and select Check In or they can simply hit the Check In button in the top-right corner. This button will only be visible if the user currently has a View checked out. Doing so will remove the View from the user’s source selector. All documents in the View will move to new levels based on the automation rules set up for this level. Users will now be able to Check Out a new View of documents.
Best Practices and Notes#
Changing the Automation Level of a View#
To bulk move documents to a different level, check the desired View(s) in the View Manager go to Actions -> Set Auto Level. You can then choose from among the list of available levels.
This process can also be used to force promotion or demotion of documents. For example, if you had documents that are currently in a ‘Responsive’ level (level 1) and you want to bulk move all of them to a ‘Hot’ level (level 2), you can simply assign all the relevant documents to the ‘Hot’ level.
You can also clear the assigned level for a document set by selecting Reset Auto Level from the same Actions menu.
Note: Documents that are currently checked out should never be manually promoted.
Checking in Another User’s View#
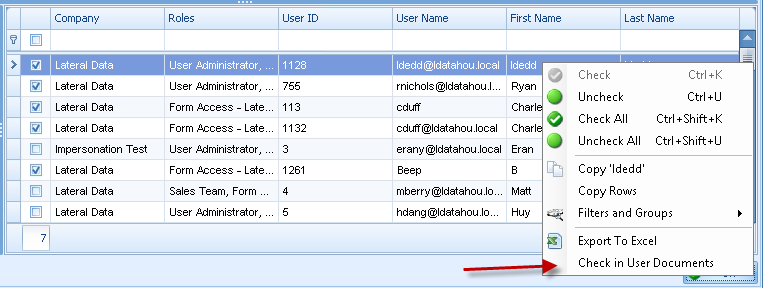
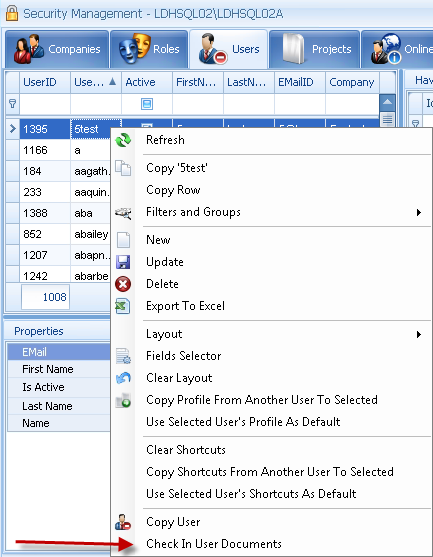
When a user is not able to Check In their own documents, administrators can Check In the documents for them. Checking in documents for another user will perform the same Check-In process as it would be if the user did it themselves from the user interface. There are two ways of performing this process.
- From the View Manager’s Automation Levels interface, right-click on one or more users and select the option Check in User Documents. This will perform the Check In process for these users within the current Project.
- From the Security Manager’s Users tab, right-click on one or more users and select the option to Check in User Documents. This will perform a Check In process for these users across all Projects in which documents are checked out.
Document Loops#
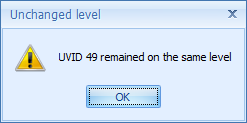
It is sometimes recommended to have documents return to the same level they were checked out from. Some examples might be having first level review documents return to first level review if they have not received a top level tag or having documents sent for redaction not having an issue code of ‘Redaction Complete’. Creating a loop for these circumstances ensures that each document is reviewed following the appropriate protocol before promoting to the next automation level. When creating rules for promotion, these looping checks should always occur before any promotion checks. If a loop has been created, a user will receive a warning upon Check In.
When a Project is first beginning, it is important for administrators to work with users to make sure that documents are promoting as expected. If they are not, it may be that an unintentional never ending loop has been created. There should always be a way for documents to move out of their current level.
End Levels#
Each Viewpoint Automation review must have at least one ‘End’ level. An ‘End’ level is meant to be a holding place for all documents that do not require any additional review. Each document that has completed review should instead move to one or more ‘End’ levels. It is not recommended to give users access to these levels as these documents do not need to be handed out for review.
View Template Steps#
When utilizing View Templates it is recommended to only apply one filter per step. This will allow users to clearly track the amount of documents reduced per filter. If a user applies a filter that removes duplicates, a date range and keywords in one step, they would not be able to tell the number of documents filtered during each step of the View Template. In addition, although review criteria will often change, such as the changing of keywords or the expansion of a date range, these filters will not typically change simultaneously. Having one filter per step allows a user to easily reapply every filter and determine reduction during each step of the process of the View Template.