
Sections Delivery Manual
Manual informationDelivery Manual
1.1 | August 30, 2021 | Rebranded adhering to the latest Conduent brand central documentation standards/guidelines. | Technical Writer
Document conventions
Convention | Explanation |
|---|---|
Bold | For file names, commands, fields, menus, options, and window names. |
Courier New | Commands as you should type them. |
Lucida Console | Example output generated by the system. |
Italics | For configuration variables, including variable portions of file names and URLs. Also indicates a document name. |
Note / Blue Callout | The Blue Callout text indicates information that is of special interest or importance, an idea that could be useful or additional information about a product or a feature. |
| The Caution icon along with the text indicates actions that can lead to problems in system operation or configuration settings if the instructions are not followed properly. |

Revision history
This section tracks the initial creation of the document after each major version thereafter.
Ver: | Date | Description | Reviewed / Approved By |
|---|---|---|---|
1.0 | Apr 12, 2013 | Initial Version | Team |
1.1 | August 30, 2021 | Rebranded adhering to the latest Conduent brand central documentation standards/guidelines. | Technical Writer |
Delivery#
To launch the Delivery module, select the Delivery button on the Dashboard.
Select New at the top-left of the Delivery module, or right-click on the main Delivery panel and select New. The user is given three options when creating a new Delivery: Use Wizard, Use Grid, and From Template.
Delivery Panel#

The Delivery panel lists the details of each delivery. Field values are non-editable from this panel. The available fields in this panel are defined below:
- ID: Unique number assigned to a delivery.
- Form: The selected form used to create a delivery
- Description: The user-generated name for a delivery.
- View ID: The source View ID used to create a delivery.
- View Description: The source View used to create a delivery.
- Files: Number of documents in the View used to create a delivery.
- Created Date: Date a delivery was created.
- Created By: User name of creator of the delivery.
- Delivered Date: Date a delivery was run.
- Delivered By: User name of the person who executed the delivery.
- Status:
- New: Delivery has been created but not actually run. (Files have not been copied to Production folder on file server.)
- Numbered: Numbering has been performed, but the delivery has not yet been run.
- Submitted: Delivery has been submitted, but has not yet started.
- In Progress: Delivery has been created and is currently running.
- Done: Delivery has been created and fully run. (All files have been copied to the Production folder on file server.)
- Error: Delivery encountered an error during the execution of the delivery, and did not finish.
- NumberingError: An error was encountered while trying to number the delivery.
- Aborted: Delivery was purposely cancelled and did not finish.
- Comments: User-entered text of the Comments field in the Delivery Wizard or Grid.
- # Of Natives: Count of native files after renumber.
- # Of Texts: Count of text files after renumber.
- Images: Number of pages in Image delivery. Only available after renumbering an image delivery.
- # Of Slipsheets: Count of slipsheet files after renumber.
- Begin Bates: First Bates (Prod) used in the delivery after renumber.
- End Bates: Last Bates (Prod) used in the delivery after renumber.
- Estimated Size (MB): The estimated size of the final delivery folder, in megabytes.
- Renumbered By: User name of the person who last renumbered the delivery.
- Renumbered Date: The date the delivery was last renumbered.
Note: Begin Bates and End Bates fields will be left blank for Later Deliveries. Bates, Renumbered, and Estimated Size fields may not be populated for delivery records that were produced prior to Viewpoint 6.2.
Right-click Menu#
Right-click on any delivery in the Delivery panel to see the following options.
- Fields Selector: This is used to add additional fields to the panel.
- Open in Review: This opens the source View of the selected delivery in Review.
- Open in Wizard: This opens the existing delivery using the Delivery Wizard.
- New: Create a new delivery using:
- Delivery Wizard
- Delivery Grid
- From Template
- Based on Current. This option allows users to create a new delivery that carries over the settings of the delivery you are choosing the option from. The volume number and starting bates number will jump to the next starting number. If you are using sequence folders in the Files section (defaulted to [Seq:000]), you will need to manually change this to the next sequential number.
- Delete: This deletes the delivery record from Viewpoint. Using this option will not delete the actual delivered files. To delete an entire delivery, use the Delete Volume option before selecting the Delete option.
- Change View: This changes the source View used for the delivery. This option is only available if the delivery has not been numbered or if the numbering has been cleared.
- Delivery/Form Visibility: This allows users with the necessary permissions to select one, or more Forms to permit users of that Form to view the Production Bates Number and Production Images/Text.
- Show delivery in Review regardless of delivery status: When checked, so long as the selected delivery has been renumbered, the delivery will appear in the production Viewers regardless of its delivery status. The Beg/End Bates (Production) fields will be populated and visible in Review. The default value is unchecked.
- Deliver: Executes the delivery process.
- Renumber: Numbers all documents in the selected delivery to match configured options. During the renumber phase, Viewpoint will assign bates numbers, update any needed paths and perform other tasks needed to meet the user-set delivery specifications.
- Renumber and Deliver: This will automatically renumber and execute the delivery process in a single step. This option is only available if the selected delivery’s status is listed as New. To keep this a one-click process, using this option will skip the prompt to populate the Data panel, as well as the prompt to run validation after renumbering.
- Clear Numbering: Resets all numbering to NULL.
- Create X-Ref: Used to create a new X-Ref file after a delivery has already been run.
- Create searchable PDF: This option will generate searchable PDFs for a completed PDF delivery. After choosing this option, the user has the option to select a specific Worker to batch the task to.
Note: The Worker performing this task requires an Expervision license in order to proceed.
- Generate redaction text: This will prompt the user to select an OCR engine. All redacted documents in the delivery will be OCR’d.
- Delete Volume: This option deletes the delivered files from the Production folder on the file server. It will not delete the delivery record from Viewpoint. Once a delivery has been run, the delivery is locked and no changes can be made. Delete Volume unlocks the delivery for changes.
Note: If using this option before running the actual delivery, the Production Image and Production Text viewers will not populate with a delivered rendering.
- Browse to: Opens a file browser to the Production folder location.
- Save As Template: Saves the currently selected delivery settings as a template.
- Export Settings: Exports a text file containing all the settings of the selected delivery.
- Import Settings: Imports a text file containing all the settings of an exported delivery file.
Data Panel#
The Data panel typically occupies the bottom section of the main Delivery window. This panel provides an overview of the delivery on a document level. With it, the user can check the numbering of the documents and certain delivery settings before the delivery has even been produced. After a delivery has been produced, the panel can also be used to help troubleshoot delivery errors and identify problematic files.
To populate the panel, right-click in the panel and select the “Refresh” option. If the delivery has not already been renumbered, the user will be prompted to renumber before the documents will be displayed in the panel.
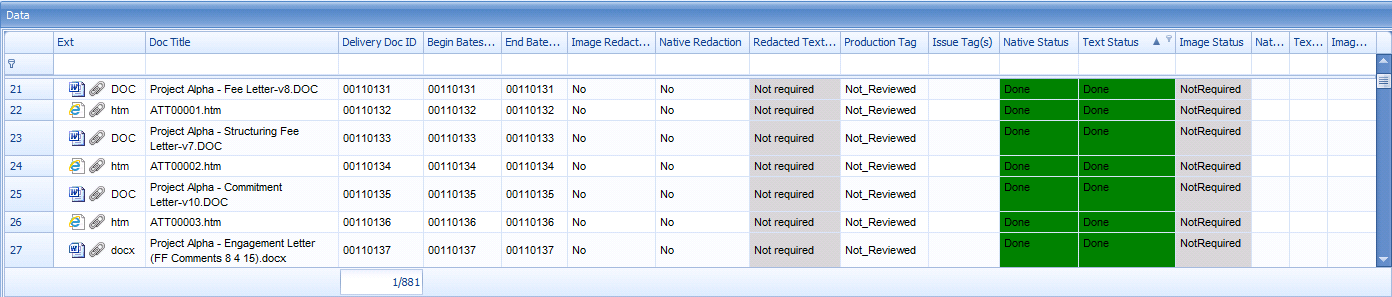
With the panel populated, users can use the right-click menu options to perform various tasks.
Right-click Menu#
- Fields Selector: Used to add additional fields to the panel.
- Copy Doc IDs: Copies the DocIDs of the selected documents to the user’s clipboard.
- Browse to (Delivered): If a selected document has been delivered, users can select this option to open up the folder location of that document’s delivered native, text, or image.
- Review Selected: With documents selected, this option is used to open up the Review window and view the selected documents in their own ad-hoc View.
- Generate redacted text: This option will be available if the user has selected one or more redacted documents that have been delivered, but has not yet had the redacted text generated.
Properties Panel#
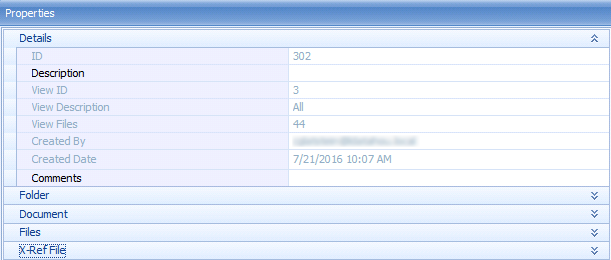
The Properties panel displays all the settings of the delivery selected in the Delivery panel. The bottom of the panel provides a short description of each selected setting. This panel can also be used to set up a new delivery, which is covered in the Create a New Delivery Using the Properties Panel section of this manual. The various parts of this panel, with each specific setting, are also covered in the respective section.
Create a New Delivery Using the Wizard#
The Viewpoint Delivery Wizard allows users to create deliveries in a guided section-by-section approach. Users may also elect to bypass the Delivery Wizard by using the Properties panel. The Properties panel approach is described in the Create New Delivery Using the Properties Panel section of this manual.
The Delivery Wizard can be launched in the following ways:
- Click the New icon located below the File menu and choose the Use Wizard option in the drop-down menu.
- Right-click in the Delivery panel, select New, and then Use Wizard.
- Existing deliveries may be opened in the Wizard by right-clicking on a delivery in the Delivery panel and selecting Open in Wizard.
Delivery Wizard Navigation#
The Delivery Wizard left panel displays all the Delivery Wizard sections applicable to the current delivery. Additional sections will be added or removed from the left panel depending on the selected settings.
- Users may jump to a desired section by clicking on the section left panel:
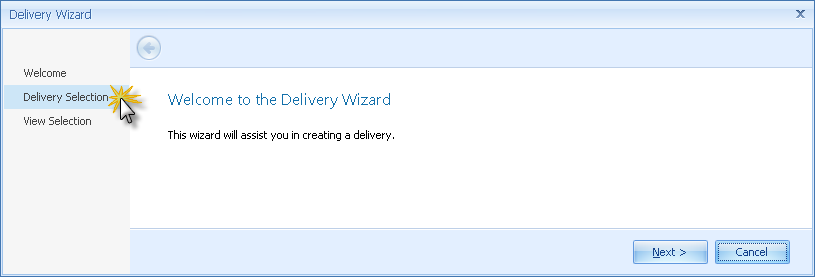
- Next: Moves to the next section of the Delivery Wizard.
- Cancel: Close Delivery Wizard.
- Left Arrow: Located near the top-left area of the wizard, this button moves to the previous section of the Delivery Wizard.
Delivery Section#
The New Delivery section provides the option to create a brand new delivery using default settings, build a new delivery using an existing delivery template, or build a new delivery using an existing delivery in the Project as a template.
- Build a new delivery: Starts the Delivery Wizard using default settings.
- Build a new delivery based on an existing template: Prepopulates the Delivery Wizard settings based on an existing global delivery template. Global delivery templates are available across all projects within the Viewpoint environment. Users may then customize the delivery settings as needed.
- Build using existing delivery volume settings: Prepopulates the Delivery Wizard settings based on an existing Delivery within the selected project. Users may then customize the delivery settings as needed.
View Selection Section#
The View Selection section requires the user to select a View to deliver. Only one View may be selected for delivery.
- Views Left Panel: Place a checkmark in one or more View folders to display all the available Views in the right panel.
- Views Right Panel: Left-click on a View to select it as the source View for the delivery. Users may sort and/or filter using the following columns in the panel grid:
- View ID: Viewpoint View ID
- Description: View description
- Files: The number of documents contained in the View
- Form: The Viewpoint form used to create the View.
- Additional fields are also available to be added using the Fields Selector option in the right-click menu options.
Once the desired View is highlighted in the Views right panel, click Next to move to the next section of the wizard. The previous screen may be accessed by clicking the left arrow button at the top of the Delivery Wizard window.
Details Section#
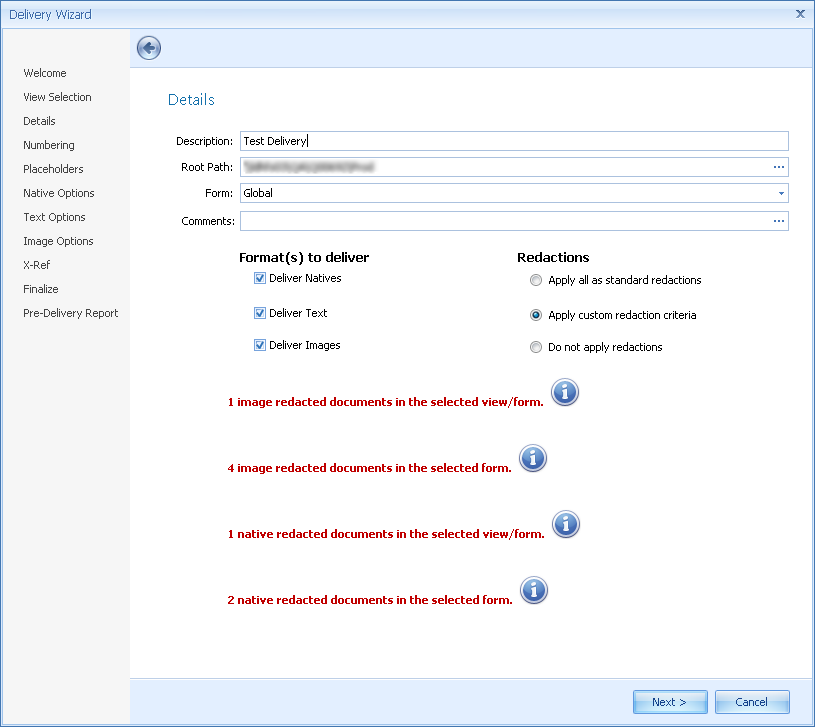
The purpose of the Details section is to define the basic parameters of the delivery. Selections made in this section may add or remove sections from the left panel of the Delivery Wizard.
- Description: User-defined description of the delivery
- Root Path: The UNC path for the completed delivery output. The default location is contained in the Prod folder of the Project network storage location. Users may change the output location by typing/pasting in a new path, or clicking the ellipsis in the field value and navigating to the desired output location.
- Form: The selected Form to use for the delivery. The selected Form may affect both the redaction set that is applied to the delivery and who has access to view the delivery in Review.
- Comments: User-defined comments about the delivery.
- Format(s) to deliver: Allows the user to select any combination of natives, images and/or text to deliver.
- Deliver Natives: Enable/disable delivery of native files
- Deliver Text: Enable/disable delivery of extracted text/OCR
- Deliver Images: Enable/disable delivery of images
- Redactions: Allow users to define redaction parameters for the delivery
- Apply all as standard redactions: This option is generally used for most deliveries of redacted documents and will apply the following redaction settings:
- Images will be delivered in redacted form
- Native files will not be delivered for redacted documents
- Redacted text will not be delivered. This text is created by running OCR on the redacted images.
- Apply custom redaction criteria: Allows the user to define custom parameters for delivery of redacted documents. The redaction settings will be applied by the user in the Native Options, Text Options, and Image Options sections of the wizard.
- Do not apply redactions: Ignore all redactions and deliver natives, text and images in non-redacted form.
- Context-sensitive redaction alerts: If the selected Form or View contains redacted documents, the following alert messages will appear:

- Indicates the number of documents in the selected Form that contain image redactions. This does not necessarily indicate that the documents are in the selected View to deliver.

- Indicates the number of documents in the selected Form and in the selected View that contain image redactions.

- Indicates the number of documents in the selected Form that contain native redactions. This does not necessarily indicate that the documents are in the selected View to deliver.

- Indicates the number of documents in the selected Form and in the selected View that contain native redactions.
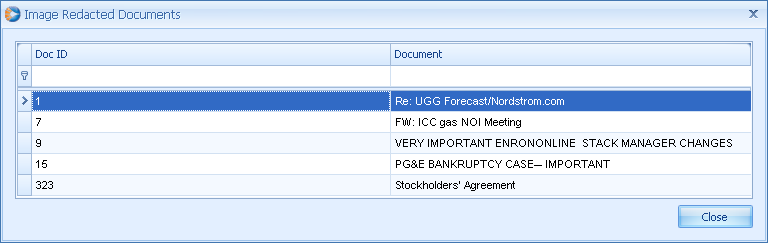
- Clicking on the information icon to the right of the alert message will open a window containing a list of documents containing the redaction:
Numbering Section#
This section sets the numbering schema that will be used for the delivery.
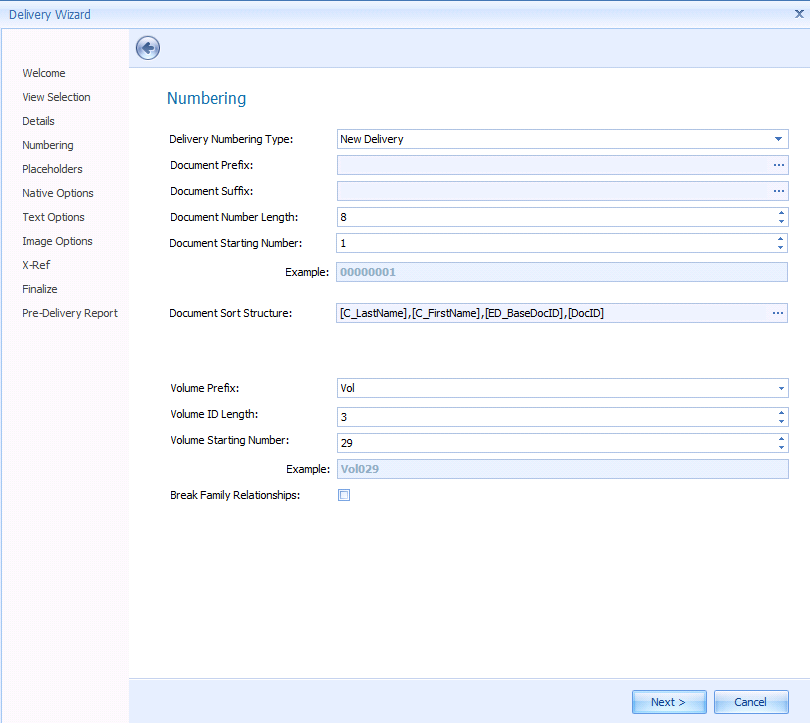
- Delivery Numbering Type: Allows the user to designate a new delivery numbering sequence or to re-use a previous delivery’s numbering sequence:
- New Delivery: Basic sequential numbering using a new delivery numbering sequence.
- Re-deliver Using Previous Bates Number: Re-delivers documents using a Bates sequence already used to deliver the selected source View. This option is not available if the View has not already been delivered previously.
- When this option is selected, the Previous Delivery option will appear. Select the previous delivery from the drop-down menu. The drop-down menu will list all the available previous deliveries of the source View.

- Images for Previous Native Delivery: Used when redelivering native files as images. This will add a “_0001, _0002” numbering scheme to the Bates number for each individual page within the document.
Note: This option will be automatically selected, and the other options grayed out, when delivering a View that was built using the Beg Bates (Production) section of the MISC. filter tab in the View Manager.
- Document Prefix: Sets a prefix for the numbering scheme. Click the ellipsis to open the Prefix Structure Builder. Specific text can be typed in the top section, or field values can be added to the prefix by double-clicking the field name below.
- Document Suffix: Sets a suffix for the numbering scheme. Click the ellipsis to open the Suffix Structure Builder. Specific text can be typed in the top section, or field values can be added to the suffix by double-clicking the field name below.
- Document Number Length: Sets the number of digits in the numeric portion of the Bates number.
- Document Starting Number: Sets the starting Bates number for the first document in the delivery. If documents have been delivered already using the selected Document Prefix, Viewpoint will automatically choose the next undelivered number as the Document Starting Number.
- Example: Displays an example of how the sequence will appear when delivered.
- Document Sort Structure: The sort structure dictates the order that files will be assigned a Bates number. The sort structure is [C_LastName],[C_FirstName],[ED_BaseDocID],[DocID] by default. With this structure, Bates numbers are assigned based on the custodian’s last name then first name then BaseDocID then DocID. Having the BaseDocID then DocID ensures that families will be kept together. You can change what is before BaseDocID to assign numbers based on Date, Author, etc. To keep family together, you should always end with BaseDocID then DocID.
- To customize the Document Sort Structure, click the ellipsis at the end of the field and define a sort structure using the Structure Builder window:
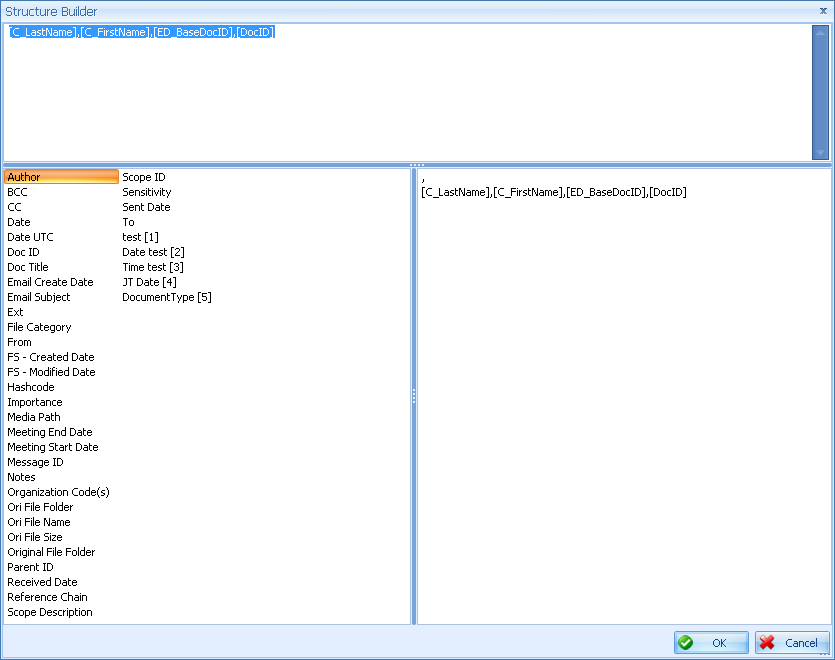
- Sort criteria can be typed directly into the top text box or the mouse can be used to select fields to use for sorting by double-clicking the desired field in the bottom-left panel.
- Volume Prefix: Enter a prefix for numbering of the delivery volume. Typically this would be a prefix that makes sense to the case and continue with that prefix for that type of delivery. (Example: Company is ‘Enron’. The Volume Prefix could be ‘ENR’.)
- Volume ID Length: The length of the numeric portion of the volume name.
- Volume Starting Number: The starting number for the numeric portion of the volume name. Viewpoint will automatically increment to the next delivery volume starting number if previous deliveries have been created using the same Volume Prefix.
- Example: Displays an example of how the Volume sequence will appear when delivered.
- Break Family Relationships: When enabled, Viewpoint will ignore the traditional renumbering and delivery rules that keep families together and also consecutively numbered. Instead, renumbering and delivery rules will be applied as if the documents in the source View were standalone documents. Delivered X-Ref files will also treat each document as a standalone file. This means that any exported field that relates to a parent/child relationship, such as Parent Main Date or Parent Bates #, will be populated as if the document is a standalone document and did not have any parent or child present.
Note: Because Viewpoint will no longer be using the family relationships to determine the order in which Bates numbers are assigned, this option can have a drastic effect on the assigned Bates number.
Placeholder Section#
A placeholder can be used to produce a slipsheet for documents in the source View based on a document’s Production Tags, Issue Tags, File ID, Organization Codes, or Slipsheet.
In terms of Viewpoint, a slipsheeted file is not the same as a file with a placeholder. A file can be slipsheeted in the Viewpoint Processing application for various reasons, and these slipsheets are already created and visible within the Viewpoint Review application. Placeholders are slipsheets that are generated at the time of delivery, based on the criteria selected per delivery.
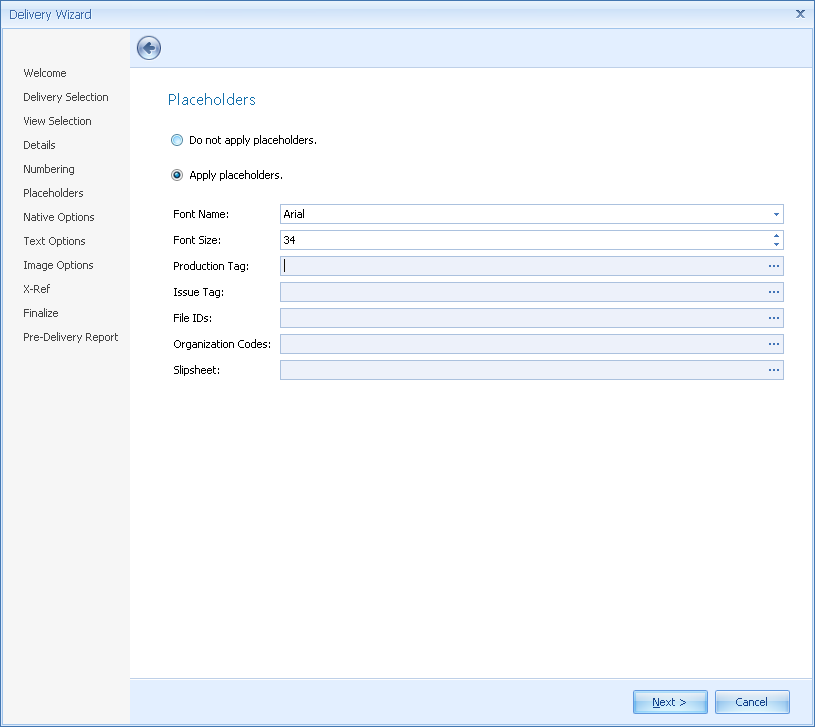
- Do not apply placeholders: Do not apply placeholders to any files in the delivery.
- Apply placeholders: Apply placeholders to certain groups of files in the delivery. This will result in a placeholder slipsheet being delivered in place of the file. No original image, text or native versions of the file will be delivered. If selected, the following options will appear:
- Font Name: Font to use for the Placeholder slipsheet to be provided in place of the actual file.
- Font Size: Font size for text to appear on the Placeholder slipsheet.
Note: Font size is 3X normal font size. Size 12 in a MS Word document = 36 in Viewpoint.
- Production Tag: Apply placeholders based on the file’s Production Tag. Click the ellipsis to configure this option:
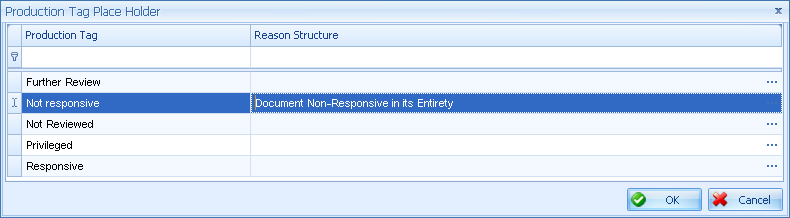
- A list of the Production Tags will appear that are contained within the source View and Form. To indicate that a Placeholder slipsheet should be delivered for that Production Tag, a Reason Structure must be supplied by either typing directly into the corresponding Reason Structure text box or by indicating a field value to appear by selecting the ellipsis on the right side of the Reason Structure column and selecting field value using the Structure Builder.
- The text value entered or the field value will appear in the text of the Placeholder slipsheet.
- Issue Tags: Apply placeholders based on the file’s Issue Tag(s). Click the ellipsis to configure this option.
- FileIDs: Apply placeholders based on the file’s File ID. Click the ellipsis to configure this option. For large deliveries, a splash screen may appear while the system loads all of the FileIDs contained in the Source View.
- Organization Codes: Apply placeholders based on the file’s Organization code(s). Click the ellipsis to configure this option.
- Slipsheet: Apply placeholders based on the processing slipsheet applied to the file. Click the ellipsis to configure this option.
Note: To apply placeholders for just the image of the document, refer to the Image Options section of this manual.
Native Options Section#
This section provides for the delivery of all or certain native files for the source View. This option is only configurable if the Deliver Natives option is selected in the Details section of the Wizard. 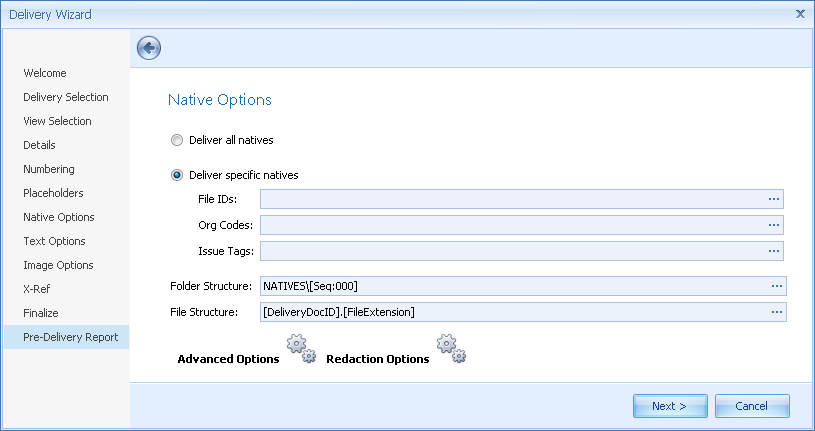
- Deliver all natives: All documents in the View will have native files delivered (default selection).
- Deliver Specific Natives: Only certain documents in the View will have native files delivered based on the following options:
- FileIDs: Deliver in native format based on a file’s File ID. To configure this option, click the ellipsis on the right side of the File ID box. A FileID Selector window will appear:
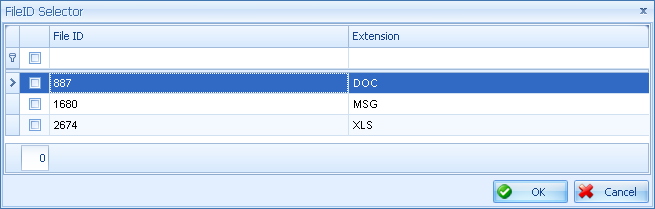
Place a check mark in the check box to the left of the corresponding File ID / Extension(s) that are to be delivered in Native format.
- Org Codes: Deliver in native format based on a file’s Organizational Code. To configure this option, click the ellipsis to the right side of the Org Code box and place a check next to the Organization Code(s) that needs to deliver native files.
- Issue Tags: Deliver in native format based on a file’s Issue Tag value(s). To configure this option, click the ellipsis to the right side of the Issue Tags box and place a check next to the Issue Tag(s) that needs to deliver native files.
Note: If the option to deliver specific natives is used, the Folder Sequence as Image option in the Native Advanced Options section will automatically be checked.
- Folder Structure: Dictates the folder structure of the delivered natives. Click on the ellipsis to customize. Please see the Structure Builder section for customization options.
- By default, natively delivered files will appear in a folder called ‘NATIVES’ in the delivery location.
- File Structure: Dictates the naming convention of the delivered native files. Click on the ellipsis to customize.
- By default, natively delivered files will be named based on the Delivery DocID (Bates Number) plus the original native extension of the file.
Native Advanced Options#
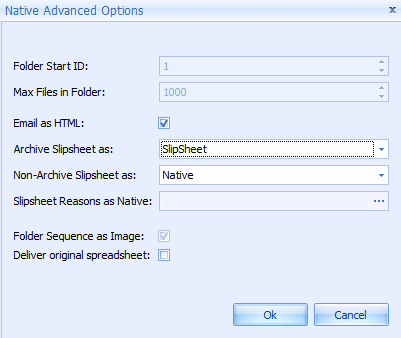
- Folder Start ID: Starting sequence folder number.
Note: This field does not automatically populate to the next number when copying settings from one delivery to another.
- Max Files in Folder: Sets the limit for number of files copied into a folder. Default setting of 1,000 recommended for native deliveries.
- Email as HTML: By default, emails are delivered in HTML format. Unchecking the box will deliver the native file.
Note: We do not recommend disabling this option as delivering emails in the original native format may have unintended consequences, including inadvertent delivery of email attachments.
- Archive Slipsheet as: Dictates how compressed archives are to be delivered. By default, the processing slipsheet will be delivered. Options include delivering a slipsheet, delivering the original native archive, or deliver both a slipsheet and the original native archive.
- Non-Archive Slipsheet as: Dictates how non-archive slipsheeted files are to be delivered. By default, the processing slipsheet will be delivered. Options include delivering a slipsheet, delivering the original native archive, or deliver both a slipsheet and the original native archive.
- Slipsheet Reasons as Native: By default, a slipsheeted file will be delivered as a slipsheet even in a native delivery. This option allows you to deliver the native file for slipsheeted files based on certain slipsheet codes. Click on the ellipsis to choose the slipsheet reason(s) to deliver as native.
- Folder Sequence as Image: This option ensures that the native file for a given document will be in a sequence folder with the same number as the corresponding image. No matter the file server path, the sequence folder for the natives will match the sequence folder for the images.
Note: This option is required if using the Deliver Specific Natives option.
- Deliver Original Spreadsheet: This relates to spreadsheet files that were processed using the Expose All Excel Content option in the Processing application. When this option is enabled, the original spreadsheet file will be delivered rather than the version with all content exposed.
Native Redaction Options#
Note: This option is only available when Apply custom redaction criteria is selected in the Details section of the Wizard.
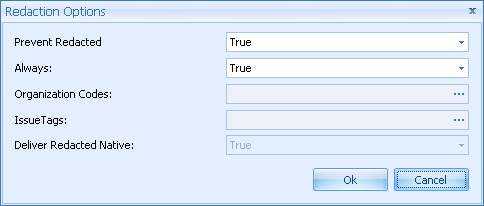
Prevent Redacted: Dictates how redacted documents will be delivered if they have been selected to be delivered natively:
- True: Image redacted files will be prevented from being produced natively. Depending on the other options selected below, native redacted files can be set to produce the redacted version of the native, the original version of the file, or no native at all.
- False: Original natives will be produced, regardless of native or image-based redactions.
- Always: Allows selective overriding of the Prevent Redacted option based on certain Org Codes or Issue Tags:
- True: Image redacted files will not be produced natively. Native redacted files will produce the redacted version of the native file.
- False: Allows certain redacted files to be produced in native format based on the selected Organization Codes and/or Issue Tags. This allows the Organization Codes and Issue Tags options to be edited on the lines below.
- Organization Codes: Specify redacted documents to produce natively. Click the ellipsis to configure. This option is only configurable if Always = False. If image-redacted documents do not have the Organization Code(s) selected, then the un-redacted native will be produced.
- Issue Tags: Specify redacted documents to produce natively. Click the ellipsis to configure. This option is only configurable if Always = False. If image-redacted documents do not have the Issue Tag(s) selected, then the un-redacted native will be produced.
- Deliver Redacted Native: Dictates how native redaction documents will be produced if they have been selected to be produced natively.
Note: This option is only enabled when Prevent Redacted = True and Always = False. For common configurations of the redaction options, please refer to Appendix A of this document.
- True: Files with a native redaction will deliver the redacted native. This is the default option.
- False: Files with a native redaction will deliver the original, non-redacted native file.
Text Options Section#
This section provides for the delivery of extracted or OCR text for the files in the source View.
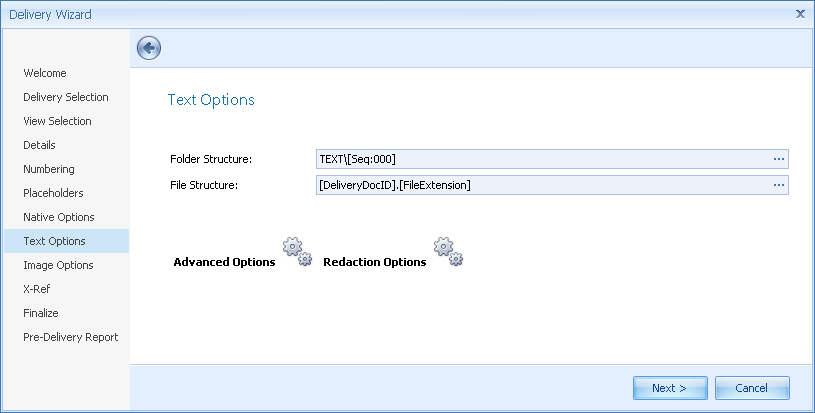
- Folder Structure: Dictates the folder structure of the delivered text. Click on the ellipsis to customize. Please see the Structure Builder section for customization options.
- By default, text files will appear in a folder called ‘TEXT’ in the delivery location.
- File Structure: Dictates the naming convention of the delivered text files. Click on the ellipsis to customize.
- By default, delivered text files will be named based on the Delivery DocID (Bates number) plus a ‘.TXT’ extension.
Text Advanced Options#
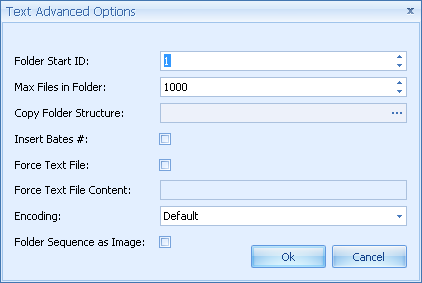
- Folder Start ID: Starting sequence folder number.
Note: This field does not automatically populate to the next number when copying settings from one delivery to another.
- Max Files in Folder: Sets the limit for number of files copied into a folder. Default setting of 1,000 is recommended for text deliveries.
- Copy Folder Structure: This option provides the ability to deliver a second set of text files to a different location.
- Insert Bates #: When checked, the files’ beginning Bates numbers will be inserted into the top-left corner of the delivered text files.
- Force Text File: When checked, Viewpoint will deliver a blank text file for all documents that do not have a corresponding text file. In the Force Text File Content field you can add custom text to be placed in the forced text file, e.g., ‘This File Has No Extracted Text.’
- Encoding: By default, text files will be delivered in their original encoding format. Use this option to switch between ASCII, UTF-16, UTF-8, and ASCII ISO 2859-1.
- Folder Sequence as Image: This option ensures that the text file for a given document will be in a sequence folder with the same number as the corresponding image. No matter the file server path, the sequence folder for the text will match the sequence folder for the images.
Text Redaction Options#
Note: This option is only available when Apply Custom Redaction Criteria is selected in the Details section of the Wizard.
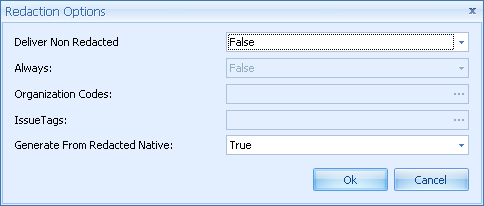
- Deliver Non-Redacted: When changed to True, Viewpoint will deliver non-redacted versions of the text for redacted documents.
- Always: When changed to True, Viewpoint will deliver non-redacted text of all redacted documents. When False (and Deliver Non-Redacted is True), users can then specify which documents should deliver non-redacted text based on their Org Code(s) or Issue Tag(s).
- Organization Codes: Click the ellipsis to specify which Organization Code(s) should deliver non-redacted text of redacted documents.
- Issue Tags: Click the ellipsis to specify which Issue Tag(s) should deliver non-redacted text of redacted documents.
- Generate From Redacted Native: Allows one to recreate text for native redaction documents.
- True: Deliver redacted versions of the text for native redaction documents. This is the default option.
- False: Deliver non-redacted versions of the text for native redaction documents.
Image Options Section#
This section provides for the delivery of the image files for the documents in the source view.
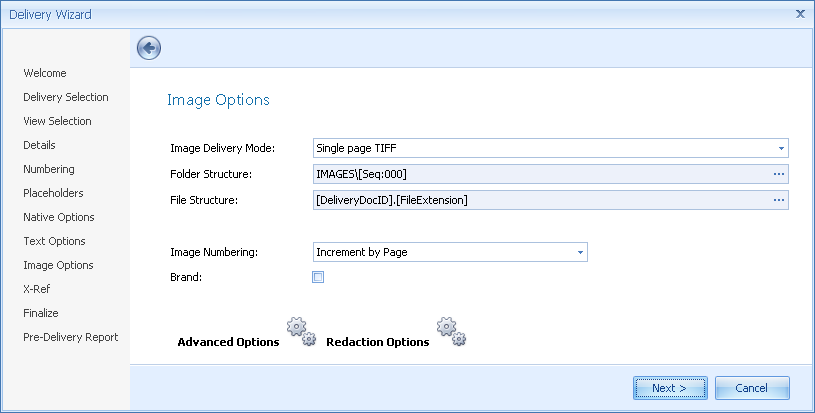
- Image Delivery Mode: Dictates the image output format for the delivery:
- TIFFSinglePage: Deliver files as single-page tiffs.
- TIFFMultiPage: Deliver files as multi-page tiffs.
- JPG: Deliver files as JPGs.
- JPGColorTIFFSinglePage: Deliver files tiffed in color as JPGs and files tiffed in black and white as single-page tiffs.
- JPGColorTIFFMultiPage: Deliver files tiffed in color as JPGs and files tiffed in black and white as multi-page tiffs.
- PDF: Deliver files as image-based PDFs.
- Folder Structure: Dictates the folder structure of the delivered images. Click on the ellipsis to customize. Please see the Structure Builder section for customization options.
- By default, image files will appear in a folder called ‘IMAGES’ in the delivery location.
- File Structure: Dictates the naming convention of the delivered images. Click on the ellipsis to customize.
- By default, the delivered image files will be named based on the Delivery DocID (Bates number), plus the appropriate extension for the selected image output format.
- MultiPage Name Method: Allows the user to define the naming convention for multipage image output formats.
Note: This option only appears when selecting a multipage image output format (Multi-page TIFF, JPGs for color, multi-page TIFFS for non-color, or PDF).
- Begin Bates: Name each multipage image file using the beginning Bates number of the document.
- File Structure: Name each multipage image file using the value of the File Structure field above.
- Range: Name each multipage image file using the entire Bates range of the document.
- Image Numbering: Select whether Viewpoint should increment the Bates number by page or by document:
- Increment by Page: Increment the Bates number by each image.
- Increment by Document: Assigns each document a new Bates number, with each individual page having a suffix of _0001, _0002, etc.
- Brand: Indicates that the images should be branded. Branding options are configurable in the Branding Options Section below.
Image Advanced Options#
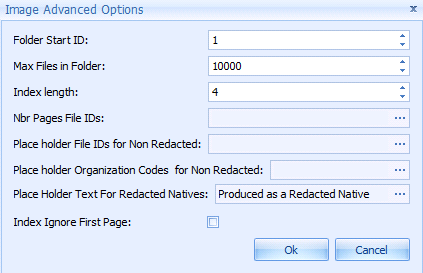
- Folder Start ID: Starting sequence folder number.
Note: This field does not automatically increment to the next number when copying settings from one delivery to another.
- Max Files in Folder: Sets the limit for number of files copied into a folder. Default setting of 10,000 is recommended for image deliveries.
- Index Length: Only available when choosing Increment by Document type numbering. Determines the number of digits in the suffix of the Bates number. The default is 4, which will give you _0001 as the suffix. Changing to 5 will give you _00001 as the suffix.
- Nbr Pages FileIDs: Allows one to specify the number of pages to deliver based on file types. Click the ellipsis and type the number of pages you would like to deliver into the field to the right of the file type. For large deliveries, a splash screen may appear while the system loads all of the FileIDs contained in the Source View.
- Place Holder File IDs for Non-Redacted: Deliver a placeholder slipsheet instead of an image file(s) for non-redacted files based on File IDs. For large deliveries, a splash screen may appear while the system loads all of the FileIDs contained in the Source View.
- Place Holder Organization Codes for Non-redacted: Deliver a placeholder slipsheet instead of an image file(s) for non-redacted files based on Organization Codes.
- Place Holder Text for Redacted Natives: Deliver a placeholder slipsheet instead of an image file(s) for natively redacted documents. Click the ellipsis to customize the text that will appear in the placeholder.
- Index Ignore First Page: When True, the page suffix will be omitted from the first page of the document.
Image Redaction Options#
Note: This option is only available when Apply Custom redaction criteria is selected in the Details section of the Wizard.
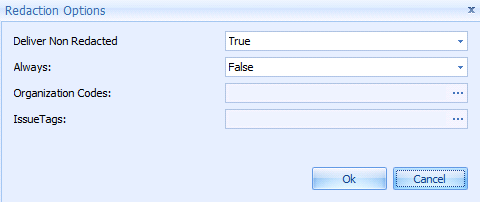
- Deliver Non-Redacted: When changed to True, Viewpoint will deliver non-redacted images for redacted documents.
- Always: When changed to True, Viewpoint will deliver non-redacted images of all redacted documents. When False (and Deliver Non-Redacted is True), users can then specify which documents should deliver non-redacted images based on Org Code(s) or Issue Tag(s).
- Organization Codes: Click the ellipsis to specify which Organization Code(s) should deliver non-redacted images of redacted documents.
- Issue Tags: Click the ellipsis to specify which Issue Tag(s) should deliver non-redacted images of redacted documents.
Branding Options#
This section provides for customizable branding of the delivered images.
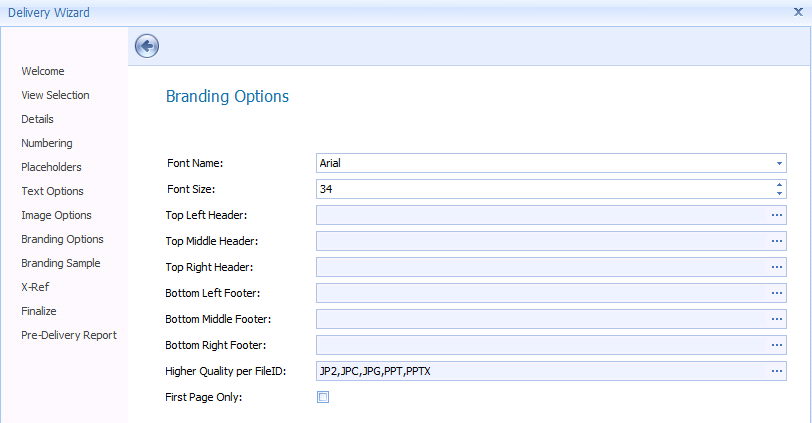
- Font Name: Change font type of brand text.
- Font Size: Change font size of brand text.
Note: Font Size is 3X normal font size. Size 12 in a MS Word document = 36 in Viewpoint.
- Customize brand for top-left, top-middle, top-right, bottom-left, bottom-middle, or bottom-right. A combination of these options may also be used.
- Click the ellipsis on the right side of the desired brand location to select brand text in the Structure Builder. Please see the Structure Builder section for more on how to use it.
- Common Brands:
- [Bates] to brand the Bates number on each page on the bottom right.
- [TagIC] or [IssueCode] to brand the text from the Brand Text field tied to that Issue Tag.
- If desired, type in the top window of the Structure Builder to brand files with free text.
- Higher Quality per FileID: HQ FileIDs: Required option for designated file ids to deliver branded images with better than normal resolution. Designated files are set by default. It is recommended that you contact Viewpoint Support before changing this option for other file types.
- First Page Only: Applies the brand settings only to the first page of each document.
Branding Sample#
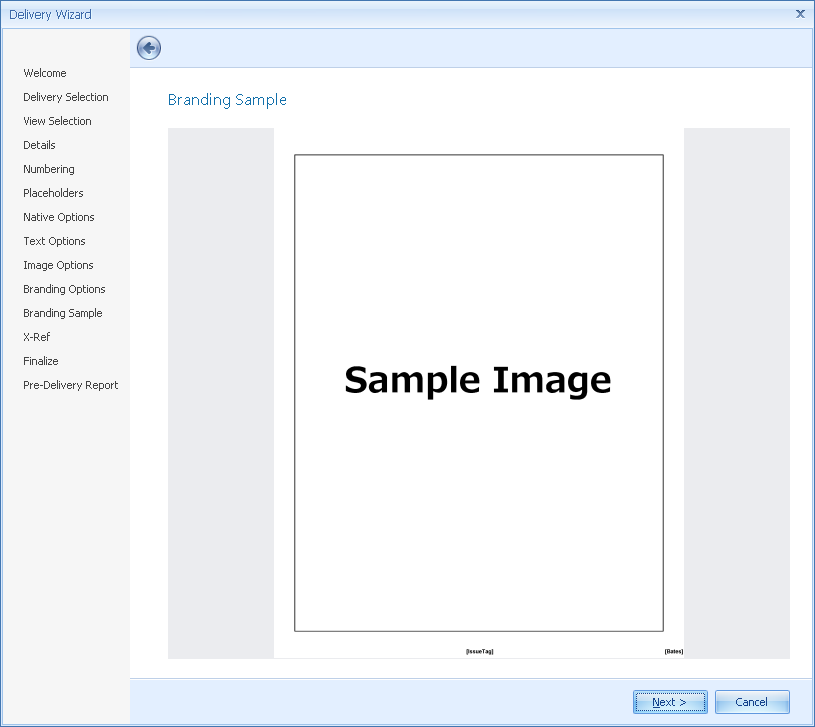
This section will display a sample image displaying how the selected brands will appear when delivered. The Sample Image border displays the dimensions of the original images and the image may be shrunk in order to supply the header and footer space in which to apply the selected brands without overlapping existing content.
X-REF Options Section#
The X-Ref Section is used for generating and customizing specific load files to include with the Delivery.
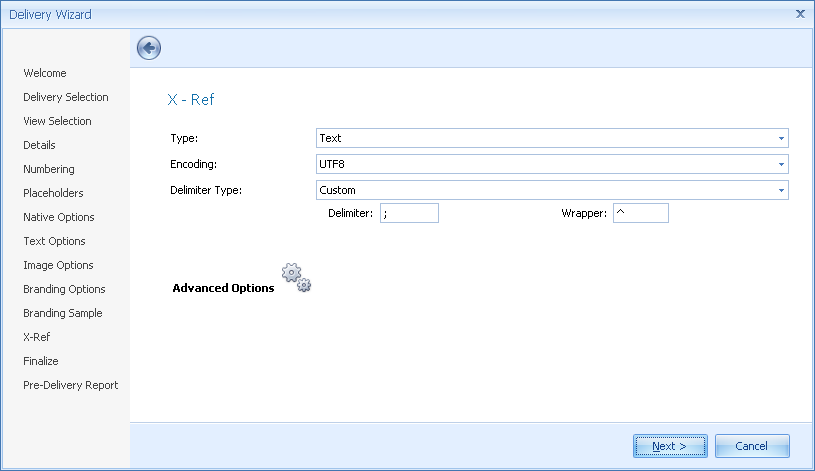
- Type: Dictates the type of cross-reference file that will be delivered:
- None: An X-Ref file will not be delivered.
- Text: An X-Ref file will be delivered in text format. Users will need to define the appropriate Delimiter Types in the option below.
- CSV: An X-Ref file will be delivered in comma delimited format.
- Ringtail: Generates a Ringtail load file. Ringtail ‘Extra Fields’ will need to be defined in the X-Ref Advanced Options section.
- XML: An X-Ref file will be delivered in XML format.
- Encoding (only available for Text X-Ref files):
- UTF8 (Default): The text X-Ref file will be delivered in Unicode UTF8 format.
- UTF16: The text X-Ref file will be delivered in Unicode UTF16 format.
- ASCII: The text X-Ref file will be delivered in ASCII format. This option is not recommended for deliveries containing non-English language documents.
- ASCII ISO 2859-1: The text X-Ref file will be delivered in ASCII Extended format.
- Delimiter Type (only available for Text X-Ref files):
- Concordance: Use Concordance delimiters.
- Summation: Use Summation delimiters.
- Custom: Use custom delimiters.
- Delimiter: User may define a custom delimiter character.
- Wrapper: User may define a custom text wrapper character.
- When running a native delivery, a DII X-Ref file is automatically created along with the selected option.
- When running a text delivery, a LST X-Ref file is automatically created along with the selected option.
- When running an image delivery, LFP, DII and OPT X-Ref files are automatically along with the selected option.
X-REF Advanced Options#
The X-Ref Advanced Options section is used to define what information will be populated to the delivered X-Ref file.
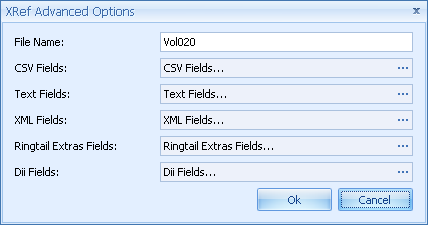
- Change the file name to be used for the cross-reference file as needed. By default, the File Name value will be the same as the Volume Name used for the delivery.
- Click the ellipsis in the text field to the right of the format type you selected for delivery of the cross reference file. For example, if Text was selected in the X-Ref Options screen, click on the ellipsis on the right hand side of the Text Fields field to define what text fields should be delivered.
- Define the fields to be included in the cross reference (X-Ref) file:
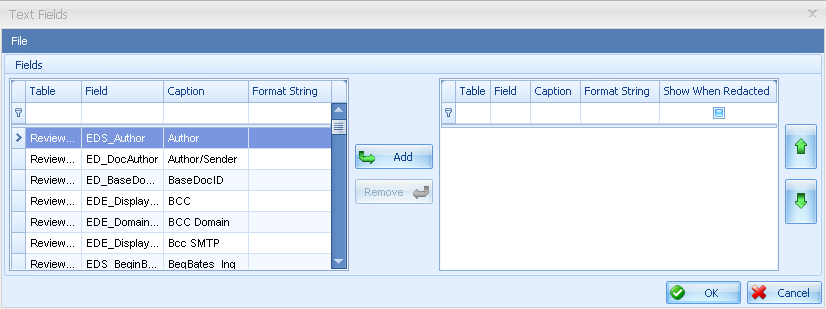
- Available fields are in the left hand windows for both normal and custom fields.
- Table Column: Displays the SQL table containing the field.
- Field Column: Displays the SQL name of the field.
- Caption: Displays the name of the field as displayed in the Viewpoint Review application. Once a field has been added to the right panel for delivery, the Caption text can be changed as required.
- Format String: Used to define the format of date/time fields. Once a field has been added to the right panel for deliver, the format string can be reformatted as necessary.
- Add desired fields to the right panel and reorder as necessary using the up and down arrows.
- Show When Redacted: This is checked by default. When the user unchecks the box for a metadata field, that metadata field will not be populated for any of the redacted files included in the X-Ref file.
- Templates: X-Ref template options are located in the File menu of the specific field selector.
- Load Template: Allows one to load previously saved templates.
- Save As Template: Allows one to save selected fields as new template.
- Available fields are in the left hand windows for both normal and custom fields.
- Click OK to accept the changes.
- Click Close to return to the main X-Ref Options screen.
You can use the shortcut ASCII character codes to place certain characters in the delimiter and wrapper fields. For example if you want ASCII character 059 (semi-colon) type ALT+059 in the desired field. For a full list of all ASCII characters codes and shortcuts please see the following web page. http://www.ascii.cl/
Completing the Wizard#
Once the Delivery options have been defined, users have several options in order to finalize and/or deliver the Delivery.
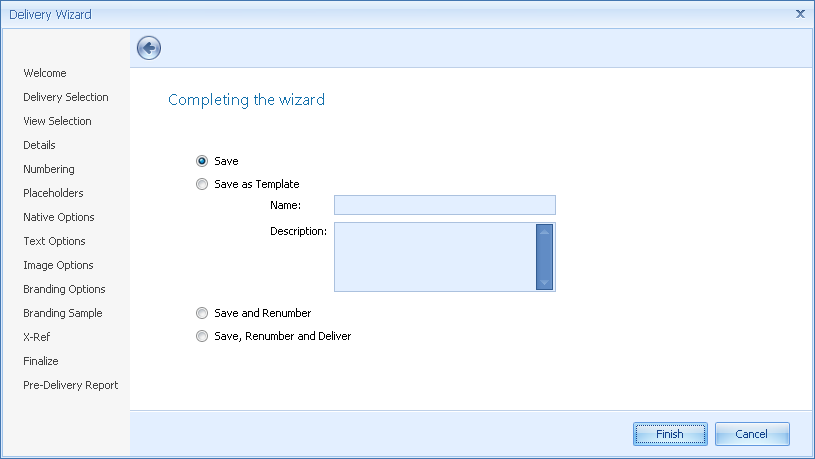
- Save: Save the delivery, but do not renumber or deliver the delivery. The delivery may then be modified and/or delivered at another time.
- Save as Template: This will make the delivery options available to others in the environment as a Delivery Template. The delivery will not be delivered at this time and may be modified and/or delivered at another time.
- Name: User-provided template name
- Description: User-defined description of the Delivery Template.
- Save and Renumber: The delivery will be saved and Viewpoint will renumber the images, text and natives according to the selected options. The actual images, text, natives and cross-reference will not be generated and delivered until the ‘Deliver’ option is selected in the Wizard or from the main Delivery interface.
- Save, Renumber and Deliver: This option saves the delivery, renumbers and generates the delivery with the selected options. This option will also allow viewing of the delivery information in the Review interface.
Click Finish to apply the selection. For more information on kicking off the delivery, please see the Running a Delivery section of this manual.
Pre-Delivery Report#
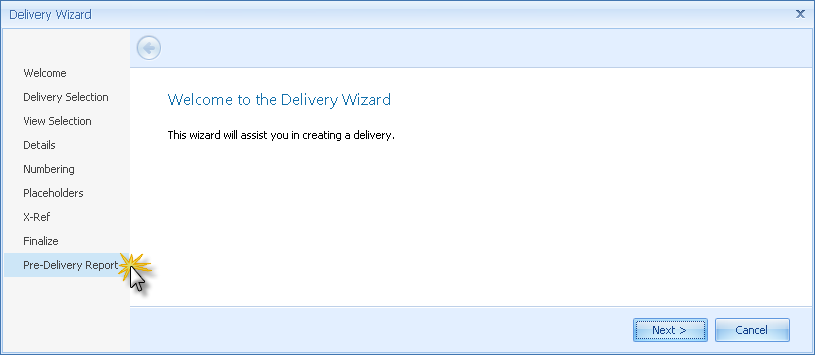
The Pre-Delivery report is a report used to display some high-level information about the documents in the View that are about to be delivered. This report may be used to understand the types of documents contained in the View and identify potential issues with the delivery before it is finalized.
The Pre-Delivery Report can be accessed at any time after View Selection has been completed by clicking the Pre-Delivery Report option on the left panel of the Delivery Wizard:
Create a New Delivery using Properties (Grid) Panel#
A new delivery using the Properties (Grid) panel can be launched in the following ways:
- Click the File menu, select New, and then choose New Using Grid
- Click the New icon located below the File menu and choose the Use Grid option in the drop-down menu.
- Right-click in the Delivery panel, select New, and then Use Grid.
- Right-click in the Delivery panel, select New, and then either From Template, or Based on Current to create a new delivery using the settings contained in the template or selected delivery.
After the new delivery has been created, select a source View from the View Selector and click OK.
Note: The current Form the user is using at the time the delivery is created is the Form that will be associated to the delivery record. The Form associated to the delivery record can be changed after creation by opening the delivery in the Wizard and selecting a different Form in the Details section.
Details Options Section#
The Details section displays basic information about the delivery. All fields except Description and ASCII are automatically generated.
- ID: Unique number assigned to the delivery.
- Description: User-defined description of the delivery
- View ID: The source View ID used to create the delivery.
- View Description: The description of the source View used to create the delivery.
- View Files: Number of documents in the source View of the delivery.
- Created by: Date the delivery was created.
- Created Date: User name of delivery creator.
- Comments: User-defined comments about the delivery.
Note: After completing any section of the Delivery properties, you can click the double arrow located in the right-hand corner to minimize that section
Folder Options Section#

- Root path: The UNC path for the completed delivery output. The default location is contained in the Prod folder of the Project network storage location. Users may change the output location by typing/pasting in a new path, or clicking the ellipsis in the field value and navigating to the desired output location.
- Volume: This is the naming convention for the delivery. Click the small plus sign to expand the Volume fields.
- Volume Prefix: Enter a prefix for numbering of the delivery volume. Typically this would be a prefix that makes sense to the case and continue with that prefix for that type of delivery. (Example: Company is ‘Enron’. The Volume Prefix could be ‘ENR’.)
- Volume ID Length: The length of the numeric portion of the volume name.
- Volume Starting Number: The starting number for the numeric portion of the volume name. Viewpoint will automatically increment to the next delivery volume starting number if previous deliveries have been created using the same Volume Prefix.
Note: As a safeguard, be sure and click the Save icon after completing each delivery section.
Document Options Section#
This section is used to assign a prefix to the documents being delivered as well as sequentially numbering the collection. You can also choose to Placeholder files based on certain criteria.
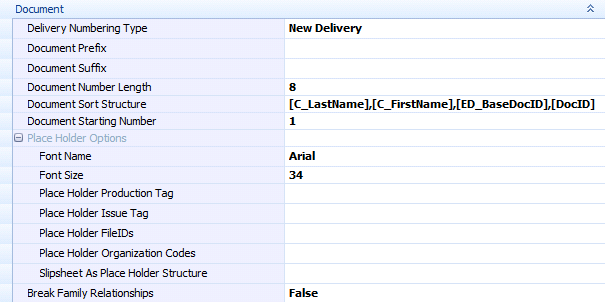
- Delivery Numbering Type: Allows the user to designate a new delivery numbering sequence or to re-use a previous delivery’s numbering sequence:
- New Delivery: Basic sequential numbering using a new delivery numbering sequence.
- Re-deliver Using Previous Bates Number: Re-delivers documents using a Bates sequence already used to deliver the selected source View. This option is not available if the View has not already been delivered previously.
- When this option is selected, the Previous Delivery option will appear on the next line below. Select the previous delivery from the drop-down menu. The drop-down menu will list all the available previous deliveries of the source View.
- Images for Previous Native Delivery: Used when redelivering native files as images. This will add a “_0001, _0002” numbering scheme to the Bates number for each individual page within the document.
Note: This option will be automatically selected, and the other options grayed out, when delivering a View that was built using the Beg Bates (Production) section of the MISC. filter tab in the View Manager.
- Document Prefix: Sets a prefix for the numbering scheme. Click the ellipsis to open the Prefix Structure Builder. Specific text can be typed in the top section, or field values can be added to the prefix by double-clicking the field name below.
- Document Suffix: Sets a suffix for the numbering scheme. Click the ellipsis to open the Suffix Structure Builder. Specific text can be typed in the top section, or field values can be added to the suffix by double-clicking the field name below.
- Document Number Length: Sets the number of digits in the numeric portion of the Bates number.
- Document Sort Structure: The sort structure dictates the order that files will be assigned a Bates number. The sort structure is [C_LastName],[C_FirstName],[ED_BaseDocID],[DocID] by default. With this structure, Bates numbers are assigned based on the custodian’s last name then first name then BaseDocID then DocID. Having the BaseDocID then DocID ensures that families will be kept together. You can change what is before BaseDocID to assign numbers based on Date, Author, etc. To keep family together, you should always end with BaseDocID then DocID.
- To customize the Document Sort Structure, click the ellipsis at the end of the field and define a sort structure using the Structure Builder window.
- Sort criteria can be typed directly into the top text box or the mouse can be used to select fields to use for sorting by double-clicking the desired field in the bottom-left panel.
- Document Starting Number: Sets the starting Bates number for the first document in the delivery. If documents have been delivered already using the selected Document Prefix, Viewpoint will automatically choose the next undelivered number as the Document Starting Number.
- Break Family Relationships: When enabled, Viewpoint will ignore the traditional renumbering and delivery rules that keep families together and also consecutively numbered. Instead, renumbering and delivery rules will be applied as if the documents in the source View were standalone documents. Delivered X-Ref files will also treat each document as a standalone file. This means that any exported field that relates to a parent/child relationship, such as Parent Main Date or Parent Bates #, will be populated as if the document is a standalone document and did not have any parent or child present.
Note: Because Viewpoint will no longer be using the family relationships to determine the order in which Bates numbers are assigned, this option can have a drastic effect on the assigned Bates number.
- Place Holder Options: A placeholder can be used to produce a slipsheet for documents in the source View based on a document’s Production Tags, Issue Tags, File ID, Organization Codes, or Slipsheet. Setting placeholder options in this section will result in placeholder slipsheets being delivered in place of the file’s native, text, and image.
In terms of Viewpoint, a slipsheeted file is not the same as a file with a placeholder. A file can be slipsheeted in the Viewpoint Processing application for various reasons, and these slipsheets are already created and visible within the Viewpoint Review application. Placeholders are slipsheets that are generated at the time of delivery, based on the criteria selected per delivery.
- Font Name: Font to use for the Placeholder slipsheet to be provided in place of the actual file.
- Font Size: Font size for text to appear on the Placeholder slipsheet.
Note: Font Size is 3X normal font size. Size 12 in a MS Word document = 36 in Viewpoint.
- Place Holder Production Tag: Apply placeholders based on the file’s Production Tag. Click the ellipsis to configure this option:
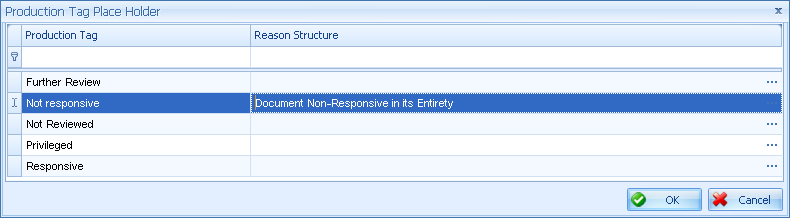
- A list of the Production Tags will appear that are contained within the source View and Form. To indicate that a Placeholder slipsheet should be delivered for that Production Tag, a Reason Structure must be supplied by either typing directly into the corresponding Reason Structure text box or by indicating a field value to appear by selecting the ellipsis on the right side of the Reason Structure column and selecting field value using the Structure Builder.
- The text value entered or the field value will appear in the text of the Placeholder slipsheet.
- Place Holder Issue Tag: Apply placeholders based on the file’s Issue Tag(s). Click the ellipsis to configure this option.
- Place Holder FileIDs: Apply placeholders based on the file’s File ID. Click the ellipsis to configure this option. For large deliveries, a splash screen may appear while the system loads all of the FileIDs contained in the Source View.
- Place Holder Organization Codes: Apply placeholders based on the file’s Organization code(s). Click the ellipsis to configure this option.
- Slipsheet as Place Holder Structure: Apply placeholders based on the processing slipsheet applied to the file. Click the ellipsis to configure this option.
Structure Builder#
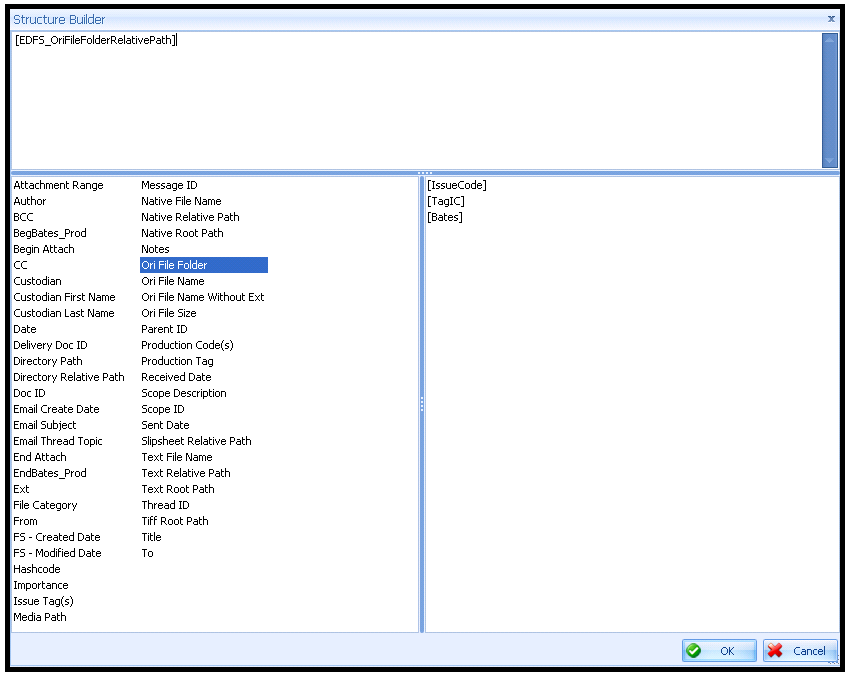
The Structure Builder is segregated into three sections.
- Individual Field Selection: Located at the bottom-left of the Structure Builder. This section lists the available fields you can use as text. Double-click on your choice to place the entry in the top section.
- Preset Text Selection: Located at the bottom-right of the Structure Builder. This section gives you the commonly chosen SQL field name entries used for the specific type of structure. Double-click on your choice to place the entry in the top section.
- Structure Text: Located at the top section of the Structure Builder. Any text placed in this field will be used as the structure for the chosen option. For example, to display the original file folder information on a placeholder file, you would type [EDFS_OriFileFolderRelativePath] into the Structure Text section.
Note: The above description is for the place holder structure builder however all other structure builders contain the same available fields and behave the exact same way.
Files Options Sections#
The Files Section is where one can choose the type of delivery you wish to run; Native, Text, or Image. You can choose to deliver any combination of these, or all three.

Native Delivery Options#
- Native: Set to True to run a native delivery, which will expand the native delivery options.
- Folder Sequence as Image: This option ensures that the native file for a given document will be in a sequence folder with the same number as the corresponding image. No matter the file server path, the sequence folder for the natives will match the sequence folder for the images. When set to True, the following options will become available to allow you to deliver specific native files.
- FileIDs: Deliver in native format based on a file’s FileID. To configure this option, click the ellipsis on the right side of the FileID box. A FileID Selector window will appear:
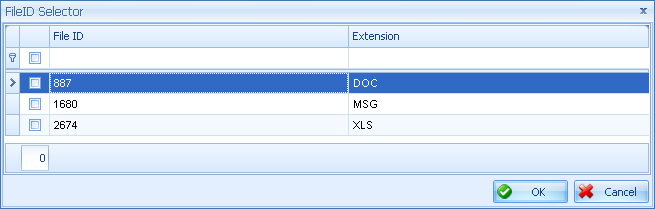
Place a check mark in the check box to the left of the corresponding FileID / Extension(s) that are to be delivered in Native format.
- Organization Codes: Deliver in native format based on a file’s Organizational Code. To configure this option, click the ellipsis to the right side of the Org Code box and place a check next to the Organization Code(s) that needs to deliver native files.
- Issue Tags: Deliver in native format based on a file’s Issue Tag value(s). To configure this option, click the ellipsis to the right side of the Issue Tags box and place a check next to the Issue Tag(s) that needs to deliver native files.
- Prevent Redacted: Dictates how redacted documents will be delivered if they have been selected to be delivered natively:
- True: Image redacted files will be prevented from being produced natively. Depending on the other options selected below, native redacted files can be set to produce the redacted version of the native, the original version of the file, or no native at all.
- False: Original natives will be produced, regardless of native or image-based redactions.
- Always: Allows selective overriding of the Prevent Redacted option based on certain Org Codes or Issue Tags:
- True: Image redacted files will not be produced natively. Native redacted files will produce the redacted version of the native file.
- False: Allows certain redacted files to be produced in native format based on the selected Organization Codes and/or Issue Tags. This allows the Organization Codes and Issue Tags options to be edited on the lines below.
- Organization Codes: Specify redacted documents to produce natively. Click the ellipsis to configure. This option is only configurable if Always = False. If image-redacted documents do not have the Organization Code(s) selected, then the un-redacted native will be produced.
- Issue Tags: Specify redacted documents to produce natively. Click the ellipsis to configure. This option is only configurable if Always = False. If image-redacted documents do not have the Issue Tag(s) selected, then the un-redacted native will be produced.
- Deliver Redacted Native: Dictates how native redaction documents will be produced if they have been selected to be produced natively.
Note: This option is only enabled when Prevent Redacted = True and Always = False. Please refer to Appendix A to see common Native Redaction configurations.
- True: Files with a native redaction will deliver the redacted native. This is the default option.
- False: Files with a native redaction will deliver the original, non-redacted native file.
- Folder Start ID: Starting sequence folder number.
Note: This field does not automatically populate to the next number when copying settings from one delivery to another.
- Max Files in Folder: Sets the limit for number of files copied into a folder. Default setting of 1,000 recommended for native deliveries.
Note: Folder Start ID and Max Files in Folder are only visible if the Folder Sequence As Image option is set to False.
- Folder Structure: Dictates the folder structure of the delivered natives. Click on the ellipsis to customize. Please see the Structure Builder section for customization options.
- By default, natively delivered files will appear in a folder called ‘NATIVES’ in the delivery location.
- File Structure: Dictates the naming convention of the delivered native files. Click on the ellipsis to customize.
- By default, natively delivered files will be named based on the Delivery DocID (Bates Number) plus the original native extension of the file.
- Email as HTML: By default, emails are delivered in HTML format. Unchecking the box will deliver the native file.
Note: We do not recommend disabling this option as delivering emails in the original native format may have unintended consequences, including inadvertent delivery of email attachments.
- Archive Slipsheet As: Dictates how compressed archives are to be delivered. By default, the processing slipsheet will be delivered. Options include delivering a slipsheet, delivering the original native archive, or deliver both a slipsheet and the original native archive.
- Non-Archive Slipsheet As: Dictates how non-archive slipsheeted files are to be delivered. By default, the processing slipsheet will be delivered. Options include delivering a slipsheet, delivering the original native archive, or deliver both a slipsheet and the original native archive.
- Slipsheet Reason as Native: By default, a slipsheeted file will be delivered as a slipsheet even in a native delivery. This option allows you to deliver the native file for slipsheeted files based on certain slipsheet codes. Click on the ellipsis to choose the slipsheet reason(s) to deliver as native.
- Deliver Original Spreadsheet: This relates to spreadsheet files that were processed using the Expose All Excel Content option in the Processing application. When this option is enabled, the original spreadsheet file will be delivered rather than the version with all content exposed.
Text Delivery Options#
- Text: Set to True to run a text delivery, which will expand the text delivery options.
- Folder Sequence as Image: This option ensures that the text file for a given document will be in a sequence folder with the same number as the corresponding image. No matter the file server path, the sequence folder for the text will match the sequence folder for the images.
- Folder Start ID: Starting sequence folder number.
Note: This field does not automatically populate to the next number when copying settings from one delivery to another.
- Folder Structure: Dictates the folder structure of the delivered text. Click on the ellipsis to customize. Please see the Structure Builder section for customization options.
- By default, text files will appear in a folder called ‘TEXT’ in the delivery location.
- Max Files in Folder: Sets the limit for number of files copied into a folder. Default setting of 1,000 recommended for text deliveries.
- Copy Folder Structure: This option allows you to deliver a second set of text files to a different location.
- Deliver Non-Redacted: When changed to True, Viewpoint will deliver non-redacted versions of the text for redacted documents.
- Always: When changed to True, Viewpoint will deliver non-redacted text of all redacted documents. When False (and Deliver Non-Redacted is True), users can then specify which documents should deliver non-redacted text based on their Org Code(s) or Issue Tag(s).
- Organization Codes: Click the ellipsis to specify which Organization Code(s) should deliver non-redacted text of redacted documents.
- Issue Tags: Click the ellipsis to specify which Issue Tag(s) should deliver non-redacted text of redacted documents.
- Generate From Redacted Native: Allows one to recreate text for native redaction documents.
- True: Deliver redacted versions of the text for native redaction documents. This is the default option.
- False: Deliver non-redacted versions of the text for native redaction documents.
- File Structure: Dictates the naming convention of the delivered text files. Click on the ellipsis to customize.
- By default, delivered text files will be named based on the Delivery DocID (Bates number) plus a ‘.TXT’ extension.
- Insert Bates #: When checked, the files’ beginning Bates numbers will be inserted into the top-left corner of the delivered text files.
- Force Text File: When checked, Viewpoint will deliver a blank text file for all documents that do not have a corresponding text file. In the Force Text File Content field you can add custom text to be placed in the forced text file, e.g., ‘This File Has No Extracted Text.’
- Encoding: By default, text files will be delivered in their original encoding format. Use this option to switch between ASCII, UTF-16, UTF-8, and ASCII ISO 2859-1.
Image Delivery Options#
- Image: This is the manner in which the documents are delivered. Set to True to run an image delivery.
- Folder Start ID: Starting sequence folder number.
Note: This field does not automatically populate to the next number when copying settings from one delivery to another.
- Folder Structure: Dictates the folder structure of the delivered images. Click on the ellipsis to customize. Please see the Structure Builder section for customization options.
- By default, image files will appear in a folder called ‘IMAGES’ in the delivery location.
- Max Files in Folder: Sets the limit for number of files copied into a folder. Default setting of 10,000 is recommended for image deliveries.
- File Structure: Dictates the naming convention of the delivered images. Click on the ellipsis to customize.
- By default, the delivered image files will be named based on the Delivery DocID (Bates number), plus the appropriate extension for the selected image output format.
- Image Numbering: Select whether Viewpoint should increment the Bates number by page or by document:
- Increment by Page: Increment the Bates number by each image.
- Increment by Document: Assigns each document a new Bates number, with each individual page having a suffix of _0001, _0002, etc.
- Index Length: Only available when choosing Increment by Document type numbering. Determines the number of digits in the suffix of the Bates number. The default is 4, which will give you _0001 as the suffix. Changing to 5 will give you _00001 as the suffix.
- Nbr Pages FileIDs: Allows one to specify the number of pages to deliver based on file types. Click on the ellipsis and type the number of pages you would like to deliver into the field to the right of the file type. For large deliveries, a splash screen may appear while the system loads all of the FileIDs contained in the Source View.
- Image Delivery Mode
- SinglePage TIFF: Deliver files as single-page tiffs.
- Multi Page TIFF: Deliver files as multi-page tiffs.
- JPG: Deliver files as JPGs.
- JPGColorTIFFSinglePage: Deliver files tiffed in color as JPGs and files tiffed in black and white as single-page tiffs.
- JPGColorTIFFMultiPage: Deliver files tiffed in color as JPGs and files tiffed in black and white as multi-page tiffs.
- PDF: Deliver files as image-based PDFs.
- Multi Page Name Method: Allows the user to define the naming convention for multipage image output formats.
Note: This option only appears when selecting a multipage image output format (Multi-page TIFF, JPGs for color, multi-page TIFFS for non-color, or PDF).
- Deliver Non-Redacted: When changed to True, Viewpoint will deliver non-redacted images for redacted documents.
- Always: When changed to True, Viewpoint will deliver non-redacted images of all redacted documents. When False (and Deliver Non-Redacted is True), users can then specify which documents should deliver non-redacted images based on Org Code(s) or Issue Tag(s).
- Organization Codes: Click the ellipsis to specify which Organization Code(s) should deliver non-redacted images of redacted documents.
- Issue Tags: Click the ellipsis to specify which Issue Tag(s) should deliver non-redacted images of redacted documents.
- Place Holder File IDs for Non-Redacted: Deliver a placeholder slipsheet instead of an image file(s) for non-redacted files based on File IDs. For large deliveries, a splash screen may appear while the system loads all of the FileIDs contained in the Source View.
- Place Holder Organization Codes For Non-Redacted: Deliver a placeholder slipsheet instead of an image file(s) for non-redacted files based on Organization Codes.
- Place Holder Text for Redacted Natives: Deliver a placeholder slipsheet instead of an image file(s) for natively redacted documents. Click the ellipsis to customize the text that will appear in the placeholder.
- Brand options: Indicates that the images should be branded.
- Font Name: Change font type of brand text.
- Font Size: Change font size of brand text.
Note: Font Size is 3X normal font size. Size 12 in a MS Word document = 36 in Viewpoint.
- Customize brand for top-left, top-middle, top-right, bottom-left, bottom-middle, or bottom-right. A combination of these options may also be used.
- Click the ellipsis on the right side of the desired brand location to select brand text in the Structure Builder. Please see the Structure Builder section for more on how to use it.
- Common Brands:
- [Bates] to brand the Bates number on each page on the bottom right.
- [TagIC] or [IssueCode] to brand the text from the Brand Text field tied to that Issue Tag.
- If desired, type in the top window of the Structure Builder to brand files with free text.
- HQ FileIDs: Required option for designated file ids to deliver branded images with better than normal resolution. Designated files are set by default. It is recommended that you contact Viewpoint Support before changing this option for other file types.
- First Page Only: Applies the brand only to the first page of each document.
X-REF Options Section#
The X-Ref Section is used for selecting and customizing specific load files.
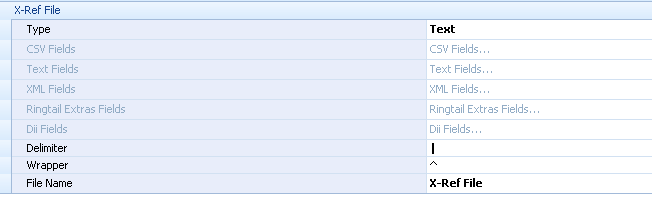
- Type: Dictates the type of cross-reference file that will be delivered:
- None: An X-Ref file will not be delivered.
- Text: An X-Ref file will be delivered in text format. Users will need to define the appropriate Delimiter Types in the option below.
- CSV: An X-Ref file will be delivered in comma delimited format.
- Ringtail: Generates a Ringtail load file. Ringtail ‘Extra Fields’ will need to be defined in the Ringtail Extras Fields option below.
- XML: An X-Ref file will be delivered in XML format.
- Encoding (only available for Text X-Ref files):
- UTF8 (Default): The text X-Ref file will be delivered in Unicode UTF8 format.
- UTF16: The text X-Ref file will be delivered in Unicode UTF16 format.
- ASCII: The text X-Ref file will be delivered in ASCII format. This option is not recommended for deliveries containing non-English language documents.
- ASCII ISO 2859-1: The text X-Ref file will be delivered in ASCII Extended format.
- Delimiter Type (only available for Text X-Ref files):
- Concordance: Use Concordance delimiters.
- Summation: Use Summation delimiters.
- Custom: Use custom delimiters.
- Delimiter: User may define a custom delimiter character.
- Wrapper: User may define a custom text wrapper character.
- When running a native delivery, a DII X-Ref file is automatically created along with the selected option.
- When running a text delivery, a LST X-Ref file is automatically created along with the selected option.
- When running an image delivery, LFP, DII and OPT X-Ref files are automatically along with the selected option.
- File Name: By default, the file name will be the volume name. Type directly in the field to create a custom name.
- Fields: Click on the ellipsis to the right of the desired X-Ref type to choose which fields to include.
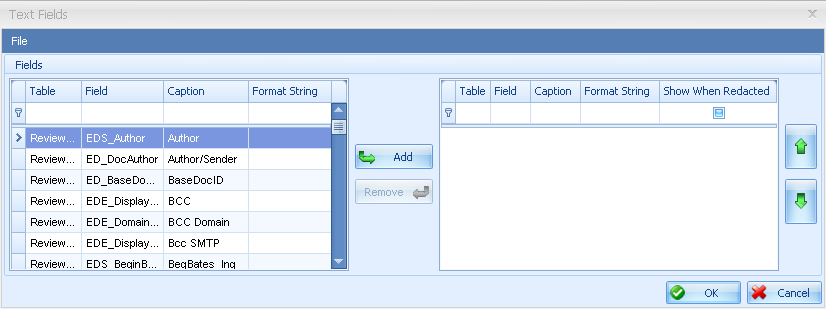
- Available fields are in the left hand windows for both normal and custom fields.
- Table Column: Displays the SQL table containing the field.
- Field Column: Displays the SQL name of the field.
- Caption: Displays the name of the field as displayed in the Viewpoint Review application. Once a field has been added to the right panel for delivery, the Caption text can be changed as required.
- Format String: Used to define the format of date/time fields. Once a field has been added to the right panel for deliver, the format string can be reformatted as necessary.
- Add desired fields to the right and rename/reorder accordingly. The format for date and time fields may be customized.
- Show When Redacted: This is checked by default. When the user unchecks the box for a metadata field, that metadata field will not be populated for any of the redacted files included in the X-Ref file.
- For Ringtail, the available fields are separated into EFile and EMail.
- Templates: X-Ref template options are located in the File menu of the specific field selector.
- Load Template: Allows one to load previously saved templates.
- Save As Template: Allows one to save selected fields as new template.
You can use the shortcut ASCII character codes to place certain characters in the delimiter and wrapper fields. For example if you want ASCII character 059 (semi-colon) type ALT+059 in the desired field. For a full list of all ASCII characters codes and shortcuts please see the following web page. http://www.ascii.cl/
Running a Delivery#
Perform the following steps:
- Once the delivery specification are complete, click Save in the top left-hand corner.
- Either click the Renumber button at the top of the Delivery panel, or right-click on the selected delivery and Renumber. During the renumber phase, Viewpoint will assign Bates numbers, update any needed paths and perform other tasks needed to meet the delivery specifications set.
- Right-click in the Data panel and select Field Selector to bring in any necessary fields for QC purposes.
- Click the Deliver button in the top left-hand corner. A window will pop up asking if you wish to run validation. By selecting Yes, the system will confirm that all necessary file renderings are present before running the delivery. This can save time when running a large delivery by identifying potential problems before the delivery actually starts.
- Redacted images that are included in the delivery will automatically have OCR text generated as the last step of the delivery process. OCR text can also be generated again for specific files after the delivery completes by right-clicking on the document in the Data panel and selecting Generate Redacted Text.
- Delivery is now complete and ready for quality check. You can navigate straight to the delivery by right-clicking on the delivery and selecting ‘Browse to’. Ensure that all documents exist in the proper location, are designated in the proper folder structure, and that the associated metadata and image reference files have been created.
Note: By default, the delivery will run on your local machine. To enable distributed delivery across your available workers, turn the Run on workers option ON in the File, Options menu.
If a delivery is aborted or errors, after you make any necessary changes you can deliver again and by clicking NO on the validation pop up it will overlook the files already copied out and only deliver the files that are not there. You cannot choose YES on the validation pop up without deleting the volume first.
Appendix A: Native Redaction Common Configurations#
Native Delivery Options#
Deliver Original, Non-Redacted Native File#
Prevent Redacted: False
Always: Hidden
Deliver Redacted Native: Disabled – False
Deliver Redacted or Non-Redacted Native File Based on Issue Tag/Org Code#
Prevent Redacted: True
Always: False
Deliver Redacted Native: Enabled – True
Deliver Non-Redacted Native or Prevent Delivery of Native Files Based on Issue Tag/Org Code#
Prevent Redacted: True
Always: False
Deliver Redacted Native: Enabled - False
Always Deliver Redacted Native#
Prevent Redacted: True
Always: True
Deliver Redacted Native: Disabled – True
Text Delivery Options#
Deliver Redacted Text for Native Redaction Documents#
Deliver Non-Redacted: False
Always: Hidden
Generate From Redacted Native: Enabled - True
Deliver Non-Redacted Text for Native Redaction Documents, Redacted Text for Image Redaction Documents#
Deliver Non-Redacted: False
Always: Hidden
Generate From Redacted Native: Enabled - False
Deliver Non-Redacted Text for Both Native and Image Redaction Documents#
Deliver Non-Redacted: True
Always: True
Generate From Redacted Native: Disabled - False
Deliver Redacted Text Based on Issue Tag/Org Code#
Deliver Non-Redacted: True
Always: False
Generate From Redacted Native: Disabled – True
Image Delivery Options#
Deliver Place Holder Tiff for Native Redaction Documents#
The only significant option for image delivery of native redaction documents is Place Holder Text For Redacted Native. Any text entered here will be used to generate a placeholder image for native redaction documents. If this field is left blank, the original, non-redacted images will be delivered instead.