
Sections Forms and Tagging Rules
Manual informationForms and Tagging Rules
1.2 | January 10,2023 | Terminology and capitalization standardization | Team
Document conventions
Convention | Explanation |
|---|---|
Bold | For file names, commands, fields, menus, options, and window names. |
Courier New | Commands as you should type them. |
Lucida Console | Example output generated by the system. |
Italics | For configuration variables, including variable portions of file names and URLs. Also indicates a document name. |
Note / Blue Callout | The Blue Callout text indicates information that is of special interest or importance, an idea that could be useful or additional information about a product or a feature. |
| The Caution icon along with the text indicates actions that can lead to problems in system operation or configuration settings if the instructions are not followed properly. |
Revision history
This section tracks the initial creation of the document after each major version thereafter.
Ver: | Date | Description | Reviewed / Approved By |
|---|---|---|---|
1.0 | Feb 3, 2014 | Initial Version | Team |
1.1 | August 30, 2021 | Rebranded adhering to the latest Conduent brand central documentation standards/guidelines. | Technical Writer |
1.2 | January 10,2023 | Terminology and capitalization standardization | Team |
Forms in Viewpoint#
Introduction#
Viewpoint Forms are an entity allowing for multi-tenant document review. With Forms, opposing counsel, co-counsel or other parties can access the same project in Viewpoint without gaining access to one another’s work product. By using Forms you can control the fields and tags that a user sees, as well as how they can interact with them.
Access and Permissions#
Minimum Recommended Permissions#
- Project Manager
- Access Forms Manager
- Access Form
- Reviewer
- Access Form
Forms Manager#
By default, projects are created with one Global Form. A Global Form is simply one that allows you to see all Fields and Tags in the project. To set up a more limited Form, open View Manager and select Forms from the Setup menu.
Creating Forms#
To create a new Form, perform the following steps:
- Open View Manager and select Forms from the Setup menu.
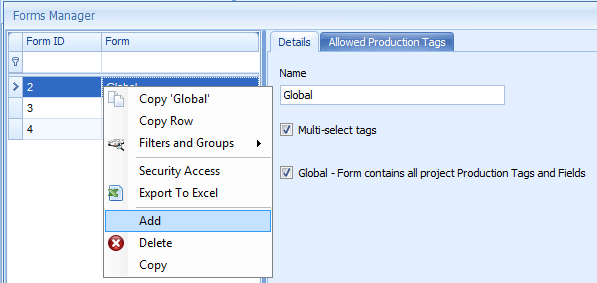
- Right-click in the panel displaying the Global Form and select Add from the menu.
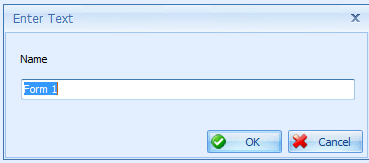
- Enter the name you would like this Form to have and click OK.
- Next, move to the Details tab where you have three options. The Name field allows you to rename the Form. The Multi-select Tags checkbox controls whether or not you can apply more than one Production Tag to a document. Finally, the “Global” checkbox allows you to quickly create a Form that gives access to all Fields and Tags.
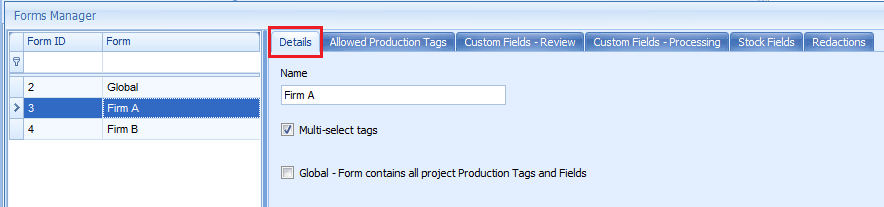
- The remaining tabs allow you to set restrictions on what is available in a particular Form. You can control Production Tags, Custom Fields created in Review or Processing, Stock Fields, and Redaction settings. Select the Field or Tag from the listing on the left, then press the Add button to move it to the right.
The read only checkbox, available for Production Tags and Custom Fields created in Review, controls whether the user is only allowed to view the existing Tag or Custom Field data, or if they can change it as well.

Note: Production Tags for different groups should be given different names. For example, if two different groups will need a Responsive Tag, you should name them in such a way as to be distinct. The easiest way to handle this would typically be to add the name of the group to the Tag; i.e. “Responsive - Firm A” and “Responsive - Firm B.”
- Once you have setup one or more Forms, click the OK button to exit the Forms Manager. You will then need to go to the Security Manager to give Users access to the Form using the Access Form permission.
When using Forms, it can be helpful to keep in mind the differing reasons for restricting access to Fields. Broadly speaking, access to Custom Fields is often a security issue. For example, Firm A is using Custom Fields to generate a Privileged Log. You need to keep the Users of Firm B from seeing this information, so you restrict access to certain Custom Fields using a Form.
Restricting access to Viewpoint Stock Fields is often a matter of convenience. When reviewing a collection of emails, you might create a Form with only email related Fields, to more easily navigate the Document Panel and Field Selector.
Keeping this in mind, it is important to remember that restricting access to Stock Fields will not always prevent the User from seeing that information. For example, a Form might be created to prevent the User from seeing the email subject Feld. While this information would not appear in the Document Panel, it would still be easily available to a reviewer by looking at the email in the Document Viewer.
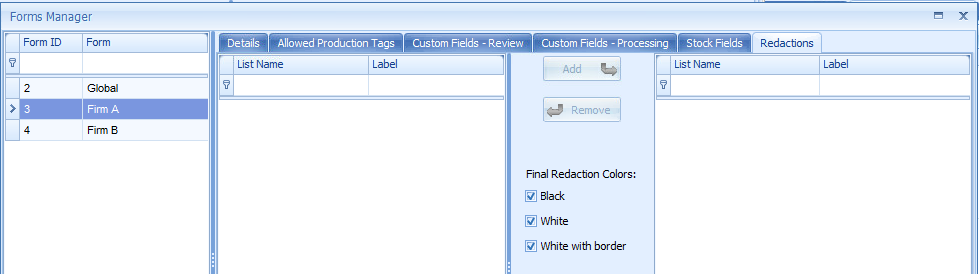
The Redactions tab controls which Redaction Labels and final Redaction colors are present in the Form. If the Form is not set as a Global Form, Users will be unable to type in their own Redaction Labels during the Redaction process. Redaction Labels are created using the Redaction Label Manager found in the Setup menu of View Manager.
Modifying Forms#
To edit a Form, follow the steps below.
- Open View Manager and select Forms from the Setup menu.
- Select From among the list of existing Forms.
- Continue steps 4 thru 6 from the Creating Forms section above.
Deleting Forms#
To delete a Form, follow the steps below.
- Open View Manager and select Forms from the Setup menu.
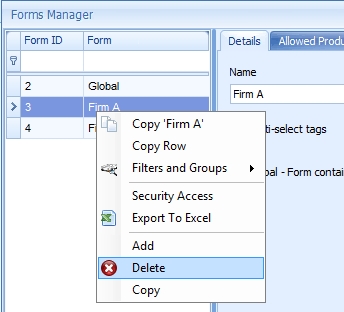
- Right-click on the desired Form and select Delete.
- Click OK to exit the Forms Manager.
Note: A Form cannot be deleted if there is a View, View Template, Automation Level or Delivery associated with it.
Copying Forms#
To use an existing Form as a template for a new Form, follow the steps below.
- Open View Manager and select Forms from the Setup menu.
- Right-click on the desired Form and select Copy.
- Enter the name you would like this Form to have. Hit OK.
- Continue steps 4 thru 6 from the Creating Forms section above.
Forms in Review#
The Forms that a User has been given access to will be listed in the Forms menu in Linear Review. The Production Tags and fielded data a User sees may vary depending on which Form they have chosen from this menu.
If no Forms have been created by the project management team, Users will only have access to the default Global Form. This Form will give them access to all Production Tags and Fields for a given project.
Note: New Users will not have automatic access to the Global Form. Permission to this Form must be selectively assigned as new Users are created.
To understand how the User experience can change when using different Forms, we will use a hypothetical example.
For Project X, the project management team has set up three distinct Forms.
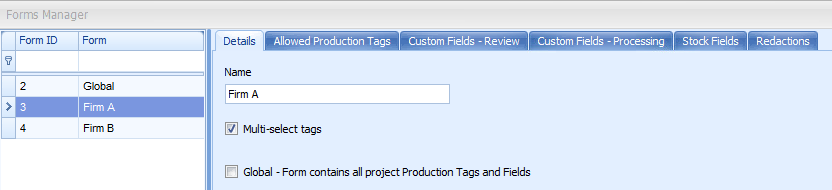
- Global – This is the default Form which only project managers will have access to.
- Firm A – Displays only those Production Tags and Custom Fields applicable to Firm A’s review team.
- Not Reviewed, Responsive and Non Responsive Production Tags
- BCC, CC, Date, Doc ID, Email Subject, EXT, From, Parent ID and To Felds
- Firm B - Displays only those Production Tags and Custom Fields applicable to Firm B’s review team.
- Privileged, Descriptor and Miscellaneous Production Tags
- Responsive Production Tag set to Read-Only
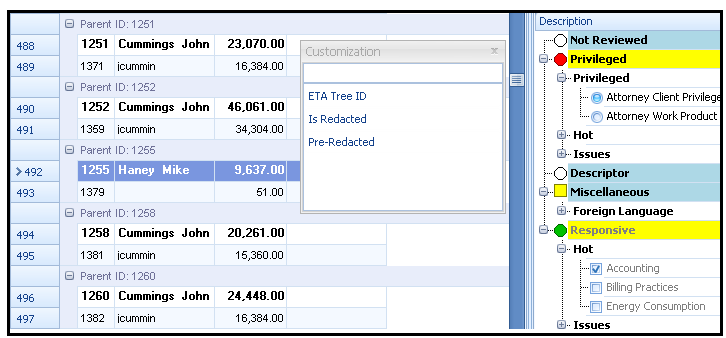
- Author, Doc ID, ETA Tree ID, Is Redacted, ND Doc Count, Ori File Size, Parent ID and Pre-Redacted Fields
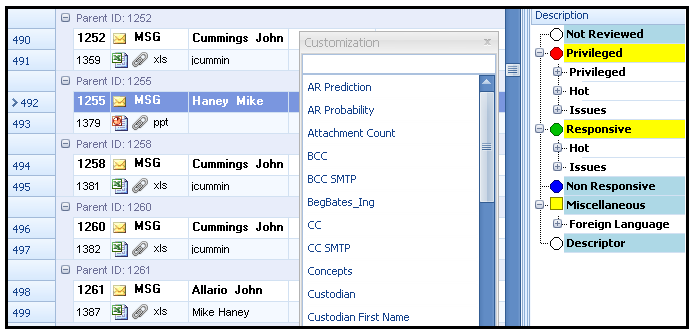
In the Linear Review window, we have Firm A’s Form selected. Notice the limited Tag panel and Field Selector window. Firm A has Tagged Doc ID 1255 with the Responsive Production Tag.
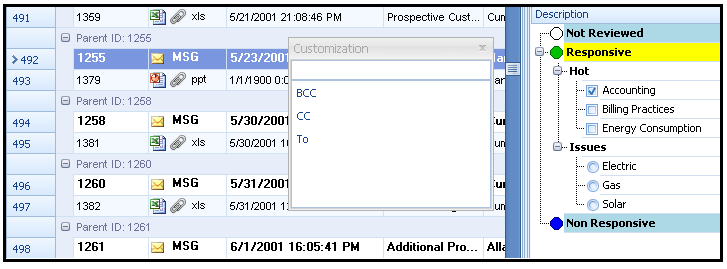
When switching to Firm B’s Form, we can see the different available Fields. Also, notice that for the same Doc ID 1255 we now see it Tagged with Privileged. The Responsive Tag is still visible but as it has been set to Read-Only for Firm B, it is disabled and cannot be changed.
Finally, when moving to the Global Form, we have access to all Production Tags and Fields.
Forms in View Manager#
Views#
Each View is tied to a specific Form. A View’s Form can be seen in the Form Field in the Main Setup tab. Upon creating a new View, the currently selected Form will be assigned to that View. To switch Forms, choose from among the list available in the Forms menu. The following Build View features are affected by Forms.
- The Date Ranges tab will only be visible for a User with access to a Form containing the Date Field.
- The Addresses tab will only be visible for a User with access to a Form containing the From Field.
- The list of Fields available in the Metadata Filter tab will be limited to those Fields contained in the Forms the User has access to.
- The list of Tags available in the Tagging Filter tab will be limited to those Tags contained in the Forms the User has access to.
- The list of Custom Fields in the MISC. Filter tab will be limited to those Fields contained in the Forms the User has access to.
Note: A User must have access to all of the Tags and Fields used to Build a View in order to Edit or Rebuild it.
View Templates#
Each View Template is tied to a specific Form. Only those View Templates tied to the selected Form will be visible. Switch Forms to see your other View Templates. Upon creating a new View Template, the currently selected Form will be assigned to that View Template. When a View Template step is executed the View that is created will be assigned the Form that the View Template is associated with at that point in time. The following View Template features are affected by Forms.
- The Date Ranges page will only be visible for a User with access to a Form containing the Date Field.
- The Addresses page will only be visible for a User with access to a Form containing the From Field.
- The list of Fields available on the Metadata page will be limited to those Fields contained in the Forms the User has access to.
- The list of Tags available on the Tagging page will be limited to those Tags contained in the Forms the User has access to.
- The list of Custom Fields on the Custom Fields page will be limited to those Fields contained in the Forms the User has access to.
Automation Levels#
The only Automation component affected by Forms is that a User will only see levels with Tags contained in the Forms he or she has access to.
Tag Manager#
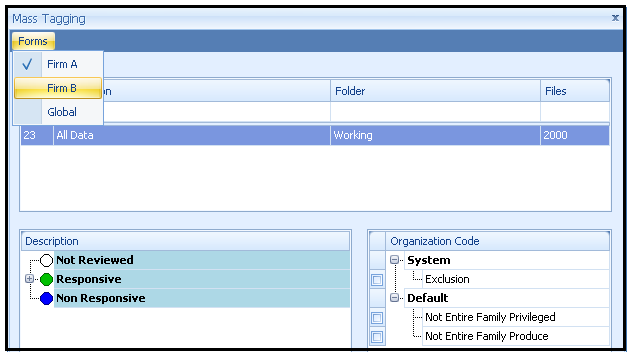
Each of the Mass Tagging, Reset Tags and Reset Issue Tags features have a Form menu selector. Before proceeding with the desired action, select from the list of applicable Forms.
Forms in Advanced Tools#
As in the Linear Review window, each of the following advanced tools will have a Form selector. Upon selecting a Form, the documents grid and Tags panel will refresh to display the applicable information.
- ND Similarity Viewer
- Email Thread Analyzer
- Concept Analyzer – Being that a documents grid is not present in CA, only the Tags panel will refresh when changing Forms.
- Relationship Analyzer – Being that a documents grid is not present in RA, only the Tags panel will refresh when changing Forms.
- Assisted Review – Only the Tags panel will refresh when changing Forms in Assisted Review.
Forms in Delivery#
Each Delivery is tied to a specific Form. A Delivery’s Form can be seen in the Form Field in the Delivery listing. Upon creating a new Delivery, the currently selected Form will be assigned to that Delivery. To switch Forms, choose from among the list available in the Forms menu. The following Delivery components are affected by Forms.
- The Custom Fields available in each Sort Structures will be limited by the Delivery’s Form.
- The Custom Fields available when configuring an X-Ref file will be limited by the Delivery’s Form.
- The Production and Issue Tags available in the Placeholder and Prevent Redacted settings will be limited by the Delivery’s Form.
Tagging Rules#
Tagging rules are used to prevent reviewers from navigating to the next document before tagging or other required actions are completed. Available requirements which can be configured in the Forms Manager are Custom Field(s) value input, Issue Tag selection from specific Issue Tag Categories and/or entering a document Note.
Creating a New Tagging Rule#
All tagging rules are configured from the Allowed Production Tags window of the Forms Manager. Tagging Rules can be added to top level Production Tags or nested Issue Tags.
- Right click on the desired tag you wish to set a rule for and select Add Tagging Rule.
- In the window which displays, check the Require a Note box to force a reviewer to add at least one document note after selecting that particular tag which the rule has been created for..
- Check from among the available Custom Fields to force a reviewer to fill in a value for those checked Custom Fields after selecting that particular tag which the rule has been created for.
- Check from among the available Issue Tag Categories to force a reviewer to select at least one Issue Tag for those checked categories after selecting that particular tag which the rule has been created for.
- Select OK to save the rule and close the window.
Edit a Tagging Rule#
To edit a Tagging Rule, right click on the desired tag and select Edit Tagging Rule. Make your desired adjustments and click OK to save the rule and close the window.
Delete a Tagging Rule#
To delete a Tagging Rule, right click the desired tag and select Delete Tagging Rule.