
Sections Quality Control Manual
Manual informationQuality Control Manual
1.1 | September, 2021 | Rebranded adhering to the latest Conduent brand central documentation standards/guidelines. | Technical Writer
Document conventions
Convention | Explanation |
|---|---|
Bold | For file names, commands, fields, menus, options, and window names. |
Courier New | Commands as you should type them. |
Lucida Console | Example output generated by the system. |
Italics | For configuration variables, including variable portions of file names and URLs. Also indicates a document name. |
Note / Blue Callout | The Blue Callout text indicates information that is of special interest or importance, an idea that could be useful or additional information about a product or a feature. |
| The Caution icon along with the text indicates actions that can lead to problems in system operation or configuration settings if the instructions are not followed properly. |

Revision history
This section tracks the initial creation of the document after each major version thereafter.
Ver: | Date | Description | Reviewed / Approved By |
|---|---|---|---|
1.0 | Feb 28, 2020 | Initial Version | Team |
1.1 | September, 2021 | Rebranded adhering to the latest Conduent brand central documentation standards/guidelines. | Technical Writer |
Introduction#
The Viewpoint Quality Control module provides the capability to review and to ensure the integrity of document image renderings prior to delivery or production. While Viewpoint can correctly render the vast majority of documents and file types automatically, there are certain file types, most never intended to be printed, that can benefit from the use of the Quality Control module.
For example, an Excel spreadsheet may not have been formatted by the author to be printed optimally, and rendering the spreadsheet using default settings may result in unintelligible results or create hundreds or thousands of unnecessary images.
Viewpoint’s Quality Control module can proactively identify potentially problematic document renderings and allows for quick and easy correction of the issue.
System Requirements#
The system requirements for running the Quality Control module are similar to those of a Viewpoint Worker machine:
- Hardware (Physical or VM)
- 4 Core – 2.4 GHz or greater
- 4 GB RAM or greater
- 80 GB storage or greater
- Software
- Required
- Microsoft Windows 7 (64 bit) or Windows 8.1 (64 bit)
- Microsoft .NET Framework v3.5 SP1 and v4.0
- Microsoft Internet Information Services (IIS)
- Microsoft Office 2007 - 2013
- Informatik Image Driver v6.21 (64-bit) or v3.0 (32-bit)
- Foxit PDF Reader v3.1.4
- Lotus Notes v8.5
- Optional
- Microsoft Project 2007 - 2013
- Microsoft Visio 2007 - 2013
- Microsoft Publisher 2007 - 2013
- DWGSee Pro v3.3.5
- J2GPlus v4.4
- Required
Selecting Documents for Quality Control#
Project Selection Panel#
When the Quality Control module is launched, the user is presented with the Project Selection panel. Once the correct Project has been selected, click OK.
Projects may be selected at any time by opening the Project Selection panel using the Project button in the Layout section of the top ribbon.
Filter Projects by a Specific Field#
- Type the desired filter text in the blank cell located between the column header and the Project list.
- If desired, use the * symbol to apply a wildcard at the beginning of a filter.
- At any time, you can see the applied filter at the bottom left hand corner of the Project Selection panel. Hit the X on the left to clear the entire filter.

Media Selection Panel#
When a Project has been selected, the Media(s) panel will appear and require that one or more Medias be selected for quality control.
Media Tab#
By default, the Media(s) panel will display the Media tab that lists the corresponding Media within the selected Project. Media are subdivided as line items according to the respective file extensions that exist within that Media. Because of this, individual Media numbers will be displayed multiple times.
The Medias table displays the following information:
- MediaID: The Media ID number associated with the Media generated during processing
- Description: The description of the Media generated during processing. Clicking on the cell hyperlink will open all TIFFed documents from that Media in the Documents panel.
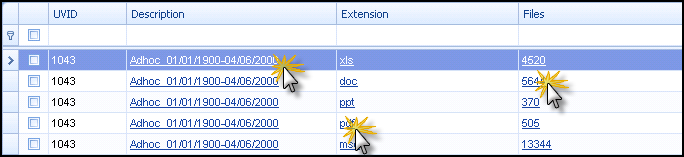
- Extension: Each row corresponds to one file extension per Media. Because of this, each Media may have one or more corresponding rows displaying each file extension contained in the Media. Clicking on the cell hyperlink will open all TIFFed documents in the database matching that extension in the Documents panel.
- Files: The number of files associated with the MediaID and Extension. Clicking on the cell hyperlink will open the corresponding documents in the Documents panel.
User Views Tab#
Views may be selected for quality control rather than Medias if desired. The User Views table displays the following information:
- UVID: The View ID number associated with the row.
- Description: The View description. Clicking on the cell hyperlink will open all TIFFed documents in the View in the Documents panel.
- Extension: Each row corresponds to one file extension per view. Because of this, each View may have one or more corresponding rows displaying each file extension contained in the view. Clicking on the cell hyperlink will open all TIFFed documents in the database matching that extension in the Documents panel.
- Files: The number of files associated with the UVID and Extension. The number displayed only contains the number of files that have been sent for TIFF rendering. Clicking on the cell hyperlink will open the corresponding documents in the Documents panel.
Note: The Refresh button must be clicked to populate the User Views table.
Column filters may be applied by typing the desired text in the blank cell located between the column header and the Project list. Multiple Medias or Views may be selected by placing checks in the checkbox at the left of the desired rows. Medias or Views may be selected at any time by opening the Media(s) panel using the Media button in the Layout section of the Quality Control Console.
Media(s) Menu Options#
The Media(s) panel menu items allow for further filtering of the Medias or User Views table:

- Good: Filters the table to include all documents that have passed QC as determined by a user.
- Bad: Filters the table to include all documents that have failed QC as determined by a user.
- New: Filters the table to include all documents that have not been QCed by a user.
- IDs: Type in a MediaID or UVID depending on whether the Medias or User Views tab are active to filter to the corresponding rows. Click the Refresh button to filter to the desired IDs.
Note: Documents will remain in the New category until a user indicates whether the document has passed QC or not. The Good and Bad designations are not automatically populated by the application and are discussed further in the Quality Control Console – General Tab / Mark section below.
Once the desired Media(s) or View(s) have been selected, click OK to go to the Quality Control Console where the QC will occur.
Alternatively, instead of checking the Medias or Views to review, it is possible to open a specific set of documents by clicking on the hyperlinked value in the cell:
Quality Control Console - General Tab#
Layout#
Project#
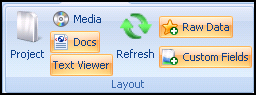
Opens the Project Selection panel. See Project Selection Panel in section 2 of this manual.
Media#
Opens the Media(s) panel. See Media Selection Panel in section 2 of this manual.
Docs#
The Docs button opens the Documents panel, which will be open by default and list the documents in the selected Views or Medias.
The Documents panel behaves similarly to other list panels and can be sorted, filtered and columns added or removed as needed. Additionally, the Documents panel may be docked, resized or popped-out as desired. Many of the fields available in the Documents panel are carried over from the Processing and Review modules, but there are some unique fields only viewable in the Quality Control module and can be added or removed from the Documents panel using the right-click, ‘Fields Selector’ menu:
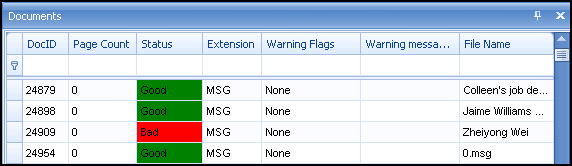
- Status: Indicates the QC designation of the document. Values are Good, Bad, or New.
- Warning Flags: Automatically generated field value that may indicate potential rendering issues with the document.
- Warning Messages: Automatically generated field values that indicate likely rendering issues with the document.
- Tagged Date: Indicates the date and time a document was given a QC status designation.
- TargetTIFFPath: Indicates where the images rendered from the document are stored on the file server.
- TIFFSourceFilePath: Indicates where the source native document is stored on the file server.
- User: Indicates the user that performed the QC designation.
Text Viewer#
The Text Viewer button opens the Text panel where the extracted or OCR text for a document may be viewed.
Raw Data#
The Raw Data panel displays metadata associated with the selected document.
Custom Fields#
The Custom Fields panel displays the Custom Field values associated with the selected document.
Mark#
The Quality Control module provides the ability for a user to tag a document with a QC designation to indicate whether the document rendering passed QC or requires correction. This function allows a user to quickly review and mark documents which can then be remediated by that user or another user at a later time.
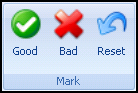
- Good: Indicates that the selected document rendering has passed QC requirements and advances to the next document in the Documents panel.
- Bad: Indicates that the selected document has not passed QC requirements and advances to the next document in the Documents panel.
- Reset: Resets the QC designation to ‘New’.
Once a QC designation has been made, the Status column in the Documents panel provides a color-coded quick reference as to the documents QC status.
Filter#
The Filter menu provides additional filtering capabilities to isolate specific sets of documents in the Documents panel.
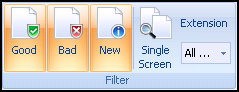
- Good: Selecting this option will cause documents with a ‘Good’ QC status to be displayed in the Documents panel.
- Bad: Selecting this option will cause documents with a ‘Bad’ QC status to be displayed in the Documents panel.
- New: Selecting this option will cause documents with a ‘New’ QC status to be displayed in the Documents panel.
- Single Screen: Filters the Documents panel to display only single page documents.
- Extension: Filters the Documents panel to show only those documents matching the selected file extension. The list is populated with a list of extensions from the entire processing database document corpus and is not limited to the selected Medias or Views. Choosing ‘All Ext’ will clear file extension filters.
Info#
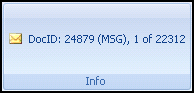
The Info menu displays the selected document’s file type icon, file extension and order within the Documents panel.
Document Navigator#
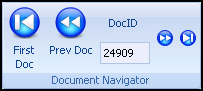
The Document Navigator menu displays the current selected documents DocID and the capability to quickly navigate to the first document, previous document, next document, or last document in the Document panel list.
DocIDs may be typed in the DocID text box to open that document in the Documents panel.
Page Navigator#
The Page Navigator menu facilitates navigation of multi-page TIFFed documents.
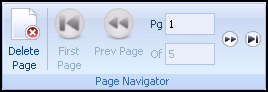
- First Page: Displays the first page of the document in the image panel.
- Prev Page: Displays the page previous to the selected page.
- Pg: Displays the selected page number. Users may also manually enter the desired page to navigate to.
- Next Page button: Displays the page after the selected page.
- Last Page button: Displays the last page of the selected document in the image panel.
- Delete Page: This button will permentantly delete the selected page. This option is typically used to delete only erroneuosly rendered blank pages from documents.
Note: Users may also navigate from page to page by using the mouse cursor to select the desired image or by selecting the image panel and using the mouse scroll wheel.
Image Viewer#
The Image Viewer menu adjusts the image size and orientiation within the image viewing panel.
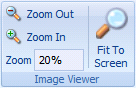
- Zoom Out: Decreases the image viewing size in the image panel.
- Zoom In: Increases the image viewing size in the image panel.
- Zoom: Displays the current image zooming level.
- Fit To Screen: Automatically zooms the image to the maximum level that displays the entire page content within the image viewing panel. This option is selected by default.
Image Viewer Panel Right-Click Menu#
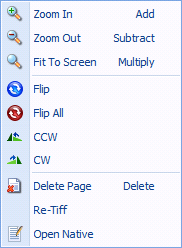
Many options contained in the Page Navigator and Image Viewer menu panels are available via the right-click menu within the Image Viewing panel:
Quality Control Console – Advanced#
Layout#
Default Layout#
Restores default panel layout.
Save Layout#
Saves current panel layout.
Documents#
History#
Opens the Quality Control History panel which displays changes the images for the selected document by action type, date and time, and user.
Open Native#
Opens the selected document using the associated native application. The computer running the Quality Control module must have the corresponding native application installed in order to use this function.
Changes made to the document using the native application are not permanently applied.
Re-TIFF#
The Re-TIFF menu option launches a Wizard for the purpose of re-rendering documents that were incorrectly or sub-optimally rendered using default settings. It is also accessible via the Image Viewing panel right-click menu. The Wizard offers a variety of methods of rendering documents to image format:
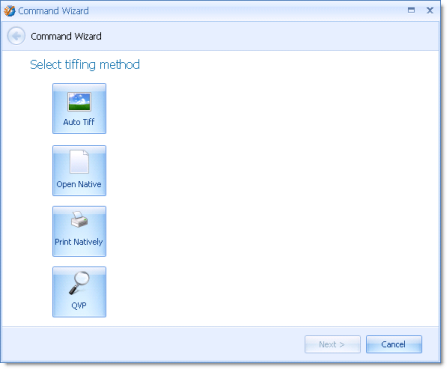
- Auto TIFF: The Auto TIFF function opens a TIFF Project Settings menu that controls Viewpoint’s automated TIFF rendering parameters. The menu is context-sensitive depending on the type of file to be rendered will display the configurable parameters the selected file type. If multiple file types have been selected then the menu will include all configurable parameters for the selected file types.
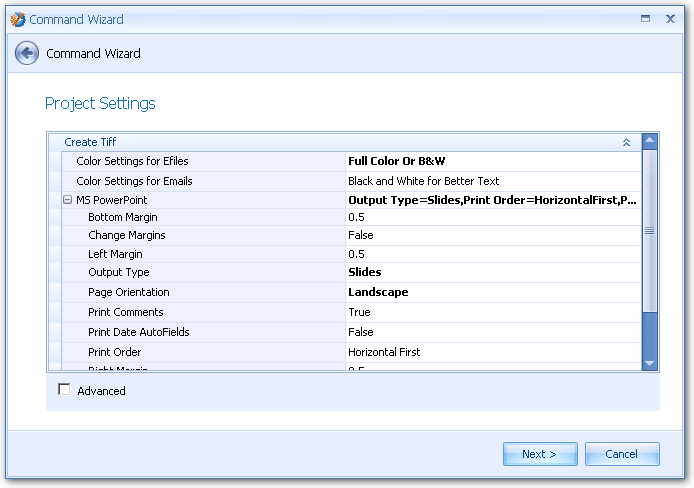
- Using the Auto TIFF function:
- Choose the document(s) to be rendered by highlighting it in the Documents panel.
- In the Advanced tab, click the Re-TIFF button.
- In the Command Wizard, click on Auto TIFF.
- Adjust the TIFF Project Settings as needed and click Next.
- In the Command Wizard, click Finish to render the document(s) to TIFF using the adjusted settings.
- Review the new images in the image panel.
Note: A full description of the configurable parameters is contained in the Reference / Auto TIFF Project Settings section of this manual.
- Open Native: The Open Native function provides the option for the user to open a document using the native application, e.g., opening an .XLS file using Microsoft Excel, in order to adjust the printing parameters. Prior to opening the document in the native application, the Open Native function applies the TIFF Project Settings to the native document.
- Using the Open Native function:
- Choose the document to be rendered by highlighting it in the Documents panel.
- In the Advanced tab, click the Re-TIFF button.
- In the Command Wizard, click on Open Native.
- Adjust the TIFF Project Settings as needed and click Next.
- Click Next to launch the document in the native application.
- Make adjustments as needed to the document in the native application and save and close the native application.
- In the Command Wizard, click Finish to render the document to TIFF using the adjusted settings.
- Review the new images in the image panel.
Note: A full description of the configurable parameters is contained in the Reference / Auto TIFF Project Settings section of this manual.
- Print Natively: The Print Natively function provides the option for the user to open a document using the native application, e.g., opening an .XLS file using Microsoft Excel, in order to adjust the printing parameters. Unlike the Open Native function, Print Natively does not apply the TIFF Project Settings to the native document prior to launching the document in the native application.
Note: The computer running the Quality Control module must have the appropriate native application and the Informatik Printer installed in order to open the document natively.
- Using the Print Natively function:
- Choose the document to be rendered by highlighting it in the Documents panel.
- In the Advanced tab, click the Re-TIFF button.
- In the Command Wizard, click on Print Natively.
- Click Next to launch the document in the native application.
- Make adjustments as needed to the document and print the document to the Informatik Printer using the Windows Print dialogue box.
- Close the native application and return to the Command Wizard.
- In the Command Wizard, click Finish to render the document to TIFF using the adjusted settings.
- Review the new images in the image panel.
Note: The computer running the Quality Control module must have the appropriate native application and the Informatik Printer installed in order to open the document natively.
- QVP: The QVP function provides the option for the user to render a document using the Quickview Plus application.
- Using the Print Natively function:
- Choose the document(s) to be rendered by highlighting it in the Documents panel.
- In the Advanced tab, click the Re-TIFF button.
- In the Command Wizard, click on QVP.
- In the Command Wizard, click Finish to render the document(s) to TIFF.
- Review the new images in the image panel.
Note: The computer running the Quality Control module must have the Informatik Printer, and Quickview Plus installed in order use this function.
Image Viewer#
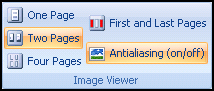
- One Page: Configures Image Viewer panel to display one page at a time.
- Two Pages: Configures Image Viewer panel to display two pages at a time, side by side.
- Four Pages: Configures Image Viewer panel to display four pages at a time.
- First and Last Pages: Configures Image Viewer panel to display the first and last page, side by side.
- Antialiasing (on/off): Reduces image viewing distortion caused by zooming in and out of an image. By default, Antialiasing is turned on.
Edit#
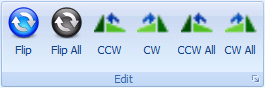
- Flip: Rotates the selected image 180°. This rotation is applied to the image for the purposes of Processing, Review, and Delivery.
- Flip All: Rotates all images of the selected document 180°. This rotation is applied to the images for the purposes of Processing, Review, and Delivery.
- CCW: Rotates the selected page(s) of the document counter clock-wise. This rotation is applied to the images for the purposes of Processing, Review, and Delivery.
- CW: Rotates the selected page(s) of the document clock-wise. This rotation is applied to the images for the purposes of Processing, Review, and Delivery.
- CCW All: Rotates the entire document counter counter clock-wise. This rotation is applied to the images for the purposes of Processing, Review, and Delivery.
- CW All: Rotates the entire document counter clock-wise. This rotation is applied to the images for the purposes of Processing, Review, and Delivery.
Auto Mark#
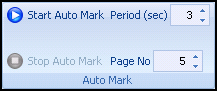
The Auto Mark function allows large numbers of documents and images to be QC’ed more efficiently by automating document and page navigation and QC designations. When the Auto Mark function is enabled, the system will mark the currently selected document as ‘Good’ and advance to the next document within the specified time allotment. If a document has multiple pages, the Image Viewing panel will advance through the specified number of pages prior to advancing to the next document.
Marking a document ‘Bad’ will disable the Auto Mark function until re-enabled by the user.
- Start Auto Mark: Enables the Auto Mark function.
- Period: Specifies the number of seconds before the page/document is advanced and automatically marked ‘Good’.
- Stop Auto Mark: Disables the Auto Mark function.
- Page No: Specifies the maximum number of pages to display from a multi-page document before automatically marking the document ‘Good’ and advancing to the next document. This feature is helpful if there are a number of lengthy documents where the review of a sample of pages is sufficient to make a QC designation.
Options#
The Options button allows the user to specify keyboard short cuts for the ‘Good’ and ‘Bad’ designations.

Help#

- About: Displays version information.
- Support: Launches internet browser to the Viewpoint support website. Contact Viewpoint Support for credentials to log into the support website.
Troubleshooting Images#
While it is possible to perform QC on all image renderings, typically QC efforts are targeted to those file types that are most likely to generate problematic renderings or to those documents that generate automatic warning messages during the Viewpoint conversion process.
Troubleshooting Workflow#
Identify Potential Issues#
- In the Documents panel, use the column filters to identify documents containing values in the Warning Flags or Warning Messages field. Warning Messages are more likely to identify problematic conversions than the Warning Flags.
- Use the Extension menu filter option or the Extension column filter in the Documents panel to isolate potentially problematic file types:
- Excel spreadsheets
- PowerPoint presentations
- Other uncommon or non-standard file types
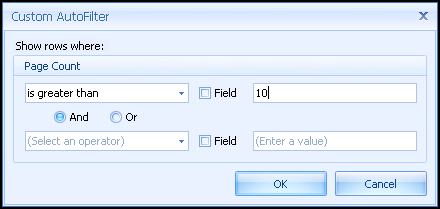
- Use the Page Count column filter in the Documents panel to identify documents containing an unexpected number of images. The Custom Autofilter option can be used to identify documents over a specified image number threshold.
Re-Tiffing Problematic Renderings#
- Select the document(s) to Re-TIFF.
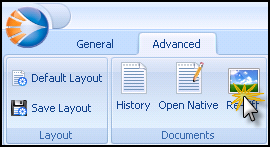
- Select the Advanced tab and click the Re-TIFF menu option.
- Select the TIFFing Method.
Note: Multiple documents may only be Re-TIFFed using the ‘Auto TIFF’ and ‘QVP TIFFing’ methods
- Review the Re-TIFFed document(s) using the image viewer panel.
- If Re-TIFFing does not correct the issue, attempt another Re-TIFF using a different TIFFing method.
Post New Images to the Review database (if Applicable)#
If the current Project has a Review database, an Update Post will have to be performed in the Processing module in order to update the images and page counts in the Review module.
- Open the Processing module and select the desired Project.
- Click on Media or View to filter to the document set containing those that were Re-TIFFed.
- Click on the Process tab.
- Double-click on the cell value corresponding to the ‘Create TIFF’ column and ‘Done’ row to open a list of the documents that have been TIFFed in the selected View or Media.
- Right-click in the document list and click Check All.
- In the right-click menu, click Maintenance Scripts and then Update TIFF Page Count
- In the right-click menu, click Update Post.
- Confirm Post Settings and click Next.
- Click Post.
Note: It is good practice to run the Update TIFF Page Count maintenance script even if there is not a Review database associated with the Processing database. Steps 2-5 describe one method of isolating documents that have potentially been Re-TIFFed. Other, more targeted methods can be used if the exact documents that have been Re-TIFFed are known, such as searching by DocID.
Tips and Best Practices#
- Use Marks
- The Marks feature can be used in order to quickly designate documents for later troubleshooting. Documents marked ‘Bad’ can then be addressed in bulk after a quick QC review has been completed.
- Use Automarks
- Viewpoint accurately renders the vast majority of common file types. The Auto Mark feature can be used to minimize keystrokes and mouse clicks by automating document and image navigation, and the marking of correctly rendered documents.
- Use Keyboard Shortcuts
- Use the Options menu item in the Advanced tab to configure keyboard shortcuts to the ‘Good’ and ‘Bad’ marks to improve image review speed.
- Use the Auto TIFF Re-TIFFing Method to Fix Documents in Bulk
- Often, many documents that render incorrectly contain the same issue. Time can be saved by isolating and addressing similar issues in bulk using the Auto TIFF rendering method.
Reference#
Auto TIFF Project Settings#
MS Excel | ||
|---|---|---|
Setting | Description | Default Setting |
Adjust Formatting | This setting must be set to true for any of the Excel settings to be used. If set to false, the document will print as is. | True |
Auto Fit | All cells will be ‘Auto Fit’ to match the size of all contained text. | True |
Automatically Hide Empty Columns/Rows | Hides entire columns containing no text content. | True |
Automatically Unhide Hidden Columns/Rows | Un-hides all sheets, columns, and rows hidden within the document. | True |
Change Margins | Changes the margins of a document to the options selected in the Bottom Margin, Left Margin, Right Margin, and Top Margin settings. | False |
Bottom Margin | Forces the bottom margin to this size (in inches). Change Margins option must also be set to true. | 0.5 |
Custom Macro File | Insert a full UNC path to any user created macro files to be used during Excel tiffing. | Leave Blank |
Left Margin | Forces the left margin to this size (in inches). Change Margins option must also be set to true. | 0.5 |
Maximum Number of Pages (0 – Tiff All Pages) | A value of greater than 0 indicates the maximum number of tiff pages to be created. After this number is reached, an additional placeholder tiff with the text ‘Following pages truncated by user’ will be appended. | 0 |
Page Orientation | Users can choose to print pages in landscape, portrait, as is, or to be automatically optimally formatted. | Landscape |
Print AutoFields | The keyword function allows users to use phrases such as Date or File Name and when the document is opened, the current date/filename will appear. If this setting is changed to ‘True’, instead of printing the date the document was opened the tiff will show the keyword names such as <date> or <filename>. | False |
Print Column Headers | Prints the column header on each page of the document. | True |
Print Comments | Shows and prints comments found on the Excel document. | True |
Print Grid Lines | Prints an outline around every cell on each page of the document. | True |
Print Order | Users can choose to print either horizontally or vertically first. | Horizontal First |
Remove Empty Pages | Empty pages within an Excel will not be printed. | False |
Remove Images | Embedded images will be removed from the document. | False |
Reset Colors | Background colors in cells will be reset to white. Useful for black and white tiffs that have dark colored backgrounds. | False |
Right Margin | Forces the right margin to this size (in inches). Change Margins option must also be set to true. | 0.5 |
Set Print Area To Last Cell | The document will not be printed beyond the last cell with content regardless of print area. | True |
Top Margin | Forces the top margin to this size (in inches). Change Margins option must also be set to true. | 0.5 |
Zoom Percentage | Sets the zoom of the document. | 80 |
MS PowerPoint | ||
Setting | Description | Recommended Setting |
Change Margins | Changes the margins of a document to the options selected in the Bottom Margin, Left Margin, Right Margin, and Top Margin settings. | False |
Bottom Margin | Forces the bottom margin to this size (in inches). Change Margins option must also be set to true. | 0.5 |
Left Margin | Forces the left margin to this size (in inches). Change Margins option must also be set to true. | 0.5 |
Output Type | Users can choose to print in either the Notes Page or Slides format. Notes Page must be selected for comments to be printed. | Notes Page |
Page Orientation | Users can choose to print pages in landscape, portrait, as is, or to be automatically optimally formatted. | As Is |
Print Comments | Slide comments will be printed on the notes page (if selected). | True |
Print Date AutoFields | The AutoField function allows users to use phrases such as Date or FileName and when the document is opened, the current date/filename will appear. If this setting is changed to ‘True’, instead of printing the date the document was opened the tiff will show the keyword names such as <date> or <filename>. | False |
Print Order | Users can choose to print either horizontally or vertically first. | Horizontal First |
Right Margin | Forces the right margin to this size (in inches). Change Margins option must also be set to true. | 0.5 |
Slide Orientation | Users can choose to print slides in landscape, portrait, as is, or to be automatically optimally formatted. | Landscape |
Top Margin | Forces the top margin to this size (in inches). Change Margins option must also be set to true. | 0.5 |
MS Visio | ||
Setting | Description | Recommended Setting |
Change Margins | Changes the margins of a document to the options selected in the Bottom Margin, Left Margin, Right Margin, and Top Margin settings. | False |
Bottom Margin | Forces the bottom margin to this size (in inches). Change Margins option must also be set to true. | 0.5 |
Left Margin | Forces the left margin to this size (in inches). Change Margins option must also be set to true. | 0.5 |
Page Orientation | Users can choose to print pages in landscape, portrait, as is, or to be automatically optimally formatted. | As Is |
Print Background | Users can choose to print the background layer of the Visio. | False |
Print Comments | Print user comments. | True |
Right Margin | Forces the right margin to this size (in inches). Change Margins option must also be set to true. | 0.5 |
Top Margin | Forces the top margin to this size (in inches). Change Margins option must also be set to true. | 0.5 |
MS Word | ||
Setting | Description | Recommended Setting |
AutoFit Tables to Content | Force tables to fit to page. | True |
Change Margins | Changes the margins of a document to the options selected in the Bottom Margin, Left Margin, Right Margin, and Top Margin settings. | False |
Bottom Margin | Forces the bottom margin to this size (in inches). Change Margins option must also be set to true. | 0.5 |
Clear Paragraph Formatting | Clears any paragraph formatting when tiffing. | False |
Left Margin | Forces the left margin to this size (in inches). Change Margins option must also be set to true. | 0.5 |
Page Orientation | Users can choose to print pages in landscape, portrait, as is, or to be automatically optimally formatted. | As Is |
Print AutoFields | The AutoField function allows users to use phrases such as Date or File Name. A setting of ‘Unlinked Values’ will print the values as the document was originally saved. A setting of ‘Linked Values’ will print the settings as they would appear the date of tiffing. If this setting is changed to ‘Macro Names’, instead of printing the date the document was opened the tiff will show the keyword names such as <date> or <filename>. | Unlinked Values |
Print Comments | Prints document comments. | True |
Print Hidden Text | Prints any hidden text. | True |
Ret-Tiff Emails with Side Margins Warning | When tiffing HTML representations of emails where there are left/right side margin warnings, Viewpoint will automatically rescale the image to attempt to fit content clipped by the side margins. | False |
Right Margin | Forces the right margin to this size (in inches). Change Margins option must also be set to true. | 0.5 |
Set Page Size To Letter | Forces the size of the document to letter prior to printing. | False |
Top Margin | Forces the top margin to this size (in inches). Change Margins option must also be set to true. | 0.5 |
Track Changes | Prints any track changes | On |